- Managing Change Control
Managing Change Control Records
Task Driven Workflow
The whole change control process is task driven, following a workflow which is clearly displayed at the top of every change control record.

Once created, a change control record can go through four stages:
The process can be interrupted if the triage is rejected. Also, the change control project can be cancelled at any time. The last two steps are optional so a change control record can be marked as complete when the implementation phase has been done.
The name boxes in the Change Control Workflow Status are colour coded:
- Dark Blue = task due (any of the people marked with this colour have a task to complete)
- Grey = task completed by someone else (originally assigned the task but somebody else completed it)
- Green = task completed by this person (a ’thumbs-up’ icon shows next to the name)

- Red = rejected or cancelled (if cancelled, the word, “Cancelled” is added above the box)(a ’thumbs-down’ icon shows next to the name)

Triage rejected:

Triage
When a Change Control request is submitted, a task is immediately created for the members of the triage team. Other users can be nominated to be notified when a new form is submitted to their OU; the triage team will be automatically notified through the task they are assigned.
To set up a triage team for any given OU, please refer to the section, Change Management Settings of the article, Change Control Settings & Permissions.
New change control records are clearly identified in the Change Control Requests tab. Users with the permission, “Change Control: Manage Changes” can also triage a new record without needing to be members of the triage team; they just don’t get assigned a task. Anyone with permission to triage a change control request will see the Triage button. It can be found to the left of the workflow diagram in the General tab of the new record. The option to triage can also be found in the Actions dropdown menu. Users who have a triage task will find the familiar blue reminder box under the workflow diagram.
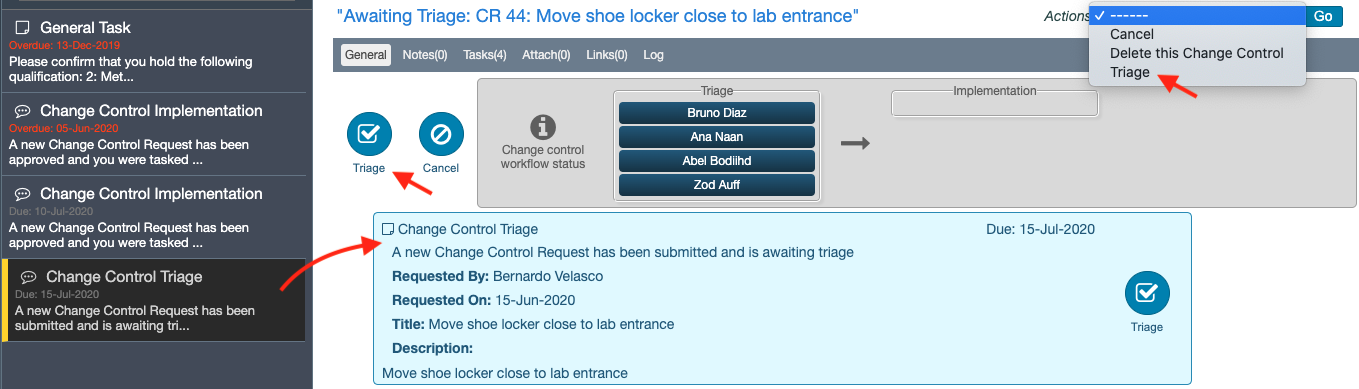
Before clicking a Triage button, the person performing the triage should complete information in the general top area of the form and set a risk level if appropriate. It is likely to be missing information when first opened, especially if the Change Control request was generated internally.
The parameters not included in the internal New Change Control form appear at the bottom of this list:
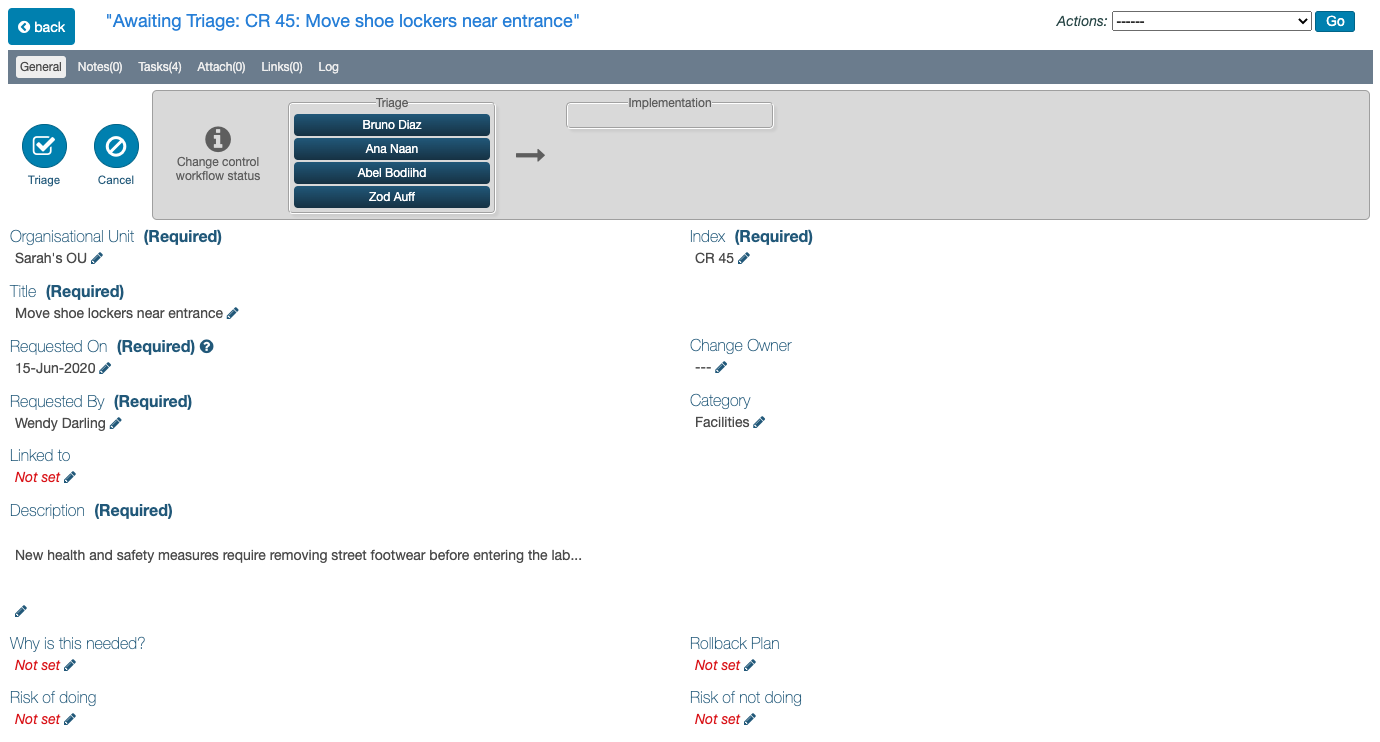
- Organisational Unit - this is required and if not set at creation, the account’s default OU will be used; it can be changed until the record is triaged
- Index - once created, it can no longer be auto-generated but it can be changed until the record is triaged
The rest of the parameters can be edited after triage:
- Title (Required) - a name for the change control project being proposed
- Requested On (Required) - the current date is loaded by default but it can be changed in the pop-up calendar which appears by clicking in the field
- Requested By (Required) - a new or different name can be selected by clicking in the field
If changing the Requested By name:
- As the name is entered in the field, the system tries to match it with that of an existing user.
- If the correct match appears, it must be clicked for it to be selected.
- If no selection is made, the field will later appear populated with the name of the user who created the Change Control record.
- Change Owner - the person responsible for managing the change record within iPassport; this individual will receive updates whenever events are completed on this change
The system uses the same name selection filter as in the field, ‘Requested By’. - Category - a dropdown menu offers the list of change control categories that have been created for that account; categories can be managed by clicking the spanner/wrench icon next to the field (please see below)
- Linked to - the change control record can be linked to any other record here
- Description (Required) - a description of the change control project
These additional parameters help justify the change and define the risks associated (they’re not included in the internal New Change Control creation page):
- Why is this needed - supporting information
- Rollback Plan - supporting information
- Risk of Doing - supporting information
- Risk of Not Doing - supporting information
Risk Section:
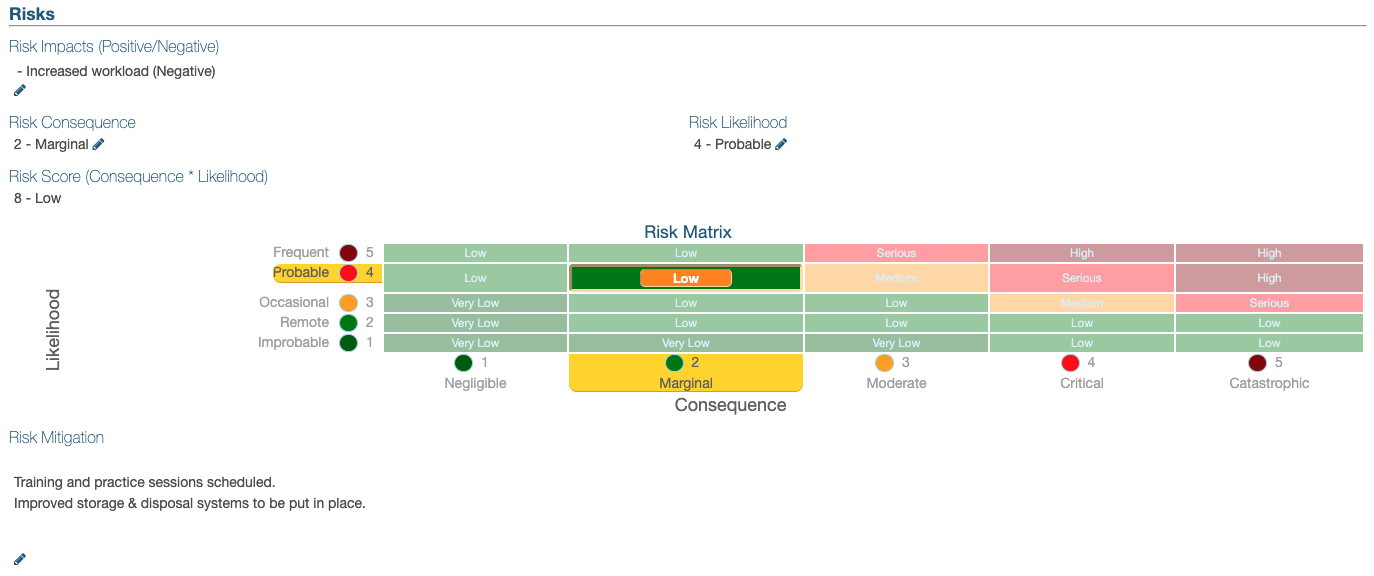
- Risk Impacts - a multiple selection filter opens when clicking the edit (pencil) icon under this field; risk impacts are user created (please see below) and they can be positive or negative
- Risk Consequence - the items in this dropdown menu move the risk along the horizontal axis (x-axis) of the risk matrix below it
- Risk Likelihood - the items in this dropdown menu move the risk along the vertical axis (y-axis); the product of (adding or multiplying) this value with the Risk Consequence value yields the Risk Score
- Risk Mitigation - supporting information
Managing Categories
To Manage Categories:
Click the spanner/wrench icon under Category to open the lightbox
-
To add a category,
- Click [+]Add Change Request Categories
- Enter a Name in the field provided
- Click, Create Change Request Categories
- Click [+]Add Change Request Categories
-
To edit a category,
- Click the pencil icon in the Actions column
- Adjust the name
- Click, Save Change Request Categories
- Click the pencil icon in the Actions column
-
To delete a category,
- If a trash/bin icon is available in the Actions column, clicking it will delete the category; if a category is in use, it can’t be deleted
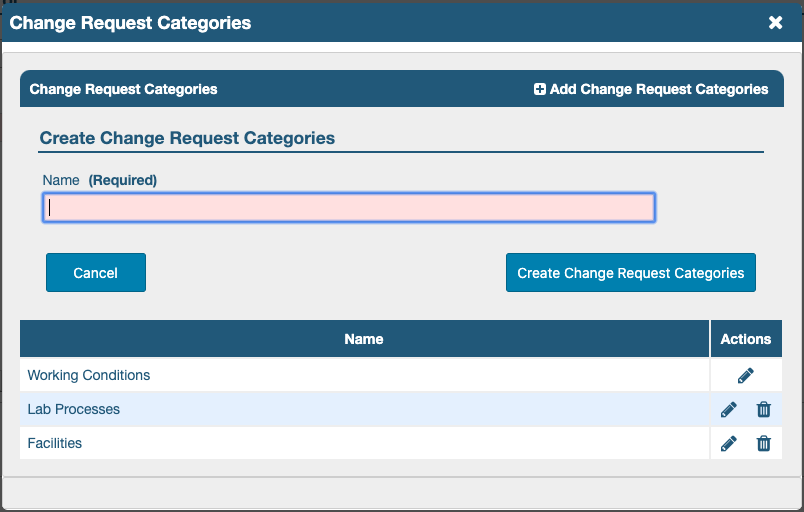
- If a trash/bin icon is available in the Actions column, clicking it will delete the category; if a category is in use, it can’t be deleted
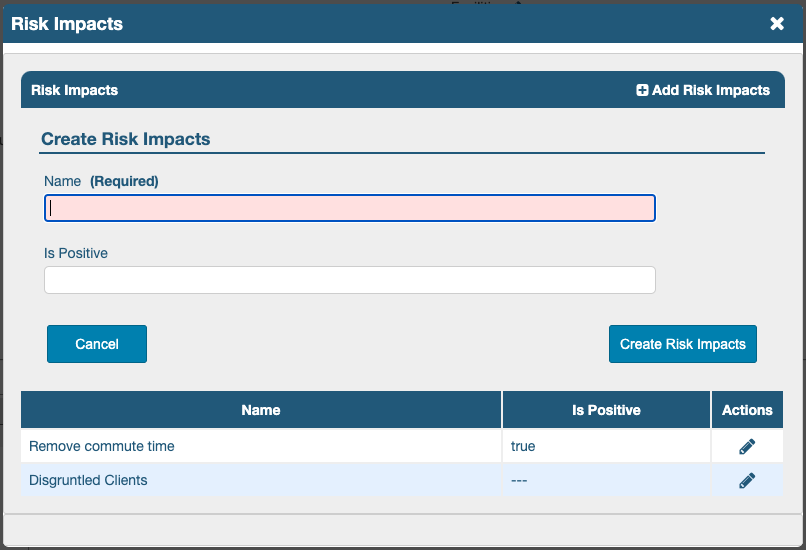
Managing Risk Impacts
To Manage Risk Impacts:
Click the spanner/wrench icon under Risk Impacts to open the lightbox
-
To add a risk impact,
- Click [+]Add Risk Impacts
- Enter a Name in the field provided; this is required
- If the impact Is Positive enter any text; if it’s negative, leave this field blank
- Click, Create Risk Impacts
- Click [+]Add Risk Impacts
-
To edit a Risk Impact,
- Click the pencil icon in the Actions column
- Adjust the name and/or whether it “Is Positive"
- Click, Save Risk Impacts
- Click the pencil icon in the Actions column
-
To delete a Risk Impact,
- If a trash/bin icon is available in the Actions column, clicking it will delete the Risk Impact; if a Risk Impact is in use, it can’t be deleted
- If a trash/bin icon is available in the Actions column, clicking it will delete the Risk Impact; if a Risk Impact is in use, it can’t be deleted
Completing the Triage
Triggering a triage from a button or the Actions menu, opens a lightbox where the change control request can be approved or rejected.
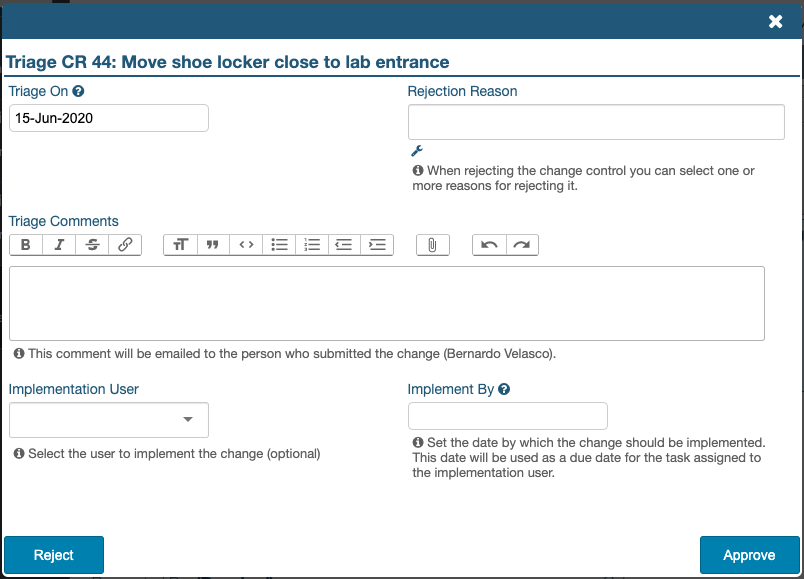
The fields in this lightbox include:
- Triage On - the current date displays by default but it can be changed if required
- Rejection Reason - a reason can be selected from a dropdown menu of user created options (please see below)
- Triage Comments - a free text box to enter details about the decision made
- Implementation User - it is possible to nominate the person in charge of the implementation of the change at this point (this can be skipped and done later)
- Implement By - a target day to complete the implementation can be selected from a pop-up calendar (this can be skipped and done later)
- Reject button - closes the request leaving no parameters editable; rejection reason and rejection comments should be entered first, if required
- Approve button - clicking this button, transitions the change control record to ‘awaiting implementation’ status
Triage Rejection Reasons
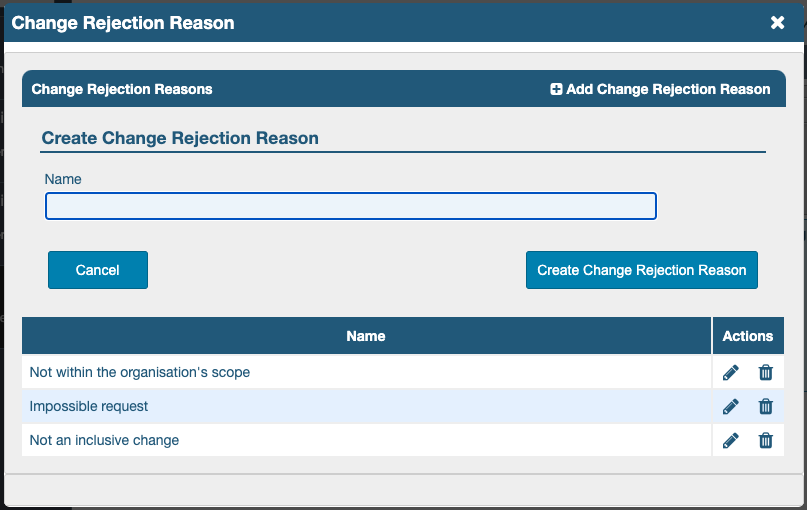
Managing Rejection Reasons:
Click the spanner/wrench icon under Rejection Reason to open the lightbox
-
To add a Rejection Reason,
- Click [+]Add Change Rejection Reason
- Enter a Name in the field provided
- Click, Create Change Rejection Reason
- Click [+]Add Change Rejection Reason
-
To edit a reason,
- Click the pencil icon in the Actions column
- Adjust the name
- Click, Save Change Rejection Reason
- Click the pencil icon in the Actions column
-
To delete a reason,
- If a trash/bin icon is available in the Actions column, clicking it will delete the rejection reason; if a reason is in use, it can’t be deleted and the trash/bin icon should not be visible
- If a trash/bin icon is available in the Actions column, clicking it will delete the rejection reason; if a reason is in use, it can’t be deleted and the trash/bin icon should not be visible
The fields in the Triage and Implementation sections of a change control form can be edited after it has been approved (in a triage). Users with the permission, “Change Control: Manage Changes” can click the edit (pencil) icons to update any of the fields.

Implementation
Any user in the facility can be put in charge of implementing a change control project. When one is selected, a task is generated for that person. The “Target Implementation Date” field is a target date, while the “Implemented Date” is the date when the task is actually completed. If the ‘Target Implementation Date’ has fallen into the past when the triage is completed, a task can’t be created by the system for the person assigned to implement the change.
Implementation can be performed by any user with the permission, “Change Control: Manage Changes”. It is therefore possible to change the details of the Implementation section until it has been completed. As with the Triage step, the “Implement” button is available to anyone with appropriate permissions and to the person assigned to perform it.
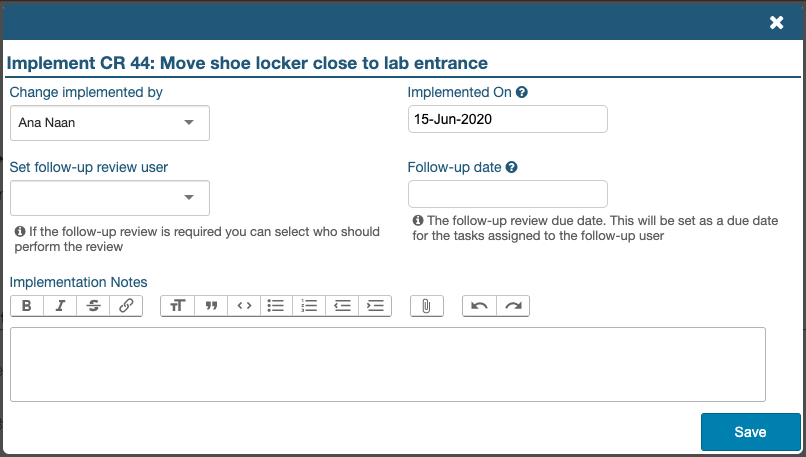
When the “Implement” button is clicked (or the action is triggered from the Actions menu), a lightbox opens with the following details:
- Change Implemented by - the user completing the implementation can be selected; the current user’s name appears by default in this field
- Implemented on - the current date shows by default but it can be changed by clicking it and selecting another date from the calendar that pops up
- Set follow-up reviewer user - if a follow-up is required, a user can be selected here
- Follow-up date - a target date to perform a review of the effectiveness of the change can be set in the future
- Implementation Notes - details of the implementation can be added here
- Save - completes the implementation process
If no user is set up for the following sections (Follow-up Review and Verification), the change control record will be marked as ‘Complete’ when the implementation is saved. At this point all fields in the form, down to the Implementation section, cease to be editable.
However, the fields, “Is Follow-up Review Required?” and “Is Verification Required?” will remain editable in case these steps want to be added later. If either of these fields is toggled from “No” to “Yes”, all the fields above it will become editable again (to those with permission to manage that change).
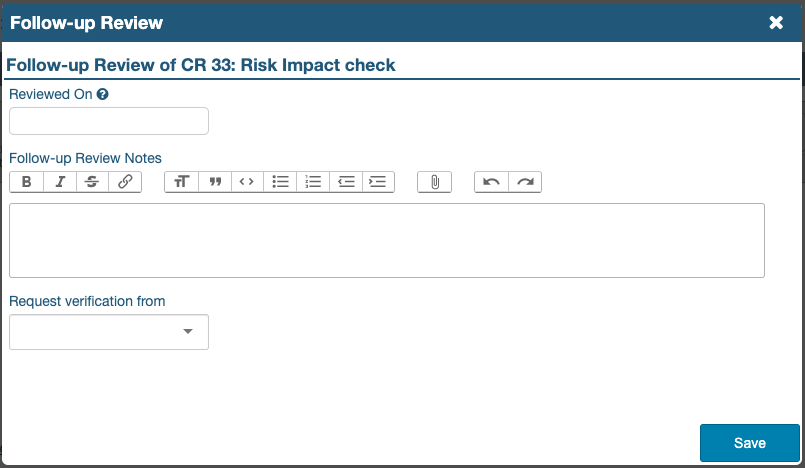
Follow-up Review
The follow-up review step allows measuring the effectiveness of the change implemented after a given amount of time has passed.
When the the field, “Is Follow-up Review Required?” is set to “Yes”, the area expands to reveal four more fields:
- Review by - Only one person can be appointed to perform a follow-up review of a change control project but users who can manage the record can also complete the review
Until a user is assigned this task, the workflow diagram will not show a ‘Review’ section. Once a person is appointed, the workflow diagram will have a ‘Review’ section with the reviewer’s name in a blue box. If this person is changed, a task is created for the new user and any task created for a previous reviewer will be invalidated. - Review Due Date - allows setting a target date
- Review Completion Date - date the follow-up review is actually done
- Review Notes - Information can be added here before and during the review, including notes entered in the Review lightbox
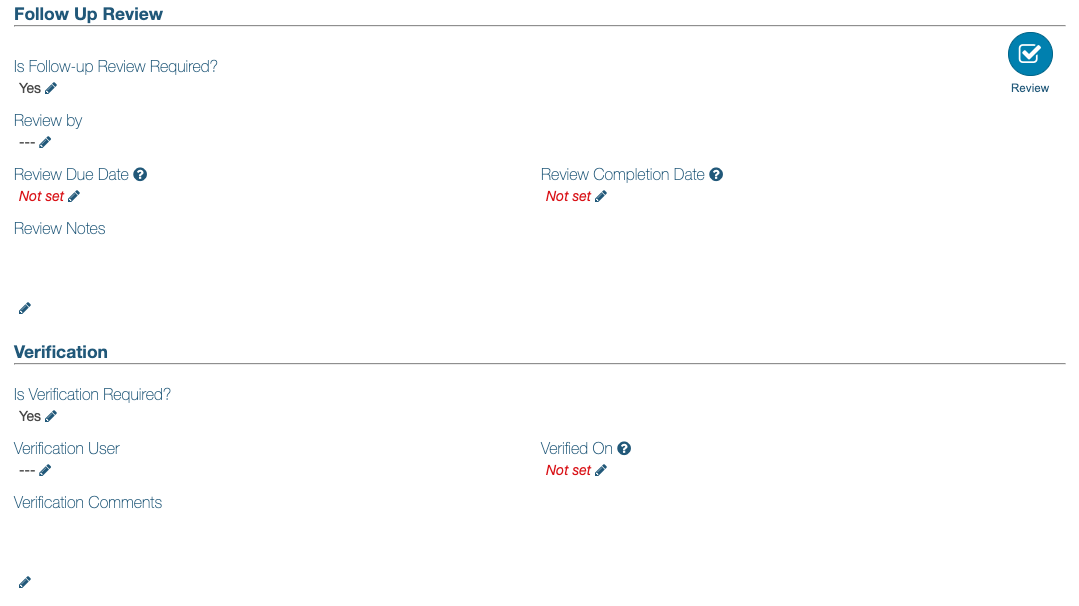
Verification
Like follow-up reviews, when the field, “Is Verification Required?” is set to “Yes”, the area expands to reveal more fields:
- Verification User - Only the person appointed can perform the verification of a change control project
Until a user is assigned this task, the workflow diagram will not show a ‘Verification’ step. Once a person is appointed, the workflow diagram will have a ‘Verification’ section with the reviewer’s name in a blue box. If this person is changed, a task is created for the new user and any task created for a previous verifier will be invalidated. - The Verified On (date) and Verification Comments can only be added by the verifier in the lightbox that opens when clicking the Verify button
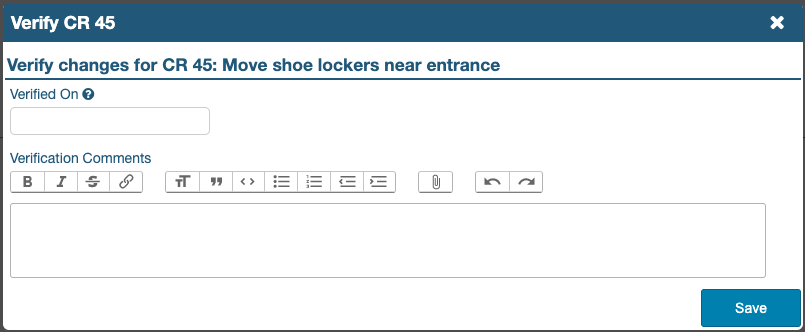
Once the Save button is clicked, the lightbox closes and the change control record transitions to the status, ‘Complete’.
At this point, the two fields, “Is Follow-up Review Required?” and “Is Verification Required?” stop being editable and the record can no longer be updated.
NEXT STEP:
The last article of this guide covers Searching and Editing Change Control Records.
PREVIOUS STEP:
Click this link for information on Submitting A New Change Control Request.