- Create Draft Documents
Creating Draft Documents
New Controlled Document
Few steps are required to complete the creation of a new controlled document. The streamlined process allows creating the record quickly with minimal information and other data can be added at the user’s convenience later.
This article describes the creation of new documents in iPassport. To create a new version of an existing document, please refer to the user guide, Create, Edit & Publish New Versions of Documents.
To create a new controlled document:
-
Navigate to Laboratory Records > Controlled Documents > New Document; the plus sign [+] next to the Controlled Documents sub-menu item is a shortcut to the New Document tab
-
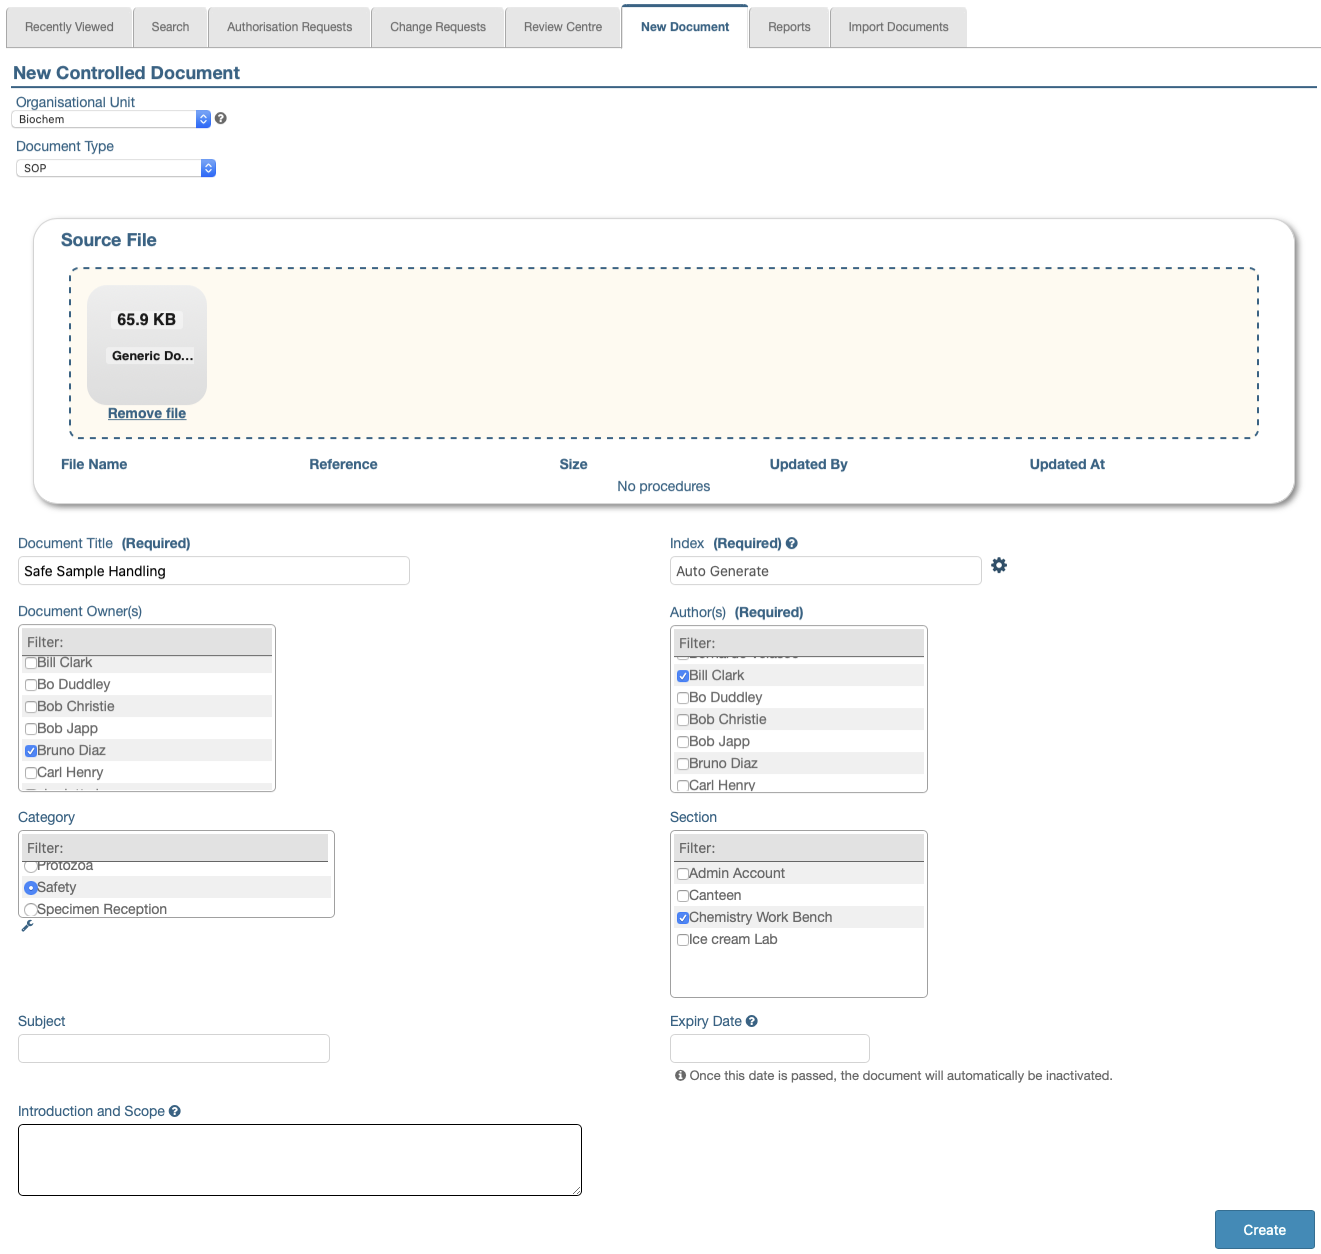
(Required) Select the Organisational Unit in which the document will be kept from the dropdown menu
- Users will only see OUs in which they have permission to create controlled documents. If they only have the permission in one OU, they won’t see this field and the document will automatically be assigned that OU.
- By assigning an OU to a document, it will have a defined place so that permissions can be set up to determine who can access it.
-
(Required) Select the Document Type from the dropdown menu
- Users will only see document types which they have permission to create.
- Permissions can also be adjusted to limit which types of documents can be seen by different staff.
- Information about document types can be found in the next article, Document Types.
It is necessary to complete the first two fields above (Organisational Unit and Document Type) before the rest of the record information can be entered.
Depending on the Document Type selected, different fields might appear as detailed in the next article. The fields below are those for documents of the type, Document.
If the Document Type is changed before completing the new document creation, any information entered for the fields below will be lost.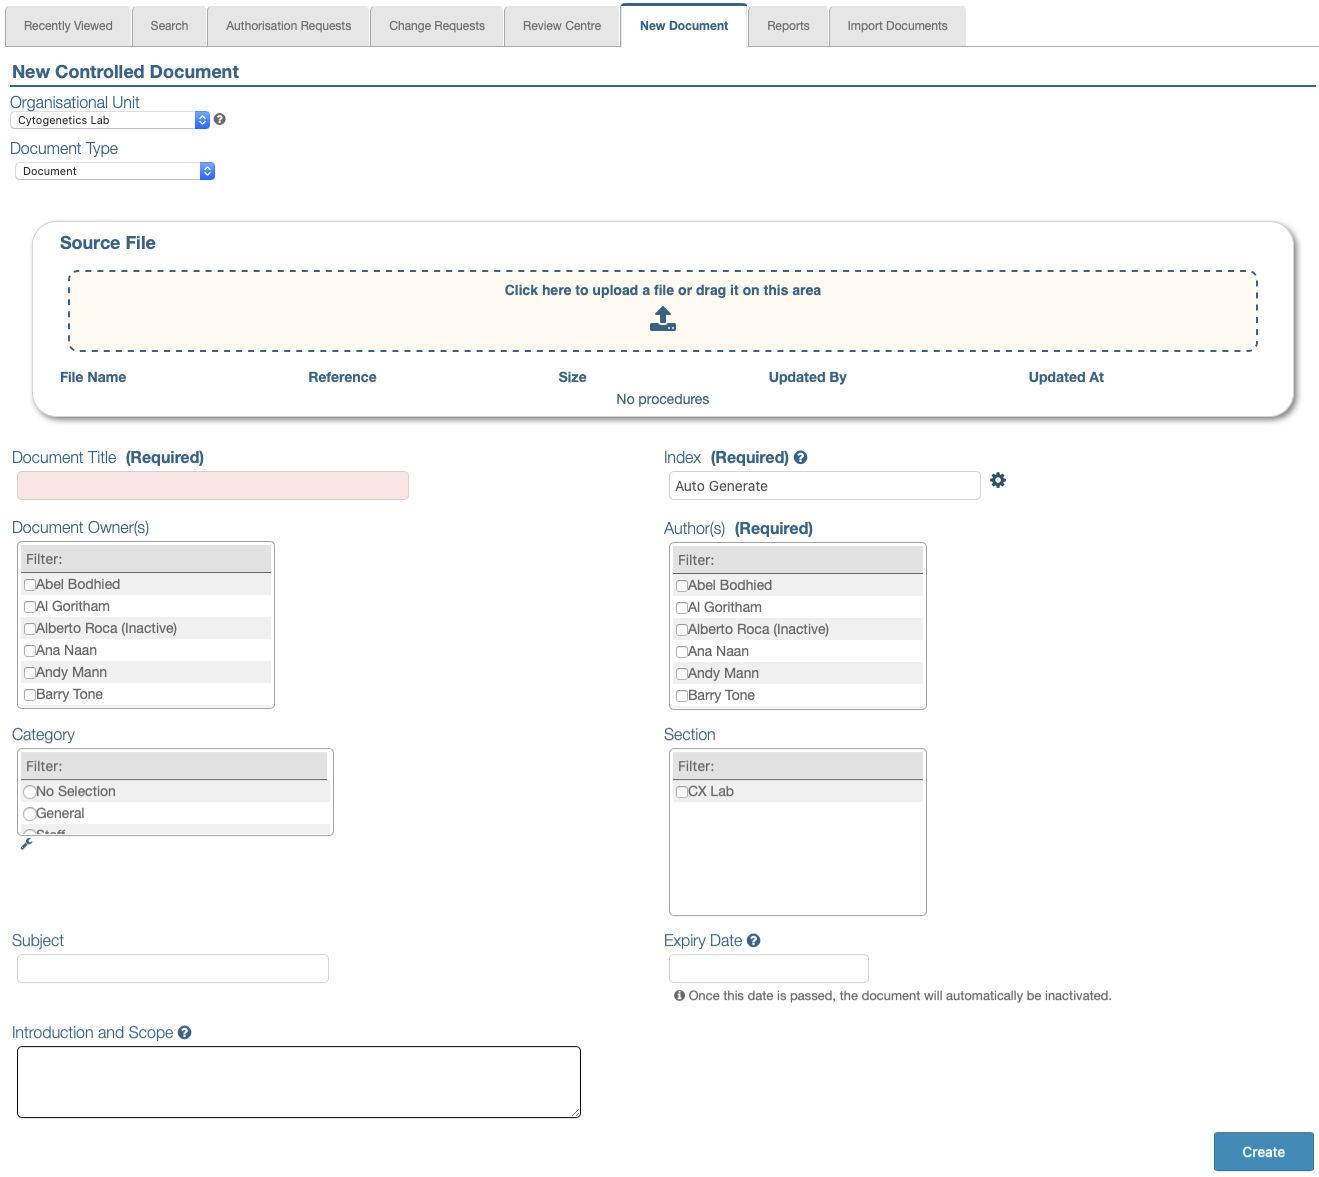
-
(Required) A Document Title must be entered
- This is a free text field, limited to 255 characters (including spaces and punctuation).
- The system will verify that the title is not repeated within the same OU and for the same type of document.
- The ‘Document Title’ doesn’t have to be the same as the name of the source file.
-
(Required) The Index can be generated automatically by the system if the legend, “Auto Generate” is left in the field; clicking the cog/gear icon next to the field, clears it so a tailored index can be entered.
The index may also be known as a ‘code’ and it’s used along with the ‘Document Title’ to make the document’s identification unique. When the field displays the ‘Auto Generate’ text, the system will add the index automatically, prepared from a ‘recipe’ defined in the Organisational Unit Preferences section of the Settings area. When toggled, the field will appear blank and an index can be manually entered.An auto-generated index ‘recipe’ can be set for each type of document in each OU by navigating to Administration > Settings > Organisational Unit Preferences (select the OU first) > Index Generation. For details about this, please refer to the user guide, Organisational Unit Preferences.
When the index has been added and the user tries and progress to the next step, iPassport undertakes a validation check to ensure that the index is not already in use. This check is conducted across all of iPassport (all OUs within the account) to ensure two documents don’t share the same code. Indices can include a sequential number, as in VIRO-56, VIRO-57, etc. This number can be repeated across OUs as long as the index as a whole is unique (e.g., VIRO-56 and BIOCHEM-56). -
(Required) The Source File can be uploaded by dragging it into the designated dotted area or by clicking in the dotted rectangle and selecting the file using the browser’s search tool. Only one file can be uploaded and though most types are admitted, only plain Word (’.doc’ or ’.docx’), RTF or PDF format files can be processed for online previewing and for printing with cover pages and watermarks.
-
(Optionally Required, according to OU preferences) The Document Owner(s) are responsible for managing their documents within iPassport.
Document owners will receive notifications and tasks about all events relating to the document (e.g. change requests submitted, document review due, etc.). By default, they are able to perform any functions on the document (edit draft version, request feedback reviews, mark the document’s compulsory review as complete, authorise) even if they only have permission to view documents in that particular OU.
The setting, “Allow Document Owners to perform any action on their documents, regardless of permissions” under, Administration > Settings > Organisational Unit Preferences (select the OU first) > Document Control can be disabled to prevent document owners from, for example, authorising their own documents. -
(Required) The Author(s) don’t play an active role in the lifecycle of the document and don’t receive notifications regarding updates to their documents. However, they are required for regulatory purposes and traceability.
Authors need to be users in the system to be eligible for selection; they can be inactive.Names can be searched by clicking in the ‘Filter:’ area and entering text to narrow the search. Ticking the checkbox next to a name selects that user.
-
Documents can be further classified by assigning a Category to them; please refer to the section below on Managing Controlled Document Categories for further detail.
-
The Section is another device to further classify documents. ‘Sections’ need to be created separately before they can be used in documents; they are a special application of ‘Locations’.
For quick reference, this is how to create a new ‘Section’ from a ‘Location’:
- Navigate to Administration > Locations > New Location or to Administration and click the plus (+) sign next to Locations
- Add a Short Name (Required) and a Long Name (Required) for the new location; the rest of the information is optional
- Click Create Location
- In the new record’s General tab, scroll down to the OUs & Tags section
- Select the appropriate OU(s) by clicking the pencil icon under Organisational Units
- Select the Tag, General, to make the location available as a ‘Section’ For more information on creating ‘Sections’ from ‘Locations’, please refer to the guide, Locations - Sections.
-
An Expiry date can be selected from the available pop-up calendar if the document needs to be retired at some point.
A controlled document can be set to expire on a certain date in the future. Once the set date lapses, the system will automatically inactivate the document. The expired document will still be searchable in the Laboratory Records > Controlled Documents > Search tab with the State filter set to Inactive. The expiry date can also be used to perform (and export) searches of documents expired or due to expire within user selected date ranges.
When an expiry date is set, the document owner will receive a notification (with an option to edit or remove the expiry date) one month in advance. Another notification is also sent on the day the document expires. -
A Subject can be added in the free-text field provided; information entered in this field can be used to search for the document.
-
If appropriate, the ‘Introduction and Scope’ of the document can be entered in the field provided; it is also possible to add this information to the body of the document and leave this field blank. However, when the information is added to this field, it can be optionally printed in a separate page.
-
Once all the required fields are filled, click the ‘Create’ button to complete the process.
Managing Controlled Document Categories
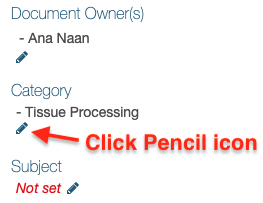
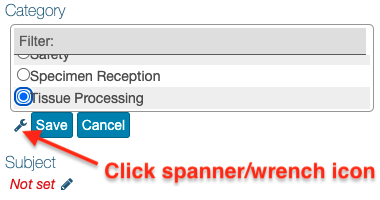
Controlled document Categories are one of iPassport’s user configurable lists of options which can be edited when the spanner/wrench icon is visible next to the field. Document categories can only be edited (and the spanner is only visible) when a document is being created or when it is in draft state and the pencil icon is visible under the field, Category. In this case, the pencil icon must be clicked first to reveal the spanner icon.
| Step 1 - in Draft Document ‘General’ tab | Step 2 |
|---|---|
 |
 |
The permission, “Controlled Documents:Edit Categories” is required to create and edit categories; “Controlled Documents:Delete Categories” is required to delete unused categories.
The scope of categories can be limited to selected OUs by adjusting their visibility.
To Manage ‘Controlled Document Categories’:
Click the spanner/wrench icon under the field to open the lightbox
- To add a category,
- Click [+]Add Document Category to expand the area
- Enter a name for the item in the field provided
- Click, Create Document Category
- Click the arrow to the left of 'Account' to expand the tree structure of OUs in the account
- Un-select 'Account' and select specific OUs or leave 'Account' selected to make the category visible in all OUs
- To edit an item,
- Click the pencil icon in the Actions column
- Adjust the name and/or visibility
- Click, Save Document Category
- If a trash/bin icon is available in the Actions column, clicking it will delete the item; if an item is in use, it can't be deleted
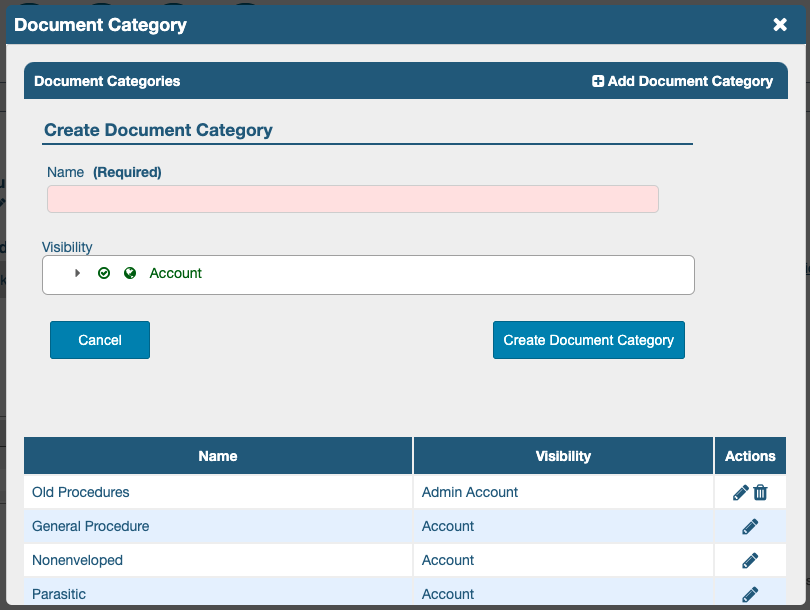
Click the “X” in the top right corner to close the lightbox.
NEXT STEP:
The next article covers Document Types
PREVIOUS STEP:
The previous article covers the Permissions and Settings for Document Creation