- Managing Stock
Managing Stock of Reagents & Materials
As mentioned previously, the batch and stock management feature is only available when it is enabled by the iPassport support team ([email protected]).
When enabled, the tabs, ‘Search Reagent Stock’ / ‘Search Material Stock’ and ‘Add Stock’ are added to the Reagents/Materials sections.
In addition, each record will have an extra tab for Inventory and the General tab will include the following fields (please refer to the article, Creating Reagents and Materials Records, for descriptions):
- Supplier
- Supplier Code
- Reagent Category/Material Category
- Expiration warning (days left) and Distribution list for warnings - explained below
- Re-order unit QTY
- Delivery time (days)
- (exclusive to Reagents) - QC Time (days)
- (exclusive to Reagents) - QC sample size
- Minimum stock level and Distribution list for stock warnings - explained below
- Stock Unit
- General Cost
- General Cost (Secondary currency)
Check in Stock
Reagent and material records need to be created before stock can be added to them. A ‘stock unit’ should be chosen as the basis for the calculations.
Stock units can be created as described in the record creation article section, Managing Storage Conditions, Types, Categories, Stock Units and Lot Statuses. A default list of stock units is supplied with the system; it includes the items, grams, kilograms, litres, microlitres and millilitres. These cannot be modified or deleted. Examples of custom stock units can be, “1 gallon bottle”, “Box of 500”, etc.
To check in stock:
-
Open the record of the reagent or material
-
Click the Actions and select the option, ‘Check In New Stock’ from the dropdown menu
-
Click Go to open the lightbox for the following steps
-
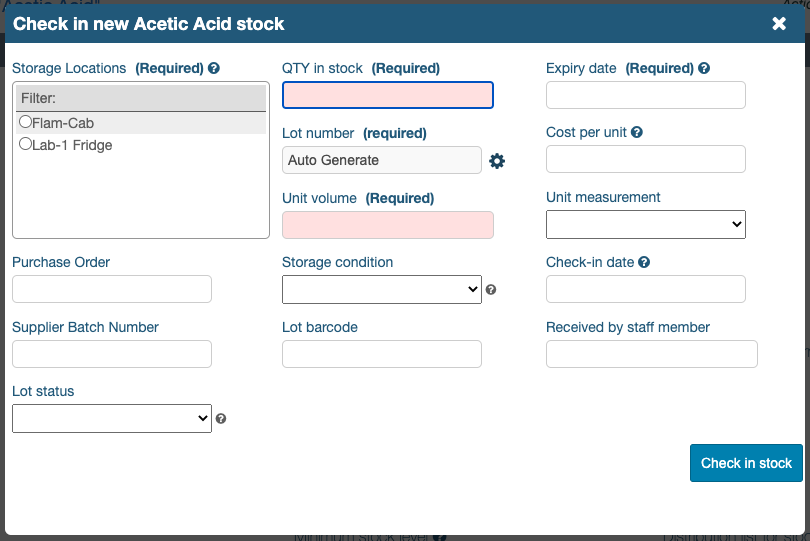
Select a Storage Location from the options available in the filter provided; if the desired location is not listed, it might require adjustment so it can be used for the reagent in question (please refer to the section below, Using ‘Locations’ for storage)
-
Enter the amount of new stock to add in the field, QTY in stock; the value must be in multiples of the ‘stock unit’ for the reagent or material being added
-
An Expiry date must be entered
-
A Lot number is also required but the system can create it; clicking the cog icon next to the field will toggle it between displaying “Auto Generate” and becoming blank so a user defined lot number can be entered
-
The field, Cost per unit refers to the selected ‘stock unit’ and allows entering a value which the system can use to calculate the cost of stock movements
-
A Unit Volume must be entered to declare how much each ‘stock unit’ contains (for example, if the ‘stock unit’ is ‘2.5 L bottle’, the ‘unit volume’ could be “2.5” litres or 2500 millilitres)
-
The Unit measurement relates to the ‘stock unit’ and the field lists all the ‘stock units’ created
A different Unit measurement can be entered here from the Stock Unit declared in the General tab. For example, a lab might purchase methanol in 2.5 litre bottles but consumes it internally in batches of 0.5 litres. The stock unit can be defined as “2.5 L bottle” in the General tab to facilitate purchasing by the bottle and setting minimum stock level warnings. The Unit measurement entered here can be, ‘millilitres’ so that the stock can be used up in batches of 500 ml.
-
A Purchase Order number can be entered for added traceability
-
The Storage Condition field offers a dropdown menu of the user created items for this field; ‘storage conditions’ can be created as described in the record creation article section, Managing Storage Conditions, Types, Categories, Stock Units and Lot Statuses
-
The Check-in date field admits dates in the past; a pop-up calendar allows selecting the appropriate date
-
A Supplier Batch Number number can be entered for added traceability
-
If a barcode reader is used to pick information from the product label, it can be pasted in the field, Lot barcode
-
The user who admitted the stock can be entered in the smart field, Received by staff member; this is a search-as-you-type field which will only allow entering staff who have an iPassport user account
-
The Lot status field lists user created items; if none have been created, they can only be added after stock has been checked in by expanding a lot in the Inventory tab, locating the field, clicking the pencil icon and following the instructions provided in the record creation article section, Managing Storage Conditions, Types, Categories, Stock Units and Lot Statuses
-
Once the required fields have been filled in, the Check in stock button can be clicked; the other fields can be adjusted after the new stock lot has been created
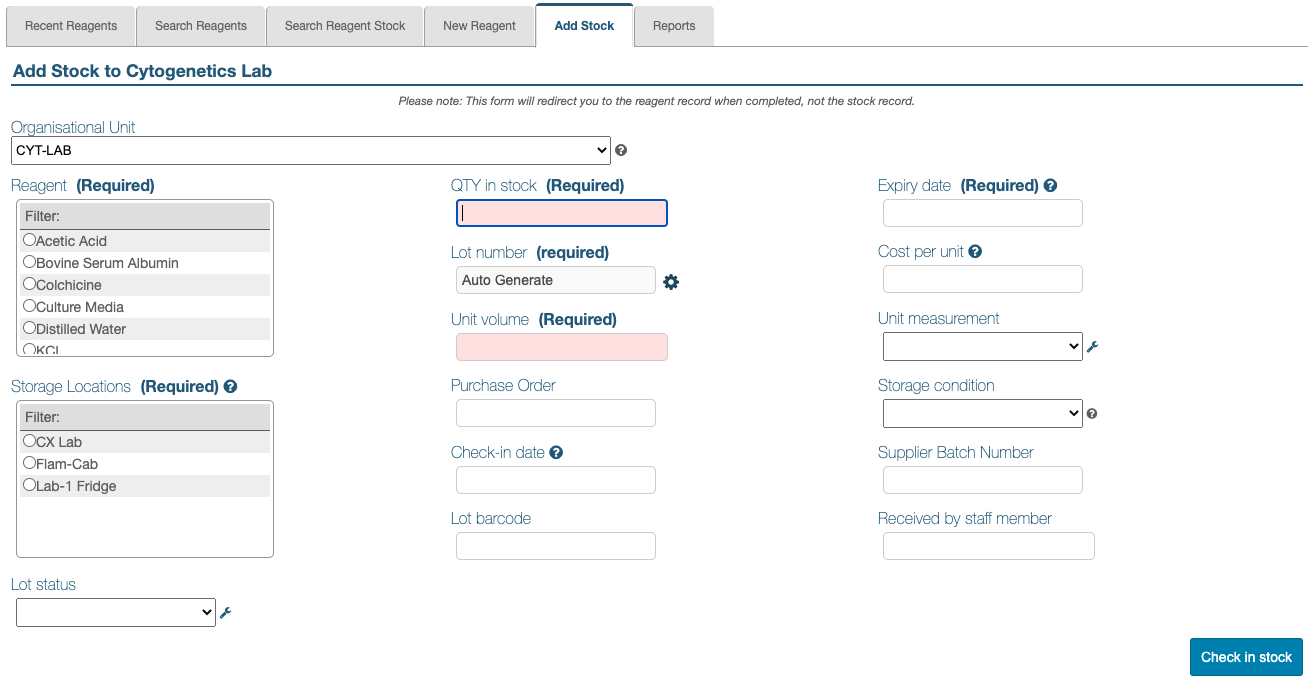
The Add Stock tab
The Add Stock tab allows checking in stock without having to open the reagent/material record first. Upon opening the tab, a very similar form to the one above will display. There are two additional fields, one to select the Organisational Unit of the reagent/material to add and one to find and select the reagent/material itself. Only reagents or materials which belong in the selected OU will be available for selection.
Using ‘Locations’ for storage
The user guide, Locations - Sections provides detailed information on creating and managing locations.
For reagents and materials, locations require the tag “Storage” both for checking stock in (storage location) and out (location of use).
If the location has been assigned an OU scope, the reagent/material must reside in one of the OUs associated with the location for the location to be available when checking stock in or out.
A location can be general like, Biochemistry Lab and doesn’t need to be a specific place like, Biochem Freezer 2.
Check out Stock
Stock can be checked out one batch at a time. Common practice is to update stock movements at the end of the day or at the end of the week to make the process more expedient. The system allows entering ‘check out’ dates in the past for this matter.
To check out stock:
-
Open the record of the reagent or material
-
Click the Actions and select the option, ‘Check Out Stock’ from the dropdown menu
-
Click Go to open the lightbox for the following steps
-
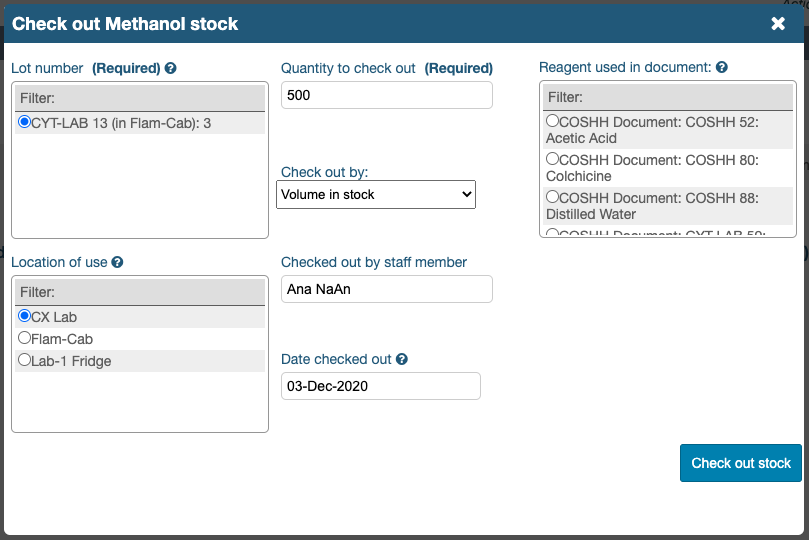
Select the Lot Number from which to remove stock; only one lot can be selected
-
Enter the Quantity to check out; this field is related to the field, Check out by (Quantity in stock or Volume in stock) so it can be a number of ‘stock units’ or a quantity based on the ‘unit measurement’ declared when the stock was checked in
Following the same example where a lab purchases methanol in 2.5 litre bottles, stock can be checked out by the bottle by selecting ‘Quantity in stock’ in the ‘Check out by’ field, or it it can be checked out by volume (e.g. 500 ml) by selecting ‘Volume in stock’ instead.
-
If there is a preparation procedure or other relevant document which should be associated with this transaction, it can be selected from the search filter, Reagent used in document
-
The location of use is not a required field and as stated above, a general location can be selected if desired
-
The user who removed the stock can be entered in the smart field, Checked out by staff member; this is a search-as-you-type field which will only allow entering staff who have an iPassport user account
-
The Date checked out field admits dates in the past; a pop-up calendar allows selecting the appropriate date
-
Once the required fields have been filled in, the Check out stock button can be clicked; the other fields can be adjusted after the new stock lot has been created
The Inventory tab
The Inventory tab is available in all reagent and material records (when the batch and stock management feature is enabled) and it offers two filters, one for Current stock and one for Stock checked out.
The information in each tab can be extracted in CSV format by clicking the Export Results button.
Every stock lot will be displayed in the Current stock tab, clearly stating when it will expire or if it already has.
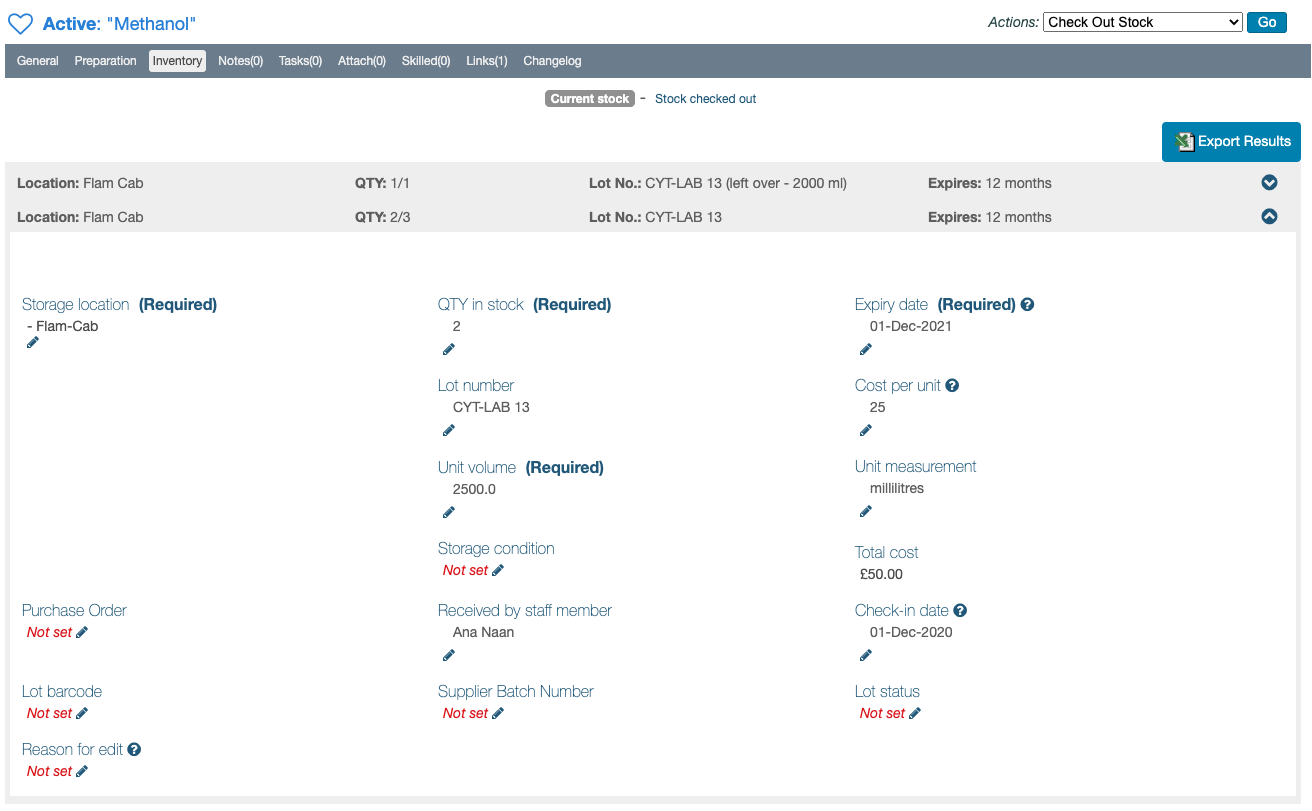
When a lot is expanded, its fields can be edited but any changes must be noted in the required Reason for edit field at the bottom.
If a portion of a ‘stock unit’ is checked out (e.g., 500 ml out of a 2.5 litre bottle), the lot will be broken into two entries, one showing the portion left over from the partially consumed unit and one showing the remainder of complete stock units.
The ‘Search Reagent Stock’ and ‘Search Material Stock’ tabs
These tabs allow searching for reagents or materials across the account. A search area is provided with a set of filters to help locate a particular record.
Each record can be expanded and edited in the same way as in the Inventory tab within reagents and materials records. It is also necessary to add details of the changes in the field, Reason for edit here.
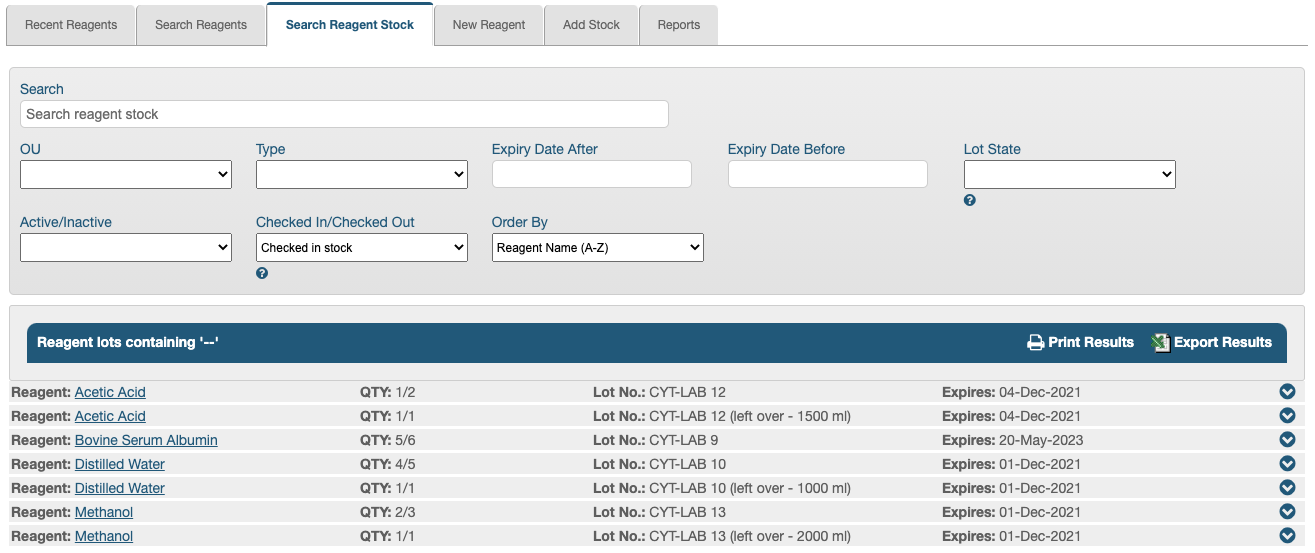
The following filters are available in both tabs:
- Search - this field accepts free text; it searches for details in the ‘Name’, ‘Code’, ’lot number’, ‘purchase order’, ’lot barcode’ and ‘Supplier Batch Number’ of reagents or materials
- OU - all reagent and material records must reside in one OU; the dropdown menu will only display the OUs which the user has permission to access
- Type - a dropdown menu displays all the user created types
- Expiry Date After and Expiry Date Before - a pop-up calendar allows selecting dates to set a date range in the search
- Lot State - a dropdown menu displays all the user created lot states; this only applies to checked-in stock as checked-out stock lacks a ’lot state’
- Active/Inactive - toggle between Active and Inactive records or select ‘blank’ to bring up all records
- Checked In/Checked Out - the results will only list either ‘Checked in stock’ or ‘Checked out stock’
- Order By - the results can be ordered in the following ways:
- Reagent Name (A-Z) / Material Name (A-Z) - (default)
- Reagent Name (Z-A) / Material Name (Z-A)
- Expiry Date (Newest first)
- Expiry Date (Oldest first)
- Check in/out Date (Newest first)
- Check in/out Date (Oldest first)
- Lot Number (A-Z)
- Lot Number (Z-A)
The results can be exported in PDF format (Print Results) or in CSV format (Export Results).
Expiration Warnings and Destroying Stock
A team of people (which can be of one person) can be assigned to be informed when a given lot of a reagent is approaching its expiry date. The number of days before the expiry date, when the team should be informed, can be entered in the field, Expiration warning (days left).
The team of people to be notified has to be added to a ‘Distribution List’ (under Laboratory Management > Distribution Lists). Once the distribution list is created, it will become available for selection in the field, Distribution list for warnings. This is a search-as-you-type field which will produce matching results in a dropdown menu as text is entered. The distribution list must be selected from the dropdown menu for it to be added to the field.
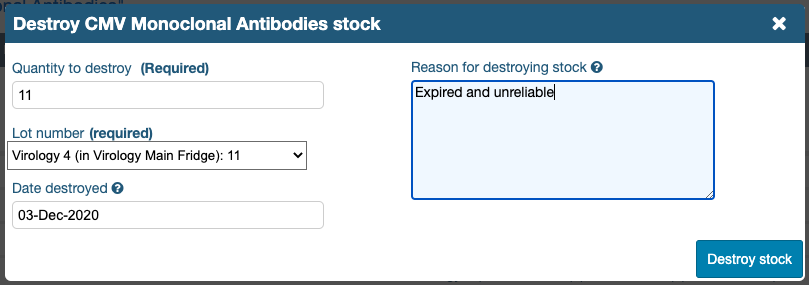
Destroying Stock
Stock that has expired can be destroyed or checked out and back in as ’re-certified’ stock. The permissions, “Reagents:Destroy Stock” and “Material:Destroy Stock” are required in the OU of the reagent/material to mark as destroyed.
To destroy stock:
- Open the record of the reagent or material
- Click the Actions and select the option, ‘Destroy Stock’ from the dropdown menu
- Click Go to open the lightbox for the following steps
- Click in the Lot Number field to display all the lots of the reagent/material in reference; each lot has the number of items left in it to help decide how many items need to be destroyed
- Select the lot to destroy; only one lot can be destroyed at a time
- Enter the number of units to destroy (based on the declared ‘Stock Unit’) in the field, Quantity to destroy
- Select the date when the stock was marked as destroyed from the pop-up calendar in the field, Date destroyed
- A comment can be entered in the field, Reason for destroying stock
- Click Destroy Stock to complete the operation
Minimum Stock Warnings
The same as with expiration warnings, a distribution list can be selected in the field, Distribution list for stock warnings, to notify the people in the list when stock levels reach a minimum threshold. This threshold is entered in whole numbers in the field, Minimum stock level and it relates to the Stock Unit declared as the unit of measurement for the given reagent or material.
Following the example above, where a lab purchases methanol in 2.5 litre bottles, a Stock Unit can be created to reflect this unit of measurement, e.g., “2.5 L bottle”. A ‘minimum stock level’ of “1” can be entered so that when the stock drops to the last bottle of methanol, a notification is sent out to the members of the distribution list.
This is the last article in this user guide.
PREVIOUS STEP: Searching & Managing Reagents and Materials