- Searching-Managing Reagents & Mtls
Searching and Managing Reagents & Materials Records
Searching Reagents & Materials
When navigating to Laboratory Records > Reagents or Laboratory Records > Materials, the corresponding Search Reagents and Search Materials tabs open by default. They include a set of search tools and a section of results below. The permissions, “Reagents:Search Reagents” and “Material:Search Material” give access to the search area. The permissions, “Reagents:View Reagents” and “Material:View Material” allow viewing and opening the individual records.
The Recent Reagents/Recent Materials tabs to the left of the ‘Search’ tabs, list reagents/materials recently viewed by the user.
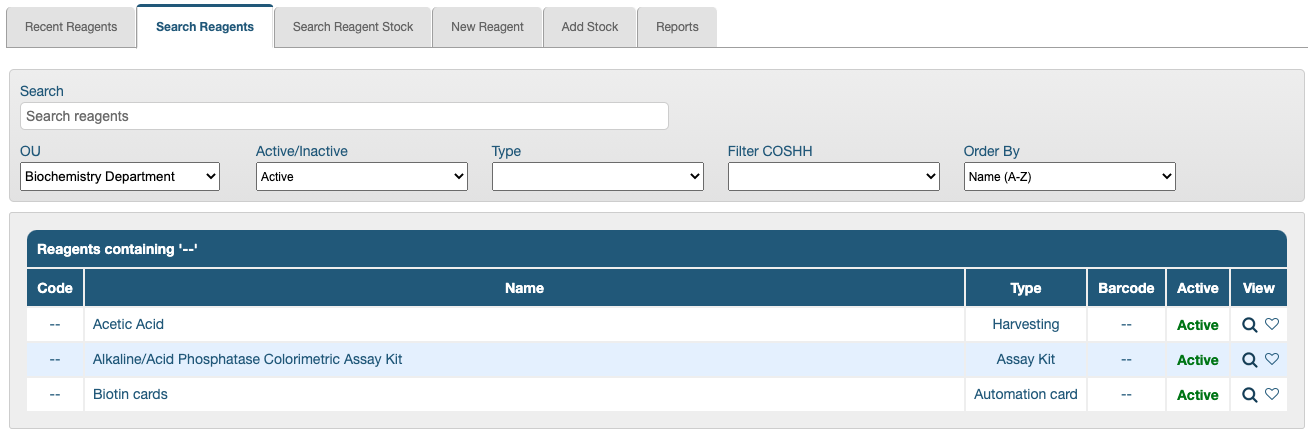
Reagents have an extra search filter (Filter COSHH) and the rest of the following filters are available in both tabs:
- Search - this field accepts free text; it searches for details in the ‘Name’ and ‘Code’ fields of reagents or materials
- OU - all reagent and material records must reside in one OU; the dropdown menu will only display the OUs which the user has permission to access
- Active/Inactive - toggle between Active and Inactive records
- Type - a dropdown menu displays all the user created types
- (exclusive to Reagents) Filter COSHH - reagents which are missing a COSHH record can be easily identified with this filter; the options available are, ‘blank’ (which includes all), ‘Has COSHH record’ or ‘No COSHH record’
- Order By - the results can be ordered in the following ways:
- Name (A-Z) (default)
- Name (Z-A)
- Index (A-Z)
- Index (Z-A)
- Type (A-Z)
- Type (Z-A)
Managing Reagents and Materials Records
Editing Reagents and Materials Records
Once a reagent or material record has been created, it is still possible to edit its fields. Any field with a pencil (edit) icon by it can be edited (assuming the user has appropriate permissions). Simply click the pencil icon to open the editable field.
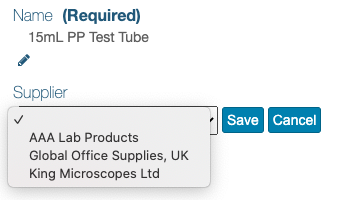
Reagents records have an additional tab where when appropriate, Preparation details can be added and also edited at any time.
All changes are user, date and time stamped in the Changelog tab.
Changing the OU
The OU field doesn’t have a pencil (edit) icon. The storage locations are also linked to OUs so some of these might become invalid when the record’s OU is changed.

Changing OU requires a different process and it’s triggered from the Actions menu:
- Click the Actions field
- Select the option, Change OU and click Go
- Click the ‘radio’ button next to the new OU in the search filter provided to select it
- Click Save
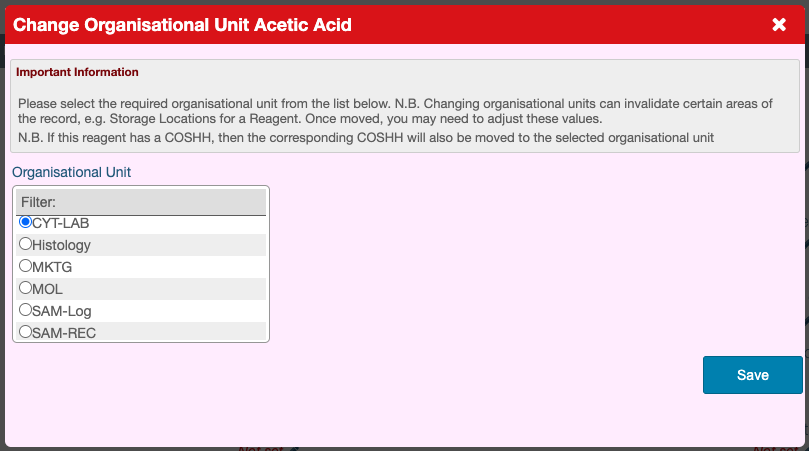
- The permissions, “Reagents:Change Organizational Unit” / “Material:Change Organizational Unit” are required in the record’s OU to have visibility of the Change OU action.
- Only the OUs where the user has the permissions, “Reagents:Create Reagents” / “Material:Create Material” will appear listed.
- The reagents/materials can be in any physical location but their records must have an OU as a home.
Printing Reagents and Material Records
Users with the permissions, “Reagents:Print Reagents” / “Material:Print Material” will see the option to Print a reagent or material record in the Actions dropdown menu. Selecting the Print option and clicking Go opens a lightbox where a Reason and a Location can be entered. Only ‘Locations’ which have the ‘Print’ tag and are associated with the reagent’s/material’s OU will be available for selection. A downloadable PDF is produced upon clicking the Print button.
Every print is recorded with a token number so it can be traced and destroyed when it becomes obsolete. This information can be accessed by selecting, Print History in the Actions dropdown menu. Prints can be marked as destroyed in this lightbox and also in the Controlled Prints tab under Quality Management > Inspection Prep.
Inactivating Reagents and Materials
Only reagents and materials which have no stock can be inactivated. The option, ‘Set as Inactive’ is only visible if all stock has been checked out or destroyed.

Once inactivated, the title of the reagent/material turns red and the Actions menu includes the option, ‘Set as Active’, in case the record needs to be used again.