- Raising Non-Compliances
Raising a New Non Compliance
There are three ways of raising noncompliances, one is through a dedicated tab in the Non-Compliance module, another is through a URL link to an external form and noncompliances are also automatically generated when an Internal Audit checklist step (requirement) is marked as noncompliant.
Internally raised Non Compliances
The permission, “Non Compliance:Create Non Compliances” is required to create a new noncompliance within iPassport. It is required in every OU where the user intends to add noncompliance records.
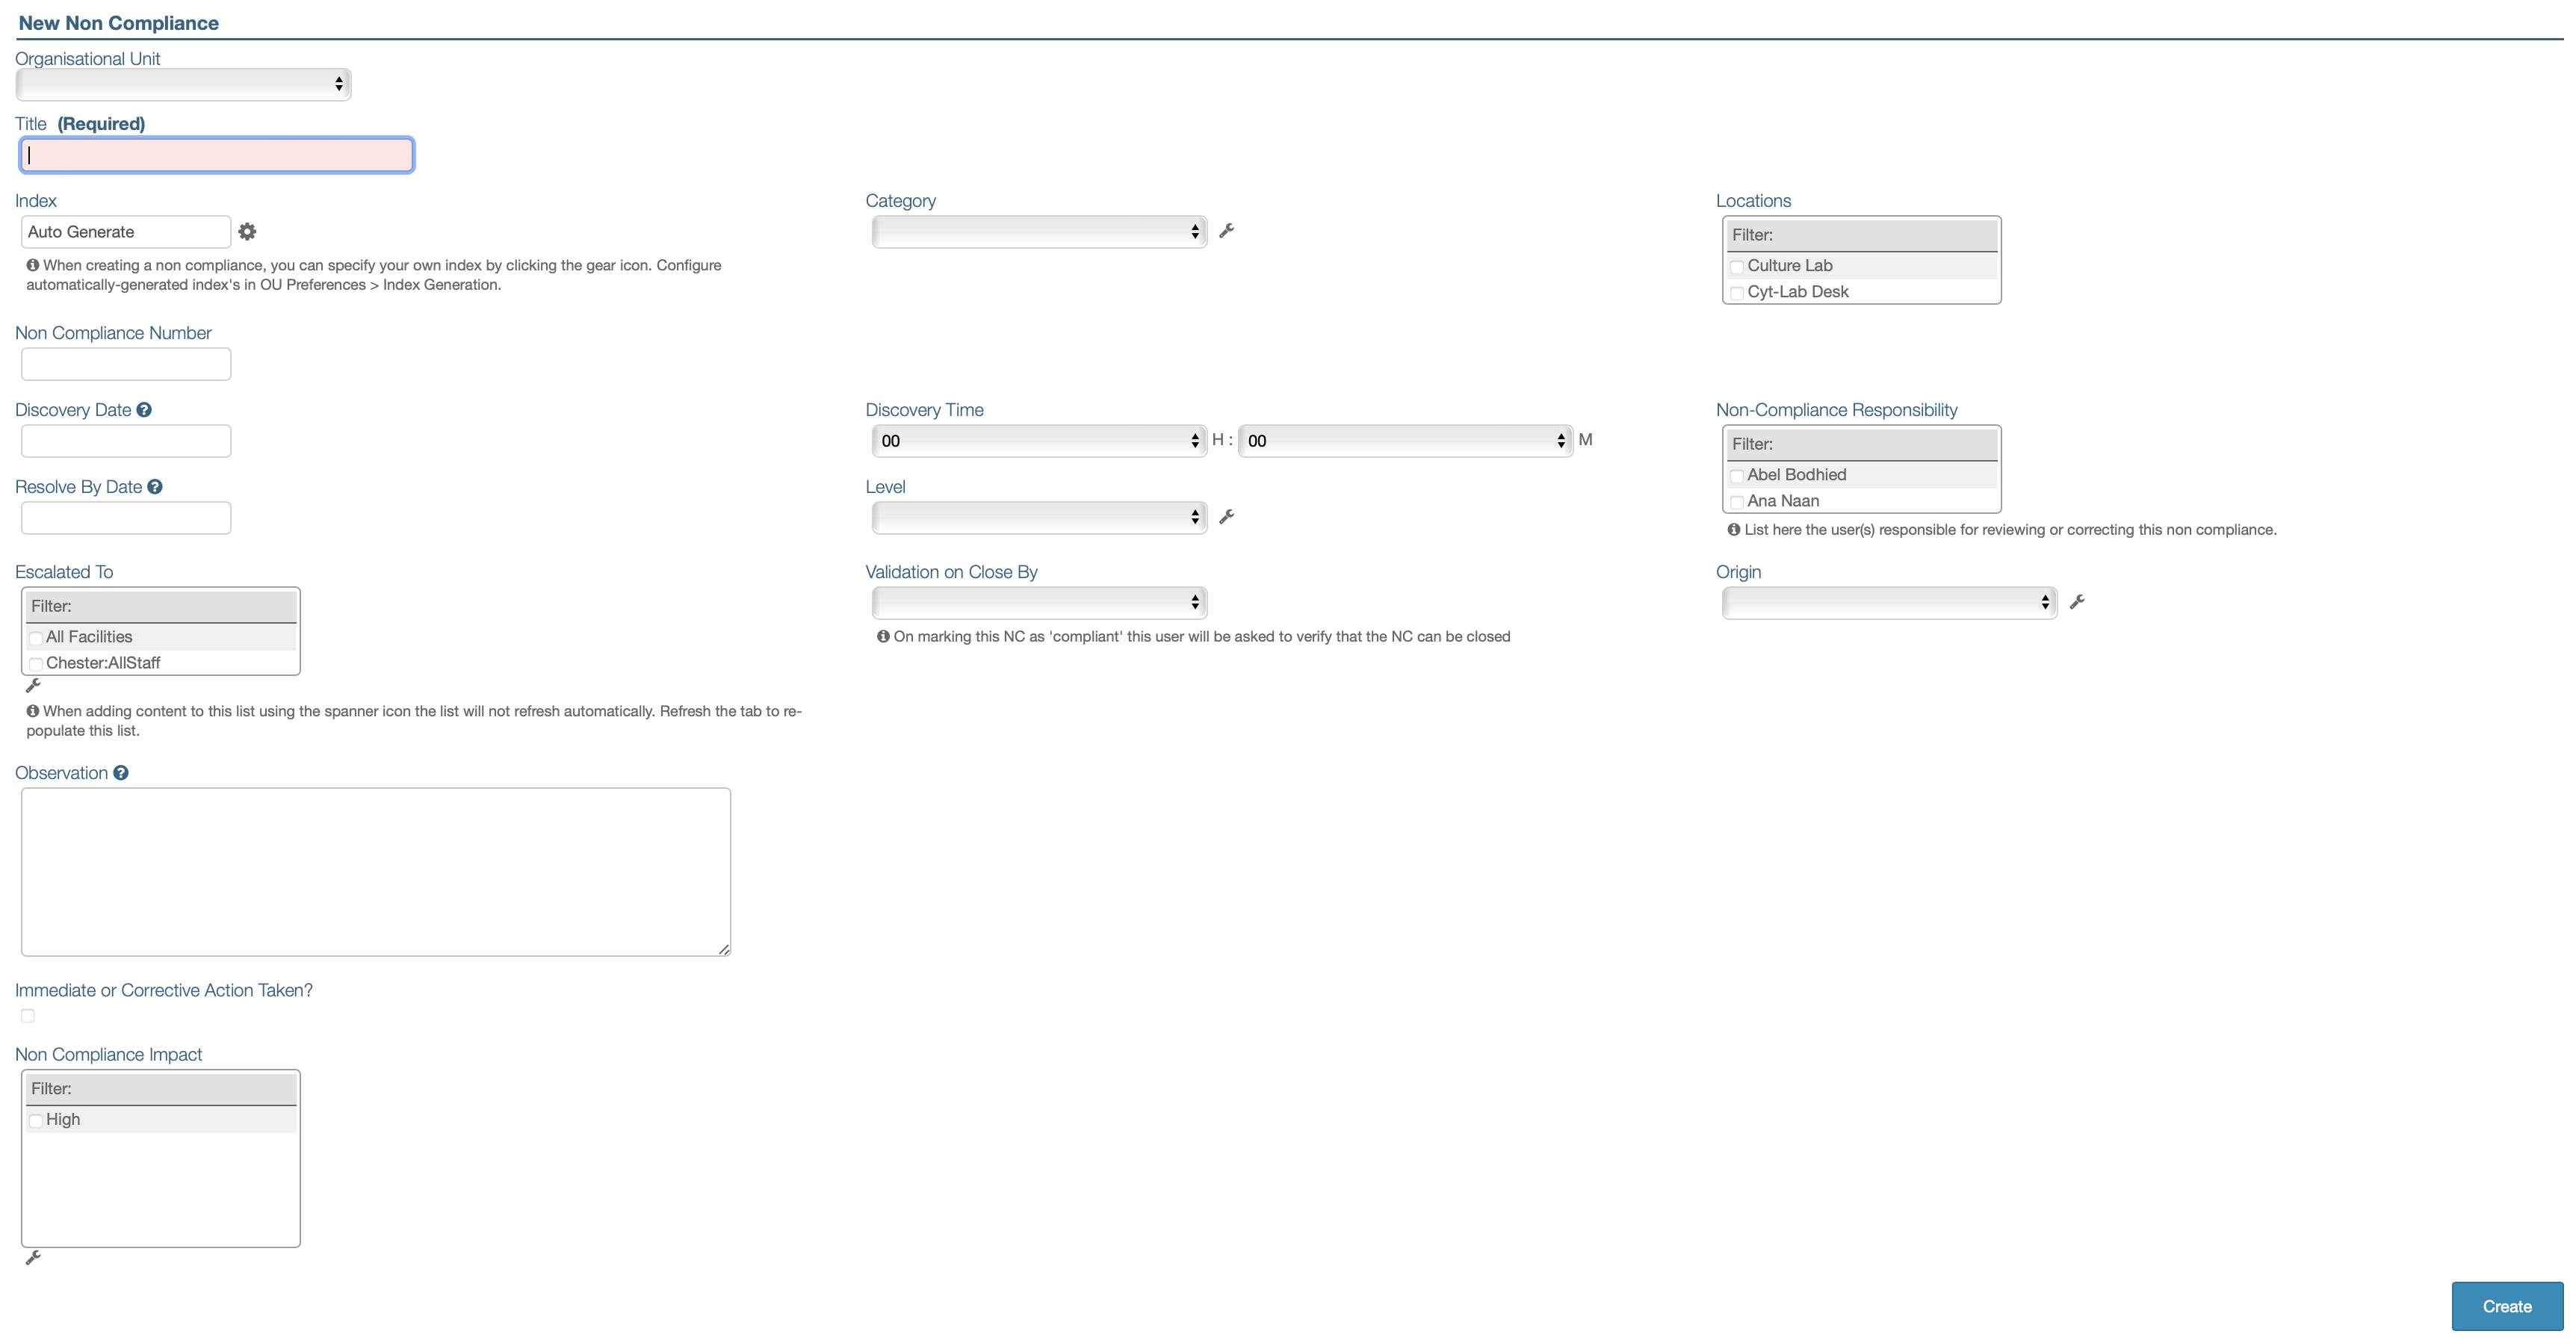
Apart from the Title, which is required and the Index and OU fields, which can’t be blank, all the fields below are optional in the NC creation step:
-
Navigate to Quality Management > Non-Compliances > New Non-Compliances to open a new record.
-
The Organisational Unit (OU) is where the NC record will live.
Once the NC record has been created, a user with the permission, “Non Compliance:Change OU” (in both the origin and target OUs) can move it to another OU.
-
Enter a Title (Required) for the noncompliance (NC); it should be descriptive (although not too long) as this is the item displayed when searching and reporting.
-
The Index can be auto generated by the system; alternatively, clicking the cog icon turns off ‘auto generate’ and allows entering a combination of numbers, letters or both. The system will validate custom made indices to ensure they are unique within the OU where the noncompliance is added.
-
A ‘Category’ can be selected from the dropdown menu; the options are user created and can be managed with appropriate permissions (please see below).
-
A Location can be selected from a dropdown menu to indicate where the noncompliance happened. New locations cannot be created from the noncompliance record but a user can add a new location after raising the noncompliance. Instructions on how to create new locations can be found below.
-
The Non Compliance Number is a free text field which allows adding an alternate ID for internal company purposes; this field is not validated by iPassport.
Since the system doesn’t check that Non Compliance Numbers are unique, it’s recommended to search for the number prior to creating a new NC.
-
The Discovery Date and Resolve By Date can be selected from the pop-up calendars which appear when you click in the fields.
The field names are self explanatory and the values work together to establish a resolution time for the noncompliance. The Resolve by Date sets a deadline by which the NC must be resolved. It is possible to set this date in the past to allow users to migrate previous noncompliances into iPassport. -
Once a Discovery Date has been set, it is possible to add a Discovery Time. This is not a required field and if it is not used it will display 00:00. It works as a drop down menu for both the hours (H) and minutes (M).
-
The user can select the Level of the noncompliance by choosing one of the options from the dropdown menu. This is a user configurable list and custom options can be added to it (please see below).
-
The Non-Compliance Responsibility field allows assigning one or more users the responsibility of resolving the NC. Names can be found by scrolling or by entering them in the ‘Filter’ area and must then be selected by ticking the checkbox next to them.
When a user is selected in the “Non-Compliance Responsibility” field, they will be issued a notification by email.
Users can control what notifications they receive, relating to noncompliances in their personal preferences area (My Profile > Preferences > Non Compliance Notification).
The user guide, Personal Preference Management has the relevant details in the Non Compliance Notification section. -
Escalated To is a user customisable multi-select field that allows a user to record that the Non-Compliance has been escalated to one or more external bodies (e.g., the local Police Dept.). The list can be customised by clicking on the spanner icon (please see below).
-
Validation on Close By allows to select a user to conduct a final sign-off when a noncompliance is ready to be closed. This can also be set up when the noncompliance is marked as Compliant (by opening a noncompliance and selecting ‘Set as Compliant’ from the Actions dropdown menu).
If a verifier is selected in the ‘set as compliant’ lightbox, the ‘Request Validation From’ field will be populated with the user’s name and the confirmation button will change from ‘Set as Corrected’ to ‘Request Verification’. Clicking ‘Request Verification’ will change the noncompliance state to ‘Pending Verification’ and the verifier will be tasked to confirm that the noncompliance can be closed. -
The Origin field allows a user to specify how the Non-Compliance was raised. This is customisable (please see below) but if a Non-Compliance is raised via an external form ((e.g., https
:://TestLab.ipassportqms.com/report_non_compliance )), the origin will be listed as ‘External Form’. -
The Observation box is a free text field, used to add a brief (or extended) account of the NC; this can be edited once the NC record has been created.
-
If the Immediate or Corrective Action Taken? checkbox is ticked to indicate that some action has been taken to respond to the issue, two fields will appear to add information:
- Action Taken By is a required field and a user needs to be selected from the dropdown menu
- Action Description is also a required field to add information of what was done
-
More than one Non Compliance Impact can be added by selecting options from the multi-select field. This is also a user definable field and custom options can be added to it (please see below).
If the option menus of the Cateogry, Level, Escalated To or Non Compliance Impact fields have no entries, it’s most likely because none have been created yet. The Origin field comes with one item (‘External Form’) and more can be added. The instructions below show how to add them.
-
Once all the details have been added, click the Create button in the lower right corner to submit the Non-Compliance.
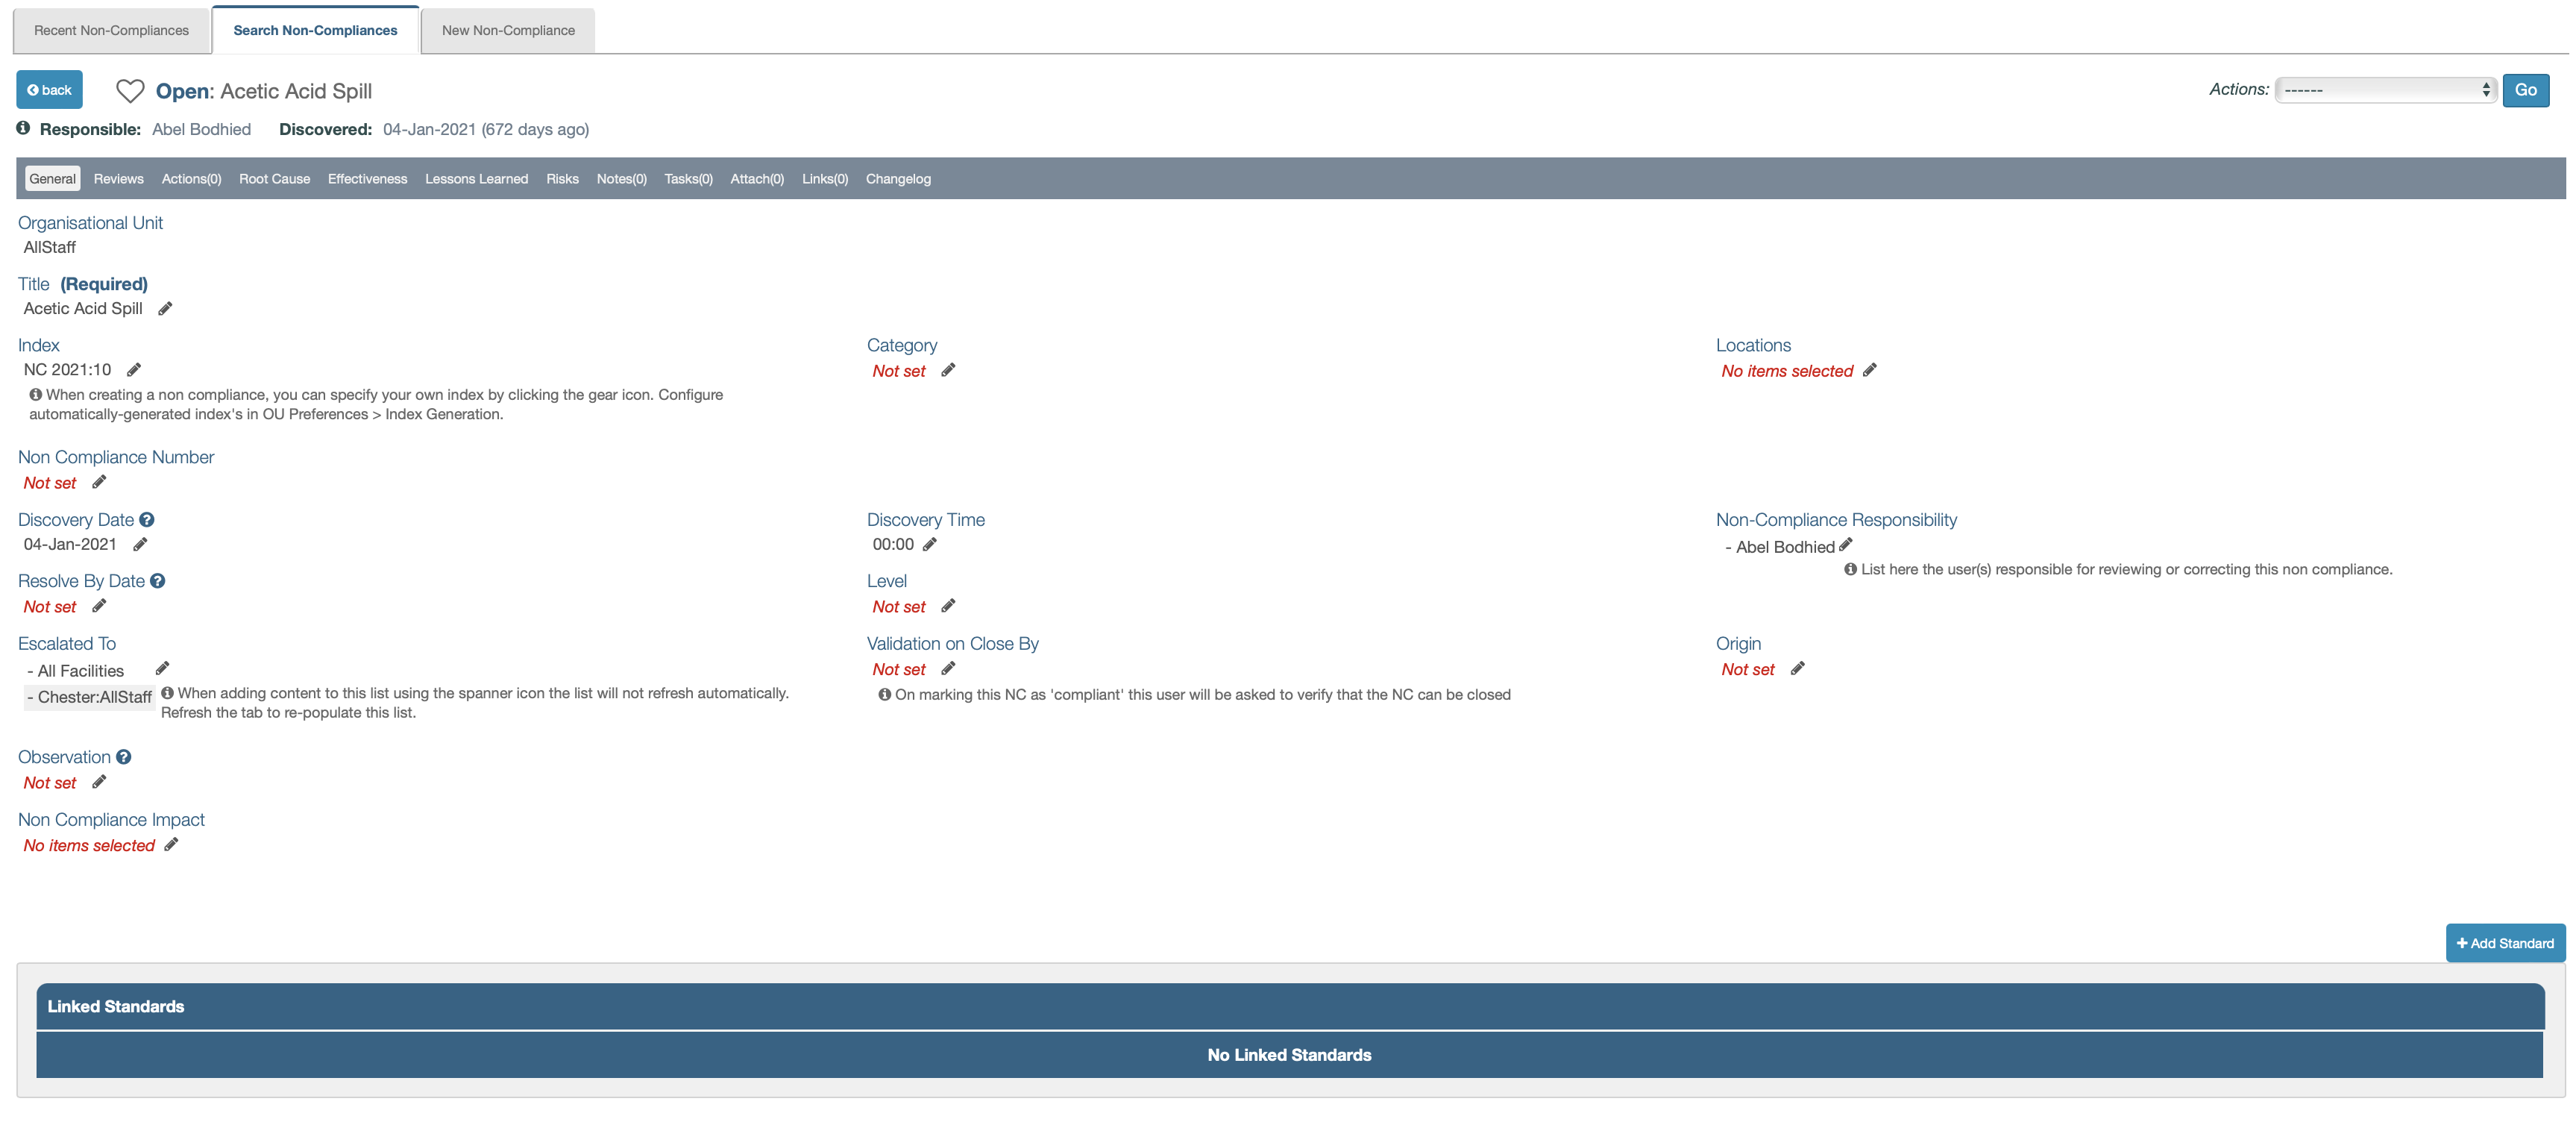
The screen will refresh to show the new noncompliance record.
Managing Non Compliance Customisable Fields
The fields, Category, Level, Origin, Escalated To and Non Compliance Impact (the ones that show a spanner/wrench icon on the New Non Compliance page) are customisable.
These are some of iPassport’s user configurable lists of options which can be edited when the spanner/wrench icon is visible next to the field.
The permission, “Non Compliance:Manage Non Compliance Categories” is required to manage categories and “Non Compliance:Edit Levels” is required to manage NC levels.
Non Compliance Origins come with a default option - External Form and other ‘origins’ can be added as required. The permission “Non Compliance:Create Non Compliances” is required to manage ‘Origin’ and ‘Escalated To’ lists.
Instructions on how to manage these configurable look-up fields can be found by clicking this LINK.
Managing Locations
Locations can only be managed in the Administration area and by users who have ‘administration editor’ rights. Only locations that have been assigned the same OU as the noncompliance’s will be available for selection. Locations also have ’tags’ to define their purpose and the tag, ‘General’ is required for a location to be available within a noncompliance. Locations can be linked to multiple OUs and tags; full details are found in the user guide, Locations - Sections.
For quick reference this is how to create a new location:
1. Navigate to Administration > Locations > New Location or to Administration and click the plus (+) sign next to Locations
2. Add a Short Name (Required) and a Long Name (Required) for the new location; the rest of the information is optional
3. Click Create Location
4. In the new record's General tab, scroll down to the OUs & Tags section
5. Select the appropriate OU(s) by clicking the pencil icon under Organisational Units
6. Select the Tag, General, to make the location available in noncompliances
External Form
Anyone in the organisation with access to the link can Report a new Non Compliance through the external form when settings are in place. Please refer to the article about Non Compliance Permissions And Settings for details about the URL, how to enable it and who gets informed when a Non Compliance report is submitted.
The link opens a secure form with a number of fields to provide basic information of the noncompliance. The form can’t be submitted without clicking the human verification check, “I’m not a robot”.
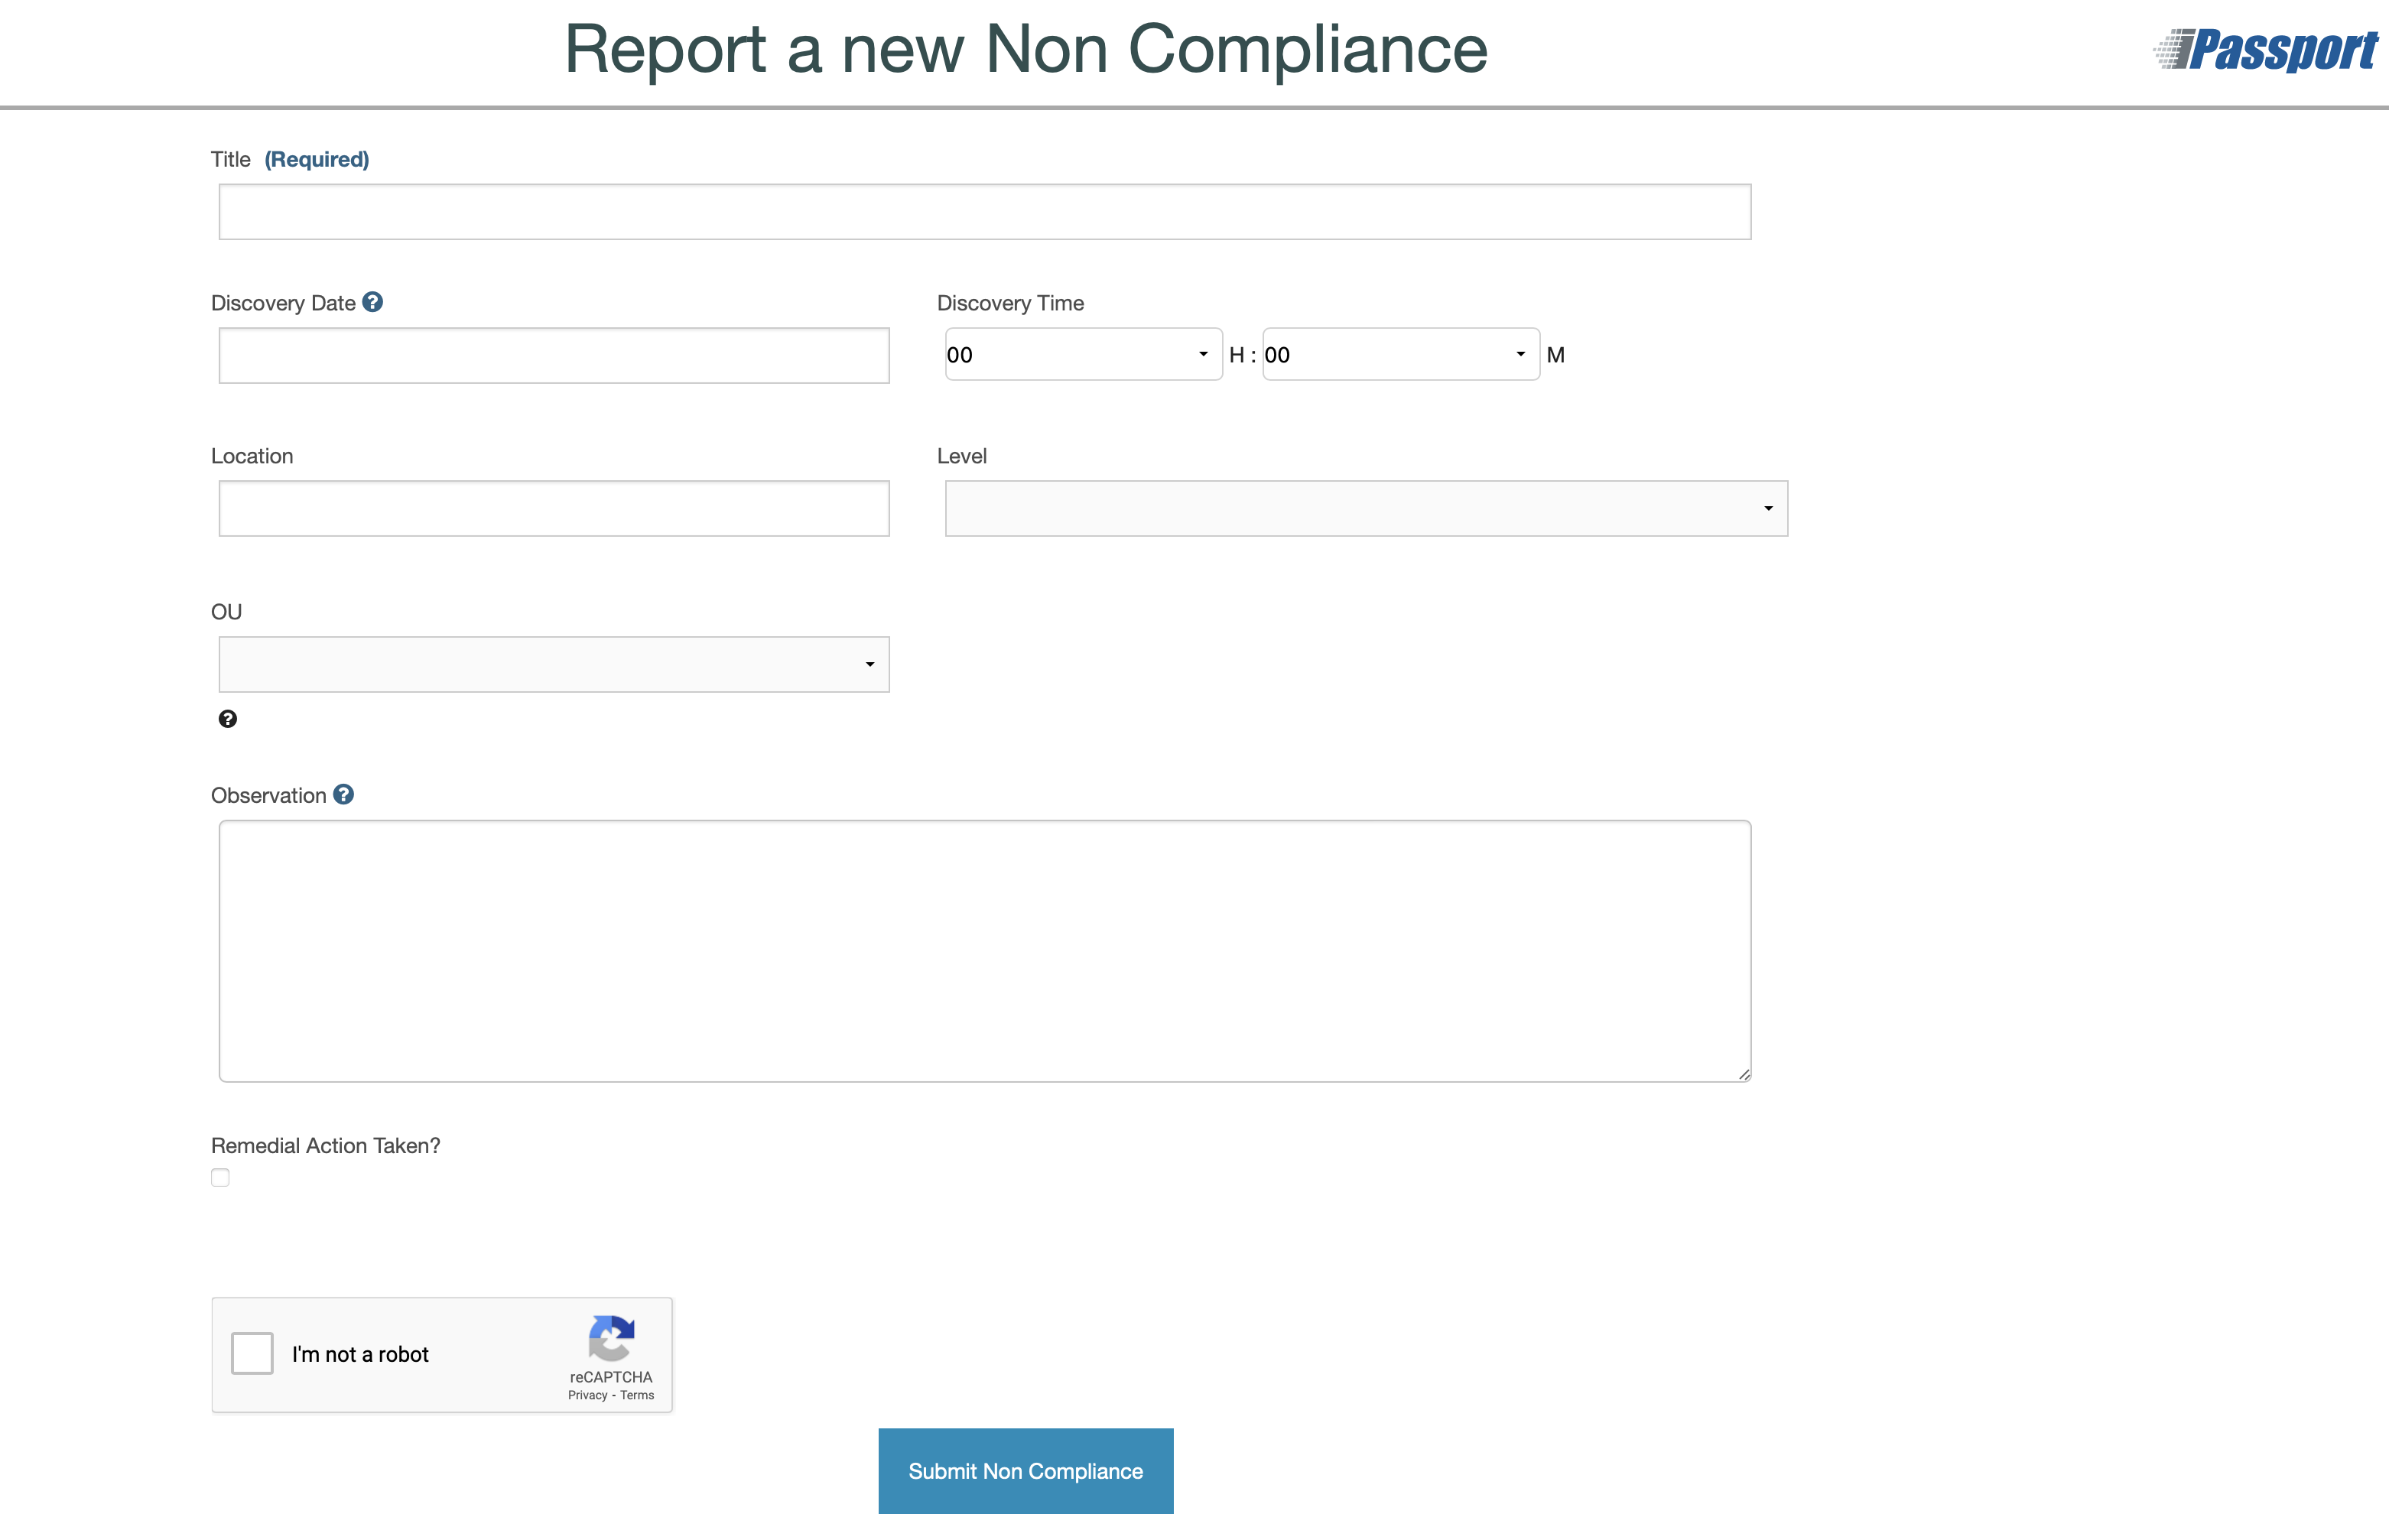
External Form Fields
Only the Title field on the external form is required by the system to submit a noncompliance report. The rest of the fields below can be filled once the noncompliance is created within the system:
- The Discovery Date - can be selected from the pop-up calendars that appear when you click in the field.
- The Discovery Time - works as a dropdown menu for both the hours (H) and minutes (M)
- Location - in the external form this is a free text field; the new noncompliance record will display this text above the Locations field so the person processing it can select the corresponding location(s) from the dropdown menu of internally declared locations
- Level - an option can be selected from the dropdown menu of available severity levels
- Organisational Unit - if this field is left blank, the request will be directed to the default OU, set in the System Preferences area
- Observation - a description of the noncompliance can be entered in this free text field
- Remedial Action Taken? - if this is ticked, the two fields below scroll out
- Action Taken By - free text field to enter a name
- Action Description - free text field to enter a description of the action taken
These two fields are used by the system to create the first noncompliance Action under the Actions tab of the new noncompliance record. The information can be edited and the action can be reassigned to an iPassport user when the noncompliance is being processed internally.
Once the title and any other information are entered and the human verification button is checked, the “Submit Non Compliance” button can be clicked to submit the form.
Noncompliances Raised from Internal Audits
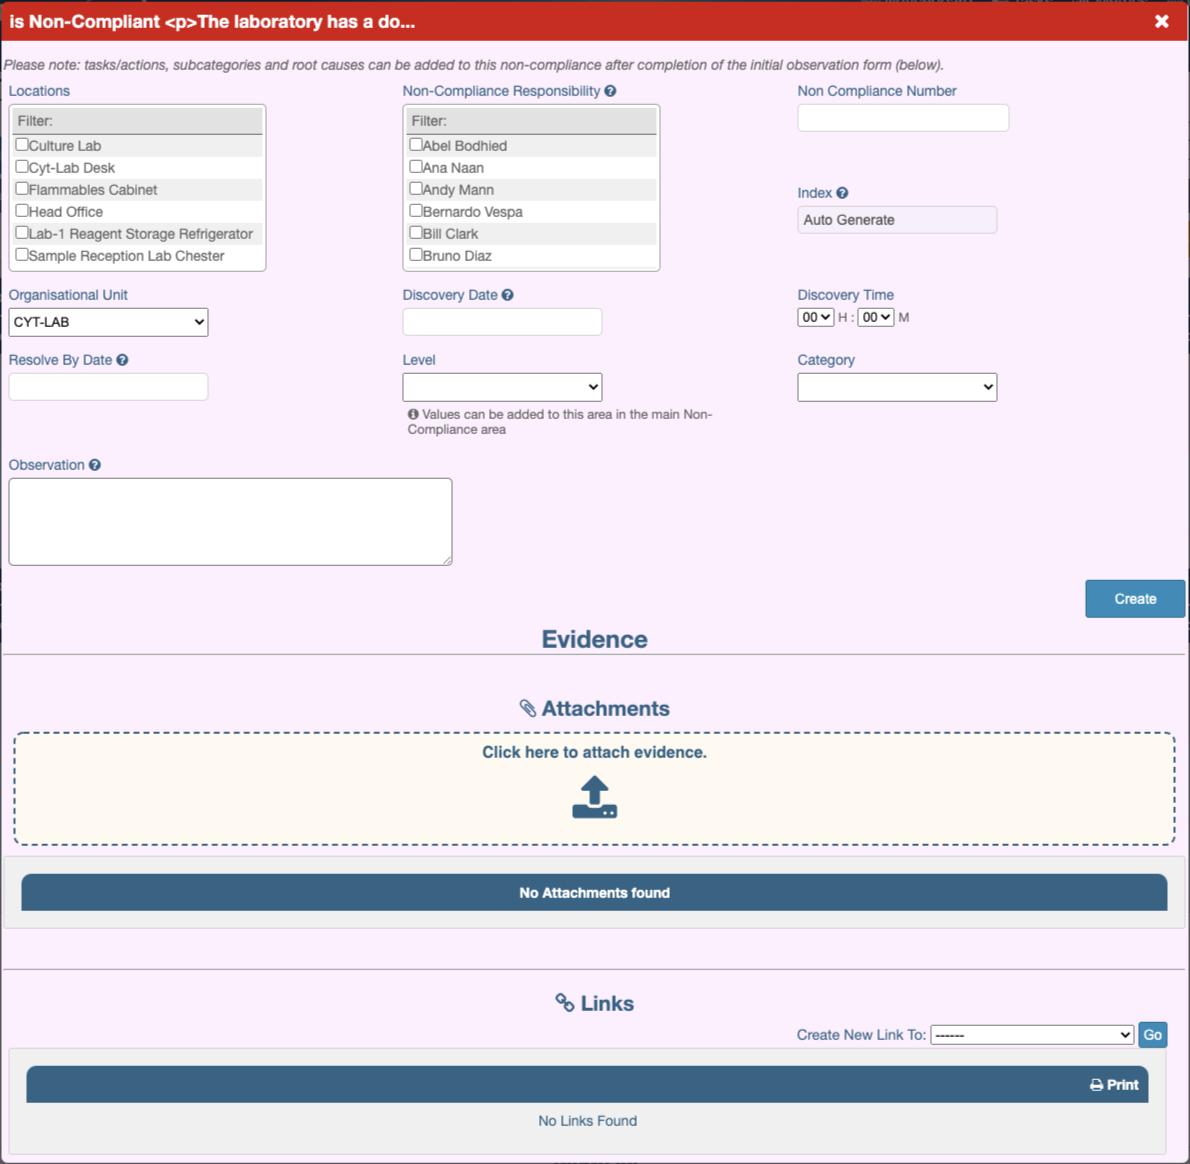
When performing an internal audit, if the auditor marks a checklist step as non-compliant, a form will pop up and the information entered will be used as the basic data to create and populate a new noncompliance record.
More information about the internal audit process is available in the user guide, Internal Audit Management.
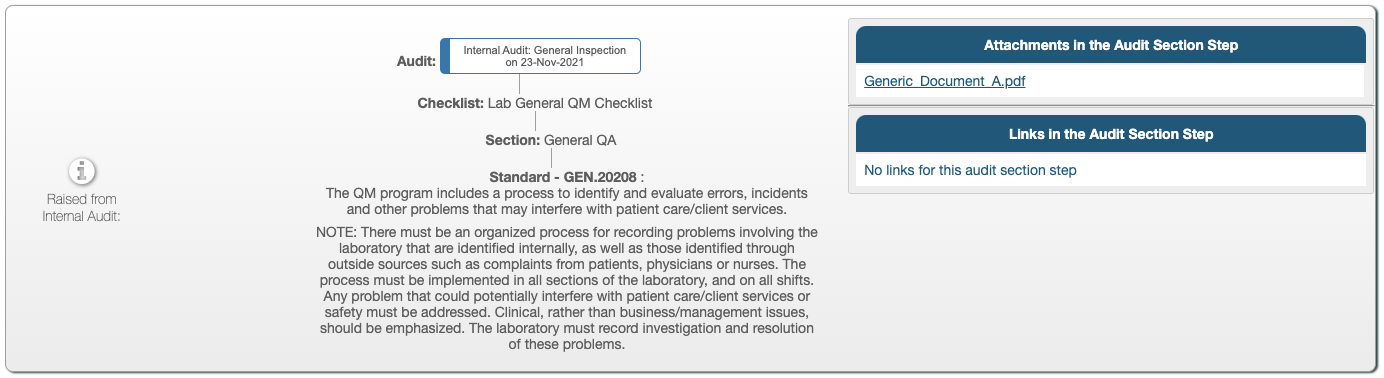
The automatically created noncompliance will be a linked but distinct record in the same OU. To help understand its nature, information about the internal audit is supplied at the bottom of the noncompliance record’s General tab, in a section marked, “Raised from Internal Audit”. The checklist step (requirement) in particular, can be read without having to navigate to the internal audit. Nonetheless, it is possible to jump to the internal audit, the attachments and the links which were added in the audit step from this area.
When the noncompliance is set as corrected, the internal audit checklist step will be automatically set as ‘compliant’.
NEXT STEP: Searching And Editing Non Compliances
PREVIOUS STEP: Non Compliance Permissions and Settings