- Managing Risks
Managing Risks
An important part of risk assessments is to find ways of mitigating the identified risks. Individual risks can be assigned actions for this purpose and they can then be reviewed to establish a residual risk score, based on the actions taken. Multiple residual risk reviews can be performed.
Creating a Risk record
Risk records are created within a risk assessment. It’s therefore necessary, to first create a risk assessment.
To add a risk record within an assessment:
-
Click ‘⊕ Add New Risk’
A new risk form builds with a risk matrix and the fields included in the ‘Risks’ tab of the source assessment configuration.
-
A sequential number generated by the system will be offered in the Ref # field; a whole number less or equal to ‘255’ can be manually entered in its place
-
A Name is required
At this point, the ‘Save’ button becomes available and the risk record can be created.
-
Select a Likelihood Value (Y-axis value) from the dropdown field; this information can be entered later
-
Select a Severity Value (X-axis value) from the dropdown field; this information can be entered later
A score will be immediately calculated and displayed on the matrix.
 TIP: Clicking a cell in the matrix will automatically populate the ’likelihood’ and ‘severity’ fields with the corresponding values.
 -
Enter or select information in the other fields included in the form below the matrix and Save
The screen refreshes to display the risk in the risks table of the assessment.
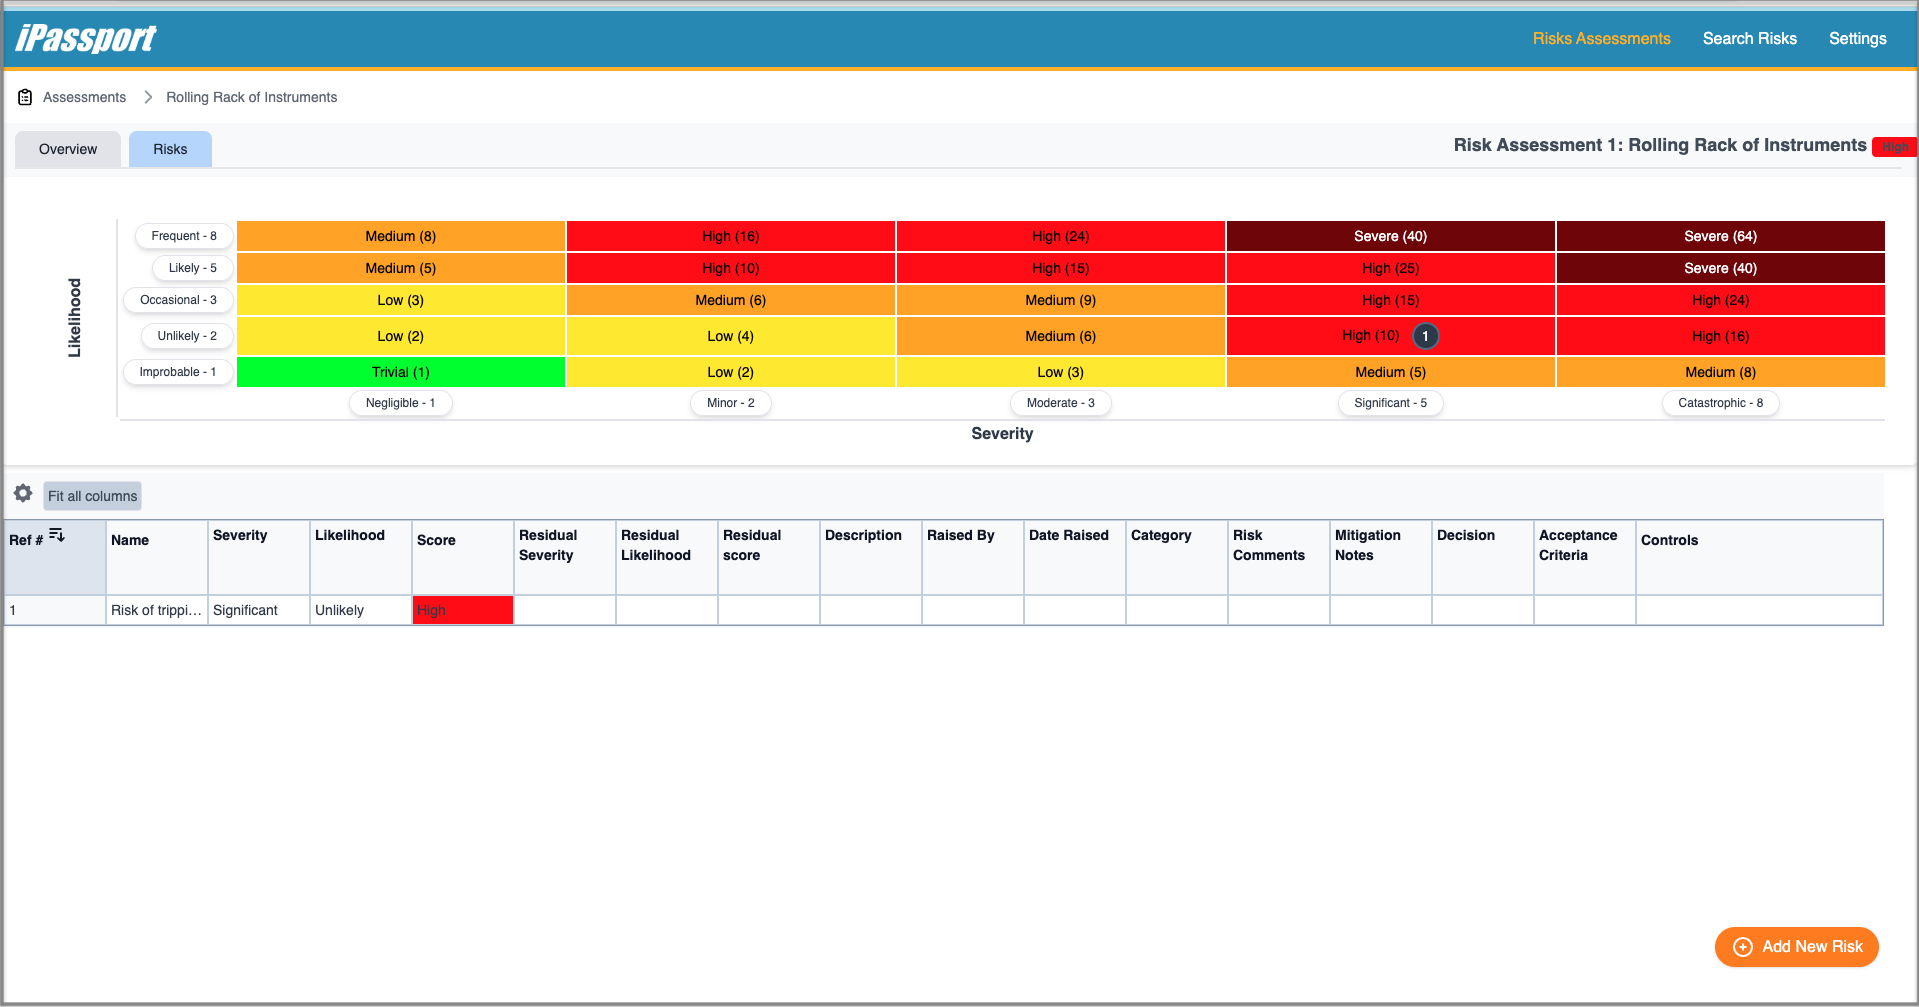
Clicking the row of the risk in the table will open the risk record where it can be edited or deleted.
Editing Risks
When an existing risk is opened by selecting it from a risks table, three tabs are available within the risk record:
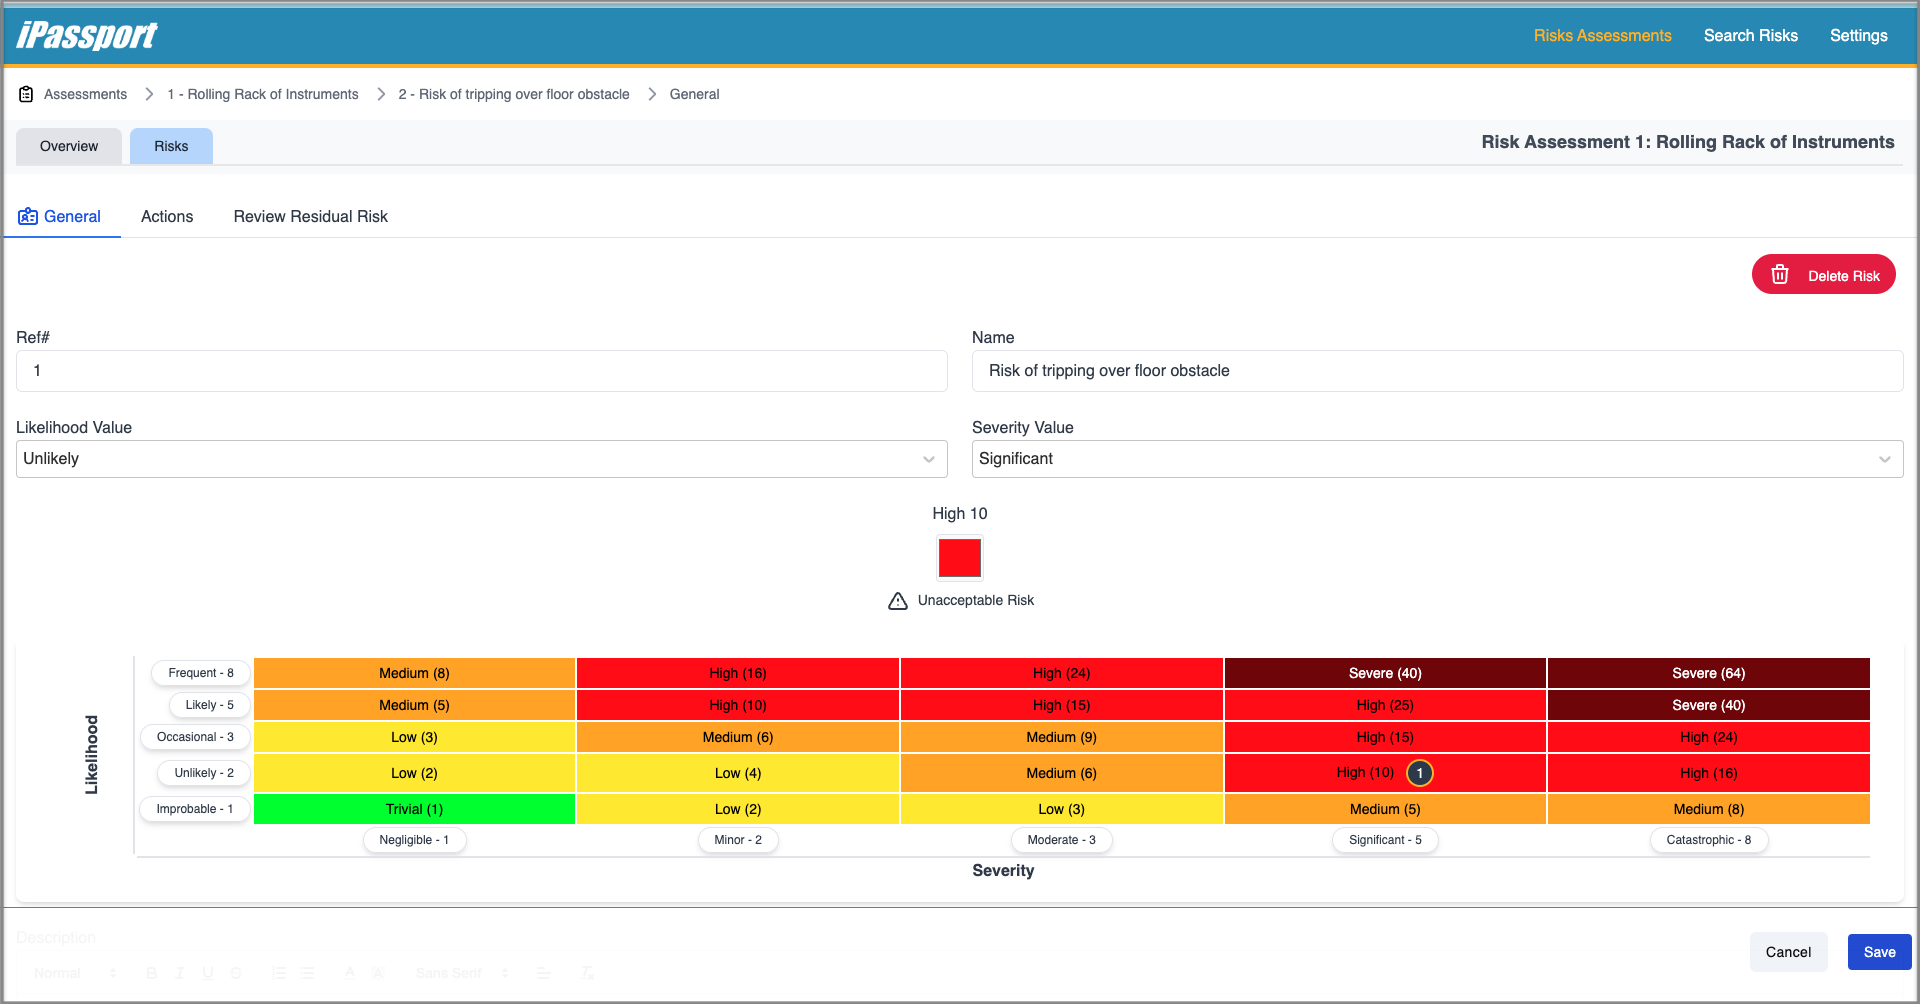
- General (which opens by default) - where the score fields, risk matrix and fields added in the ‘Risks’ tab of the parent configuration can be found
- Actions - where mitigating actions can be added to reduce the risk score
- Review Residual Risk - where reviews can performed to set a new residual score after applying actions
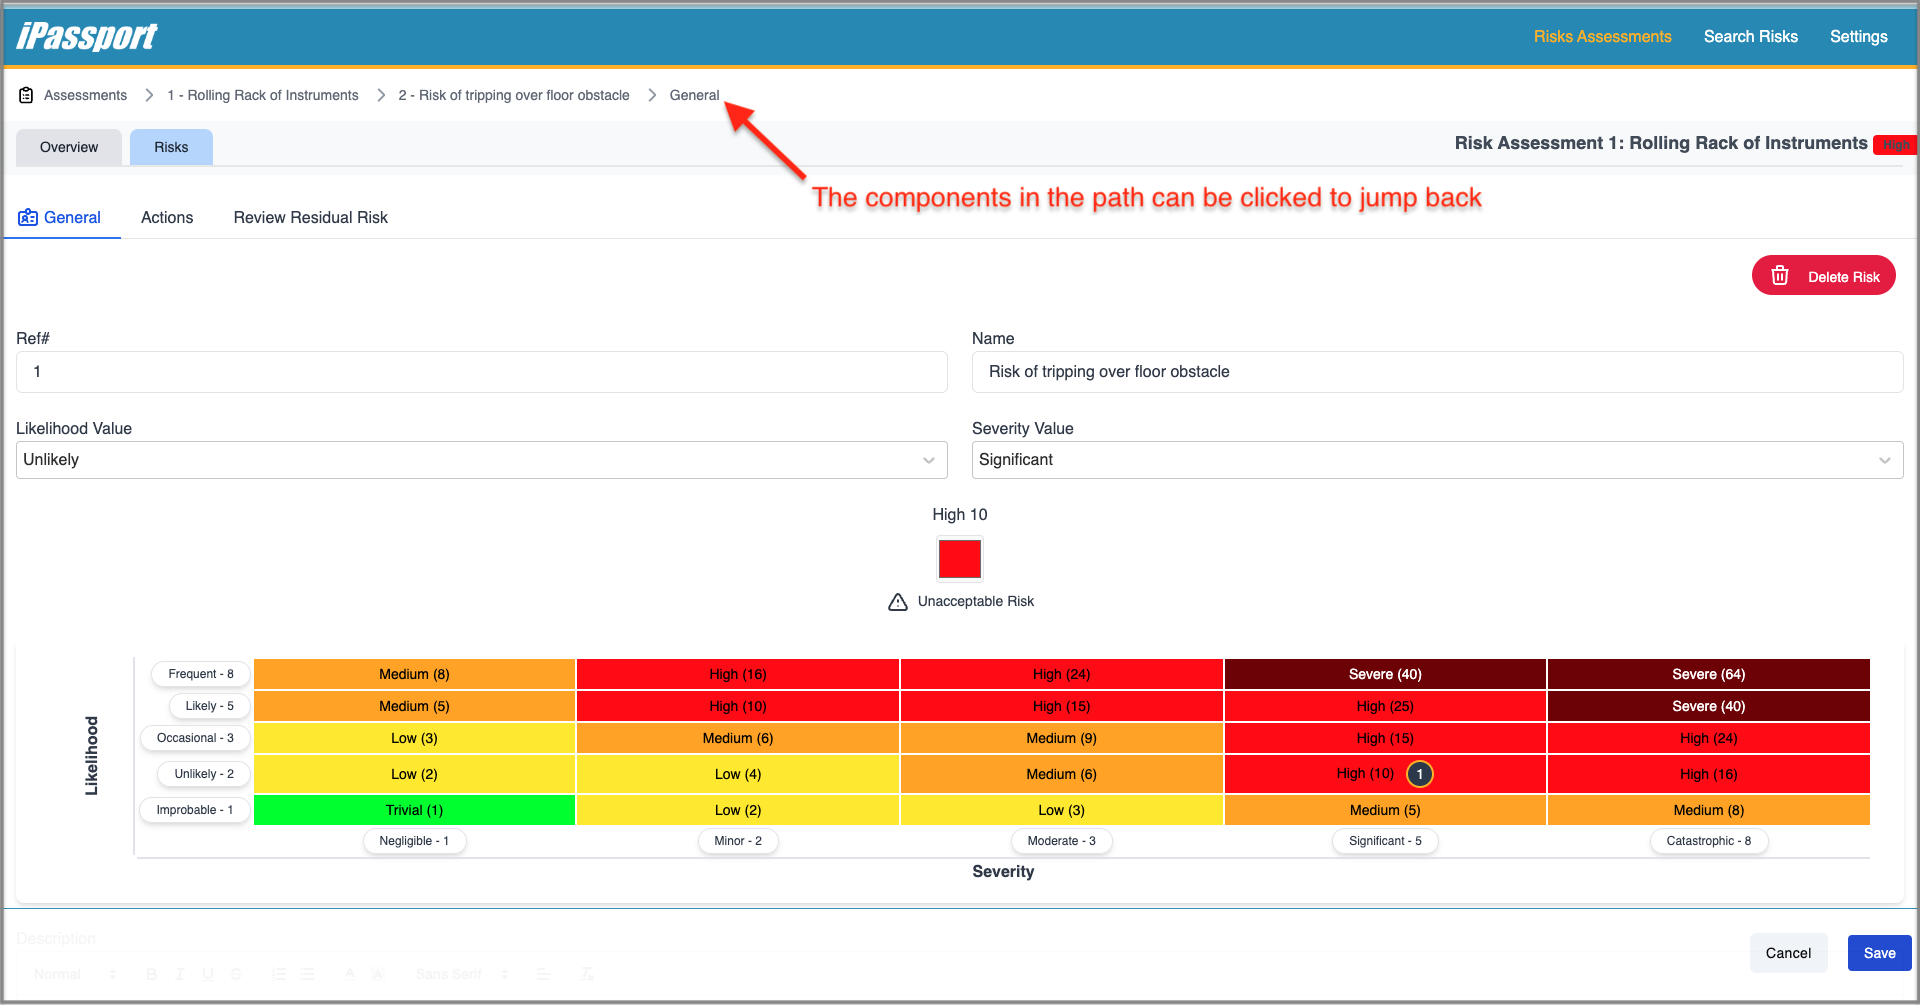
At the top of the page, the directory path is displayed and any component can be clicked to navigate back up the tree.
Near the top of the ‘General’ tab are the fields for the X-axis and Y-axis values and the matrix where the score is displayed.
It is possible to set the risk score directly on the matrix by clicking the intended cell, without having to select values in Y-axis and X-axis fields.
All the information about the risk is also stored on this tab and can be edited at any time.
There is a Save button always present in the bottom right corner of the screen to save progress at any time.
Unsaved changes in risk assessment forms are stored by the system to help prevent accidental loss of data.
When a form with unsaved changes is re-opened, a banner is displayed near the top with buttons which allow restoring or discarding the changes.

Each field also has buttons to restore or discard local changes.
![]()
Restored changes still need saving or they will be lost.
Actions Tab
Multiple actions can be added to mitigate a risk. They can be permanently deleted or just archived so they can be excluded from particular residual risk reviews. When they are marked as completed, they stand out, highlighted in green.
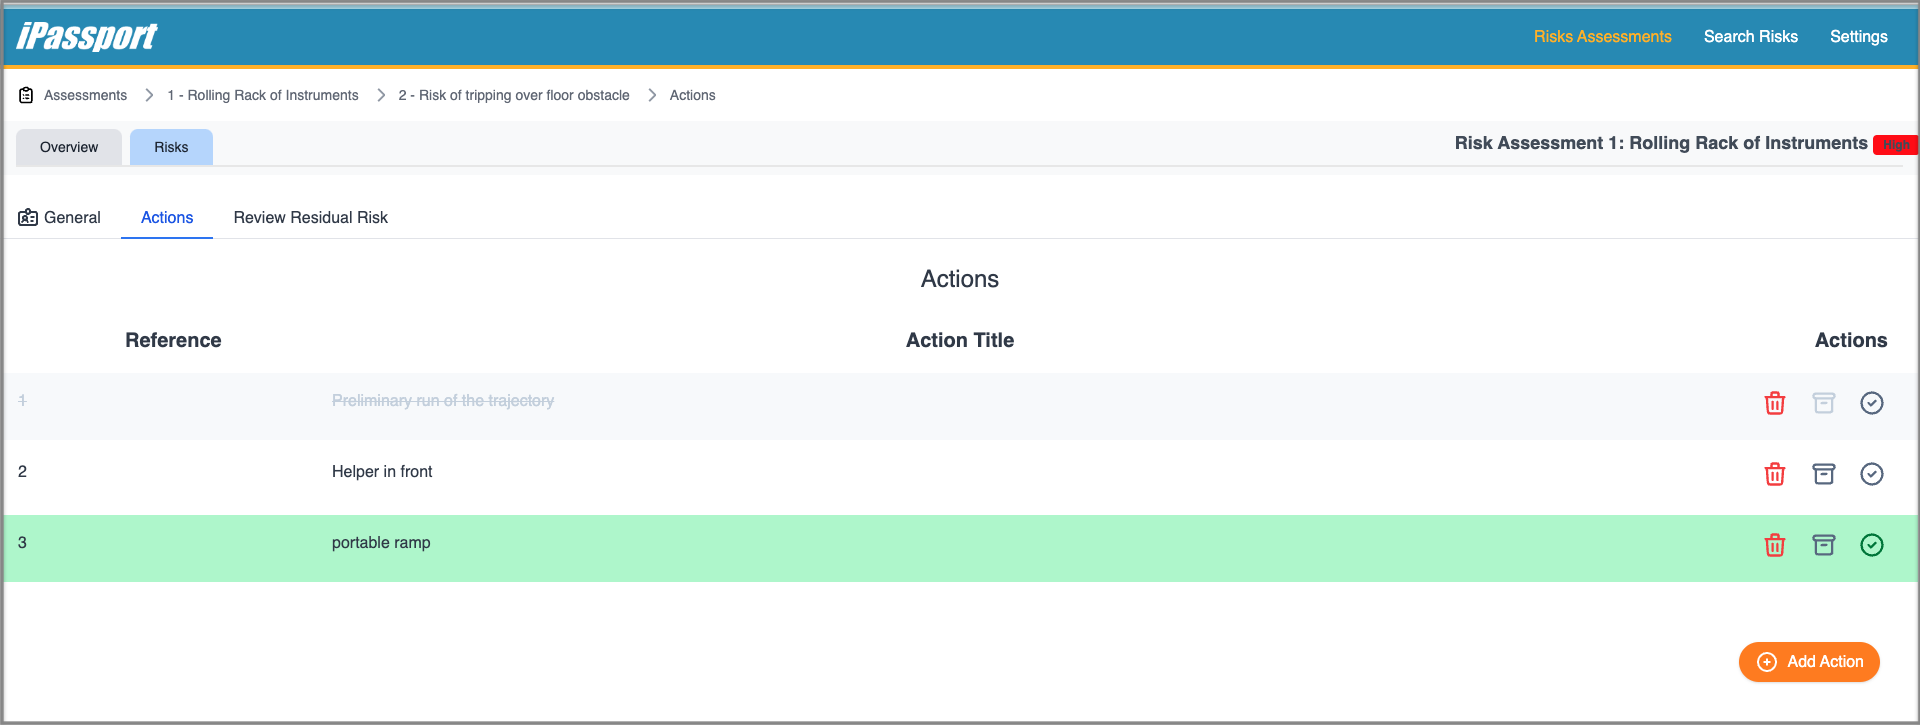
To add a risk Action:
- Click the ‘⊕ Add Action’ button
- In the pop-up window which appears, add an ‘Action Title’
- Add an Action Description if desired, to elaborate on the action’s effect
- It is also possible to link the action to an iPassport controlled document or equipment record; selecting either of these options in the Link Action To dropdown will bring up another search-as-you-type field where the relevant record can be selected
- Click Save
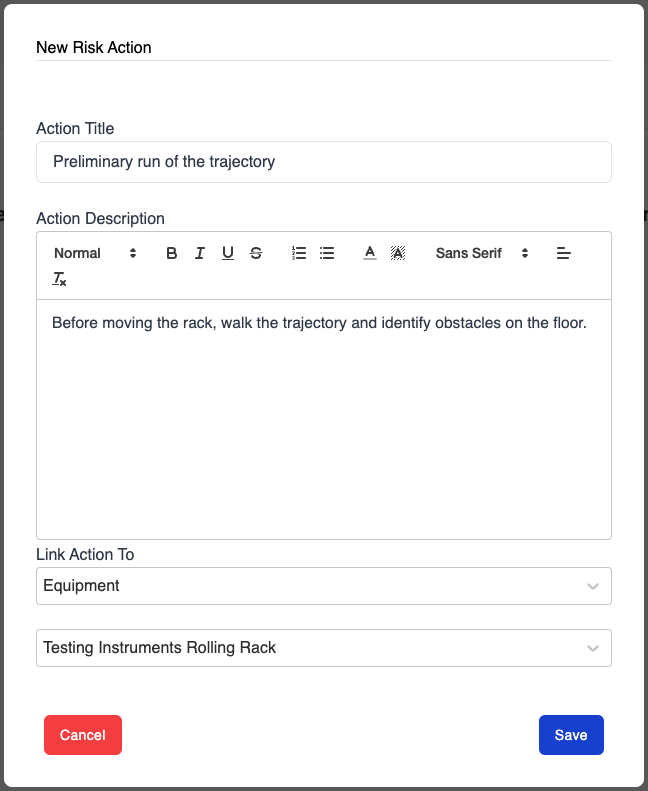
The new action is displayed in the Actions tab and it has three icons available:
- Delete Action (trash) icon - a confirmation dialogue box pops up when it’s clicked
- Archive Action (folder) icon - a confirmation dialogue box pops up when it’s clicked; archived actions appear crossed out and they can be retrieved by clicking the same greyed-out icon
- Mark Action as completed (check) icon - allows marking an action as having been performed to know it can be considered in residual risk reviews; completed actions are highlighted in green and can be reverted to not-complete by clicking the same icon

Review Residual Risk Tab
Multiple reviews can be performed on a risk to bring it down to an acceptable level.
Each new review is labelled as the ‘Current Review’ and sits at the top while ‘Past Reviews’ get stacked below, on the same page.
Once a residual risk review is marked as saved, it can’t be edited.
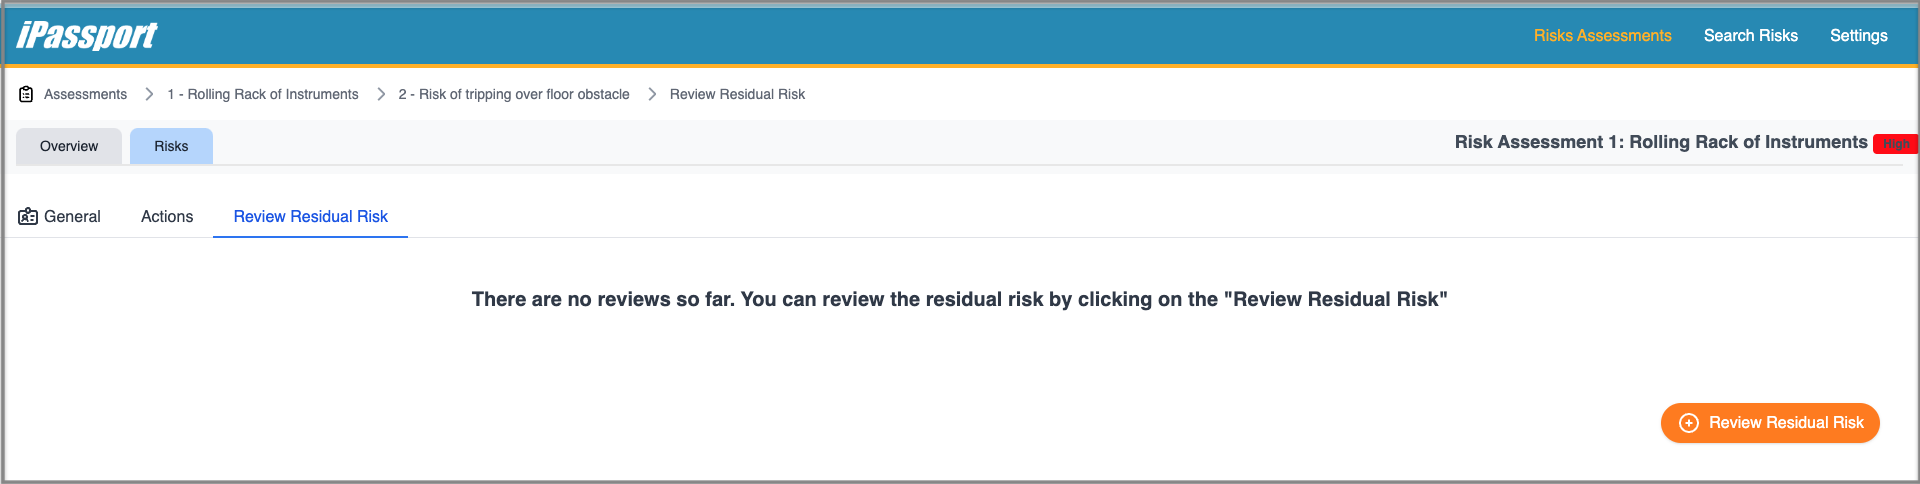
To preform a residual risk review:
- Open the Review Residual Risk tab
- Click the Review Residual Risk button
- In the new form which opens, enter new Y-axis and X-axis values, based on the actions taken to mitigate the risk (the new risk score will appear on the risk matrix)
- Scroll down to enter Residual Risk Comments and Residual Mitigation Notes as required
- Scroll further down to see the Actions taken into account
- Click Save ,in the bottom left corner of the screen, when all the required information has been entered
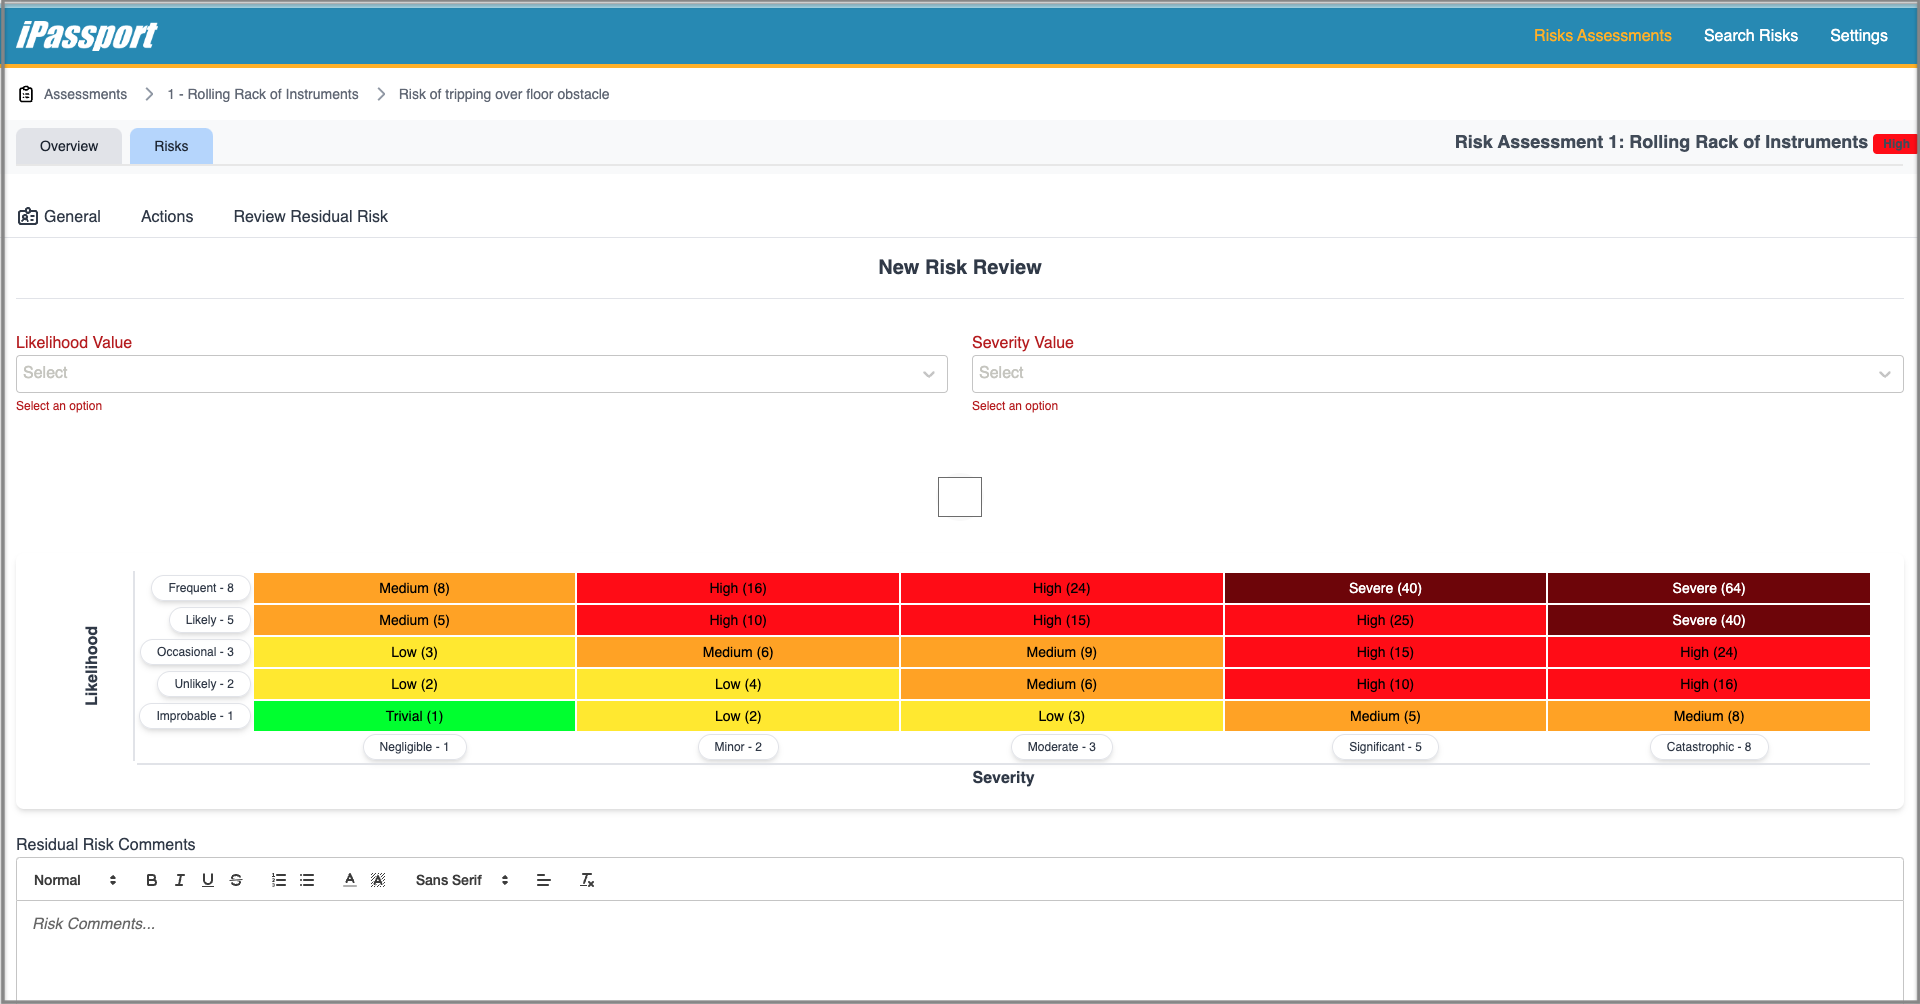
The latest residual risk review will be displayed on the risk table.
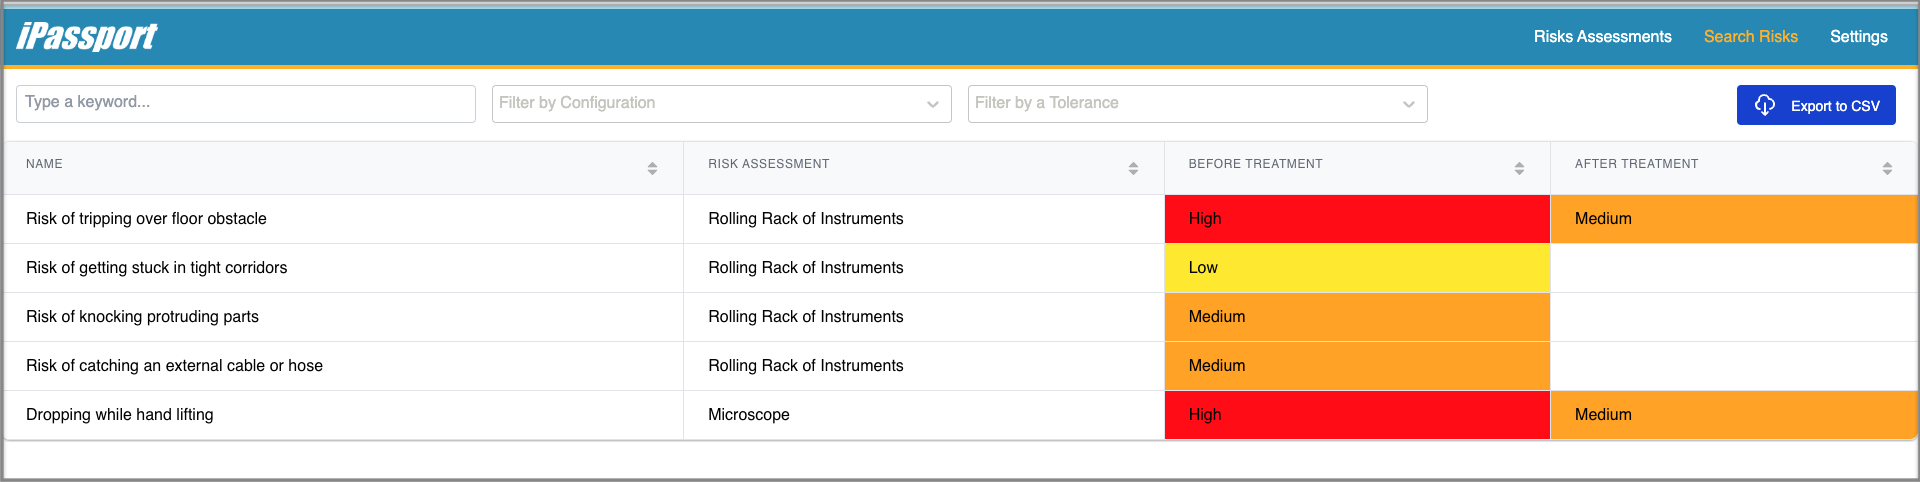
Search Risks Tab
The Search Risks tab collects all risks from all assessments and offers filters to locate and open any given risk record.
The search filters available are:
- Search - Type a keyword to bring up risk records which contain it
- Filter by Configuration - select an assessment configuration from the dropdown to bring up risk records which were created with that configuration
- Filter by Tolerance - three options are available from the dropdown menu -
- Not Set
- Acceptable
- Unacceptable
The results can be exported as a CSV report which can then be manipulated in Excel™ or similar.
NEXT STEP: Risk Assessment Templates
PREVIOUS STEP: Risk Assessments