- Standards Importer
Standards Importer
Introduction
Rather than manually setting up a Standard Set from scratch iPassport offers the ability to import Standards from a source file.
For information on setting up your source file ready to be imported please see Setting Up the Source File below.
Import a Standard
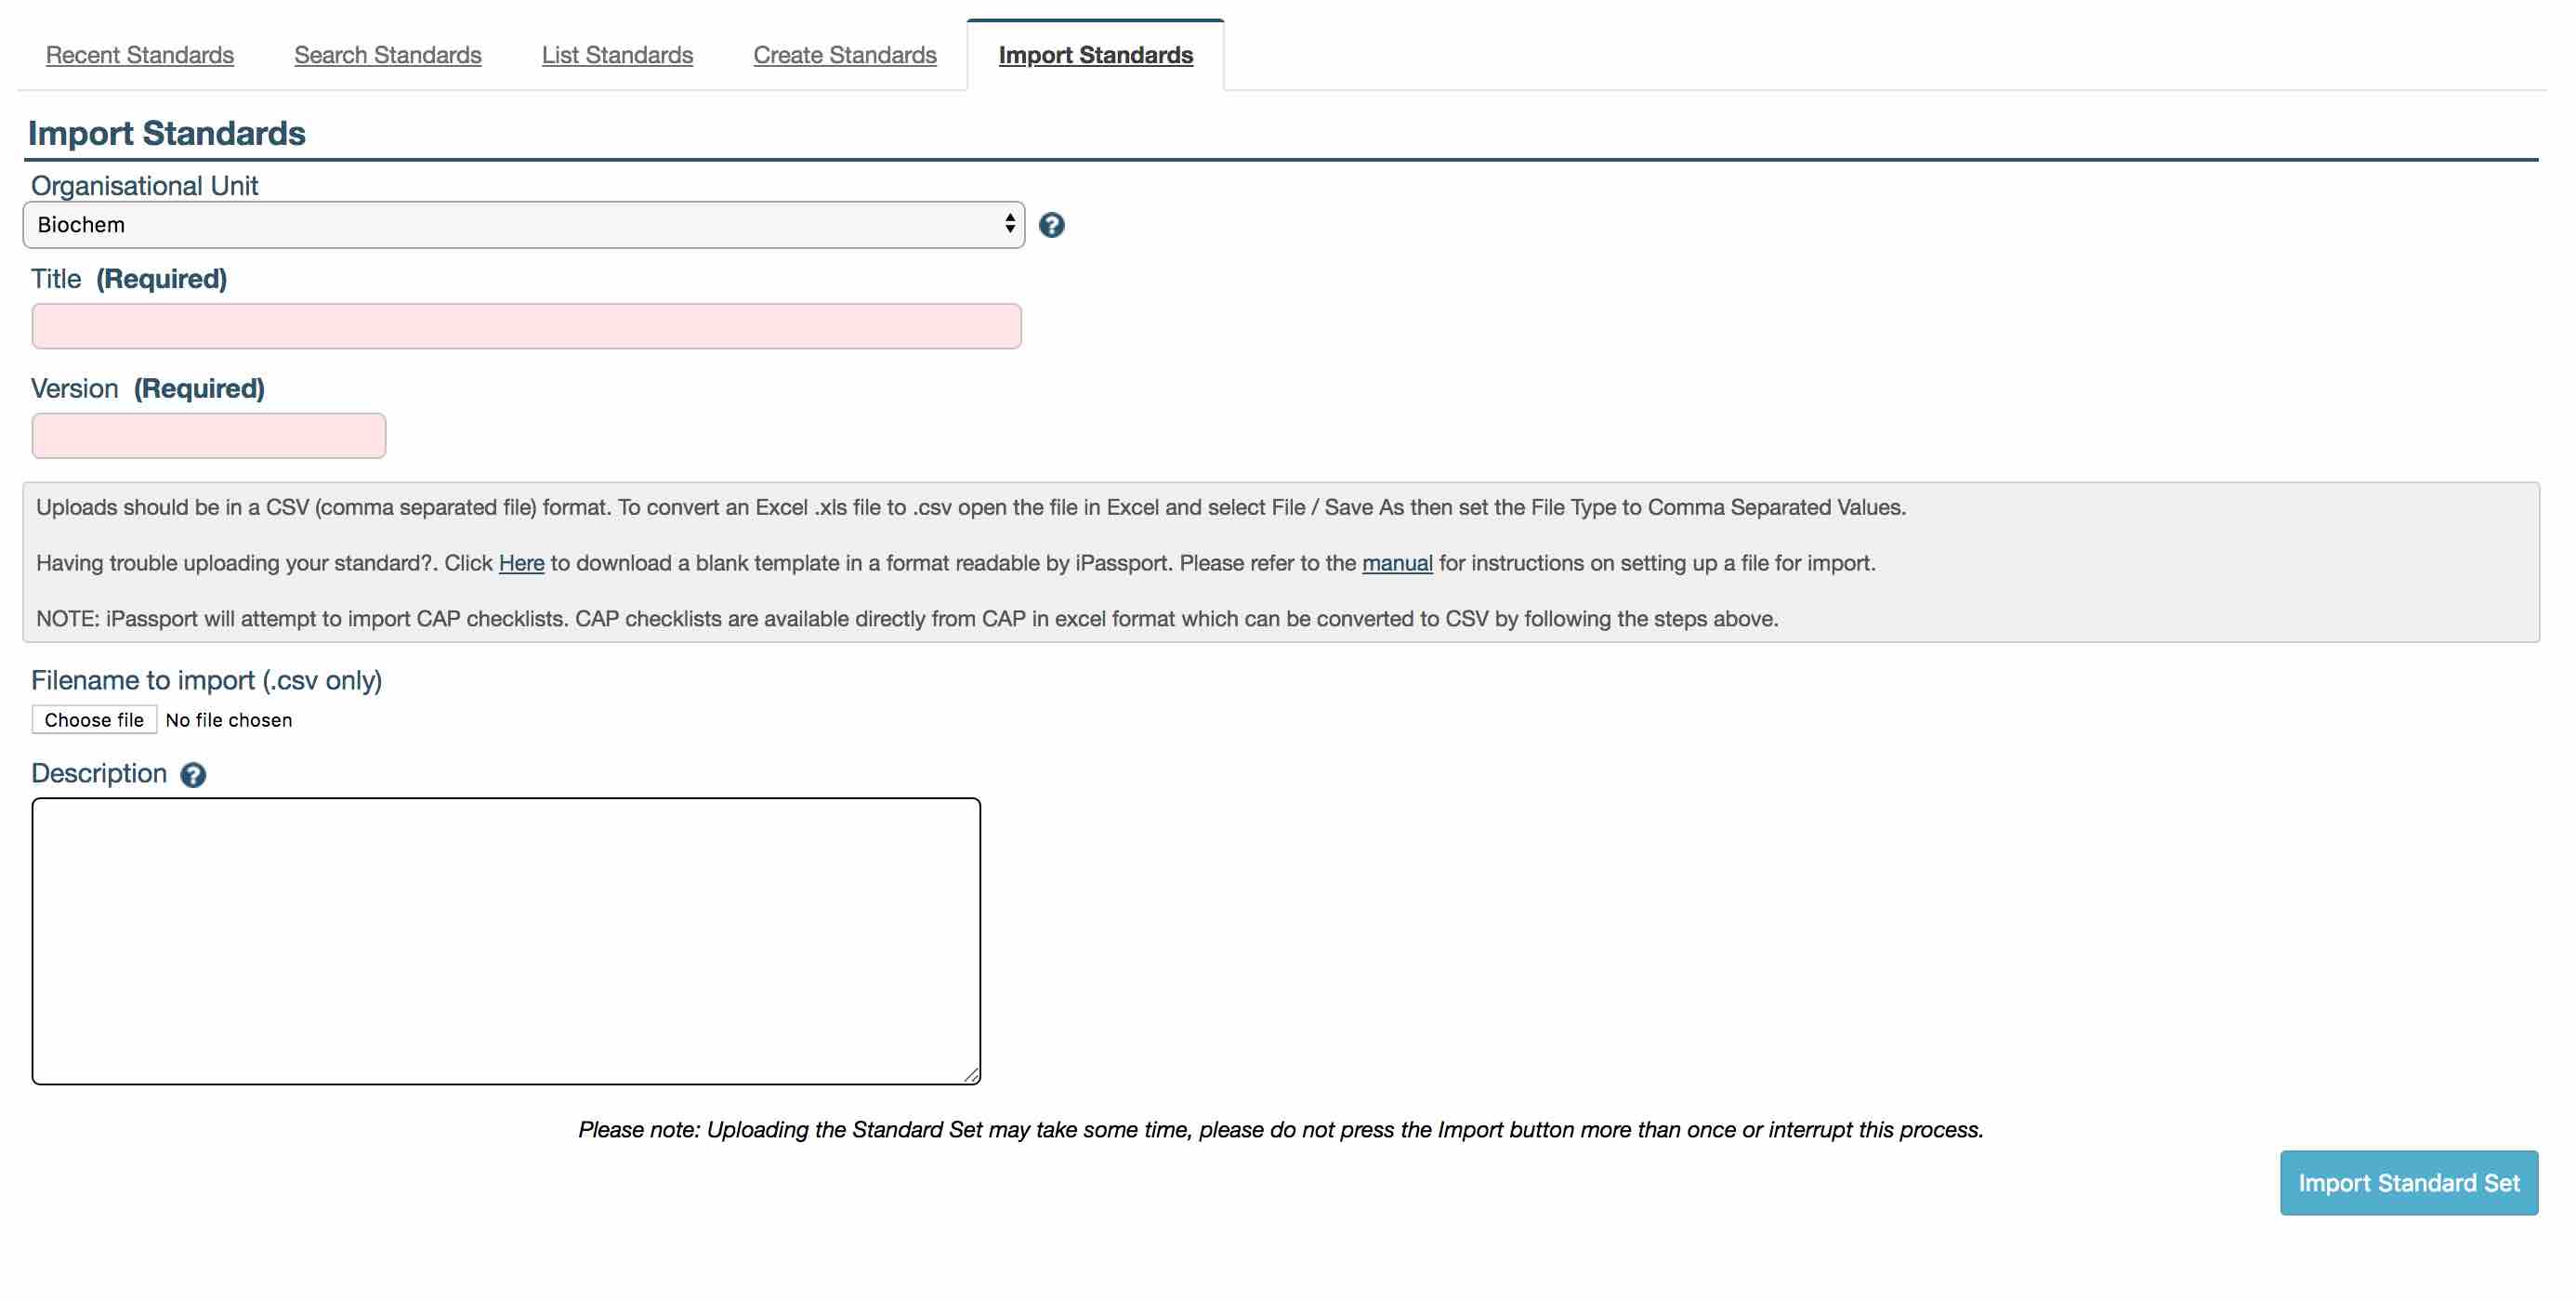
The Standards Importer tool is accessed via the main menu under Quality Management / Standards then click the Import Standard tab (permissions dependant).
- Organisational Unit
The initial OU for this standard. Standards can be copied into other OUs once imported successfully. This field is required.
- Title
This should be the name of the full standard set, for example “CAP Haematology Checklist”. This field is required.
- Version
This should be the initial version number of the standard set. This might be the date the standards were released, or a defined version number such as v2.1. This field is required.
- Filename to import (.csv only)
Here, the filename containing the standards should be selected. This field is required.
- Description
A brief description of the standard set can be entered here. This field is optional.
Once all the details have been filled in, click the ‘Import Standard Set’ button.
iPassport will check for any errors before importing, and will display an error if it cannot correctly read the standards file.
When the standards have been imported, they will appear in draft format in iPassport’s built-in standards editor, where minor modifications can be made before authorising the set.
Once you are happy with the set, it should be authorised (action menu > Sign off/authorise) which will then list this set for use within the system.
Configuring the Source File
iPassport does not support .xls or .xlsx (Excel) files. All standards must be in CSV format which can be created by going to File > Save As within Excel, then choosing ‘Comma Separated Values (.csv)’ from the format menu at the bottom of the dialog box.
iPassport accepts two different file layouts for file import: CAP Standards and our own custom structure.
Importing a CAP Checklist
The common format for CAP checklists is PDF. Customers are often not aware that CAP checklists are also available directly from CAP in Excel format.
To prepare a CAP checklist for iPassport’s importer:
-
Obtain the CAP checklist in Excel format
-
Make sure to request the “Long” version as the short version has an incompatible format
-
Convert the Excel file to a comma separated (.csv) file
To do this, open the file in Microsoft Excel and save as a Comma Separated Values file as described above.
Please note that exact menu options will vary between versions of Excel. If in doubt, please contact your local IT Department. -
It isn’t necessary to remove the top rows containing metadata as long as the column headings below are present and correct
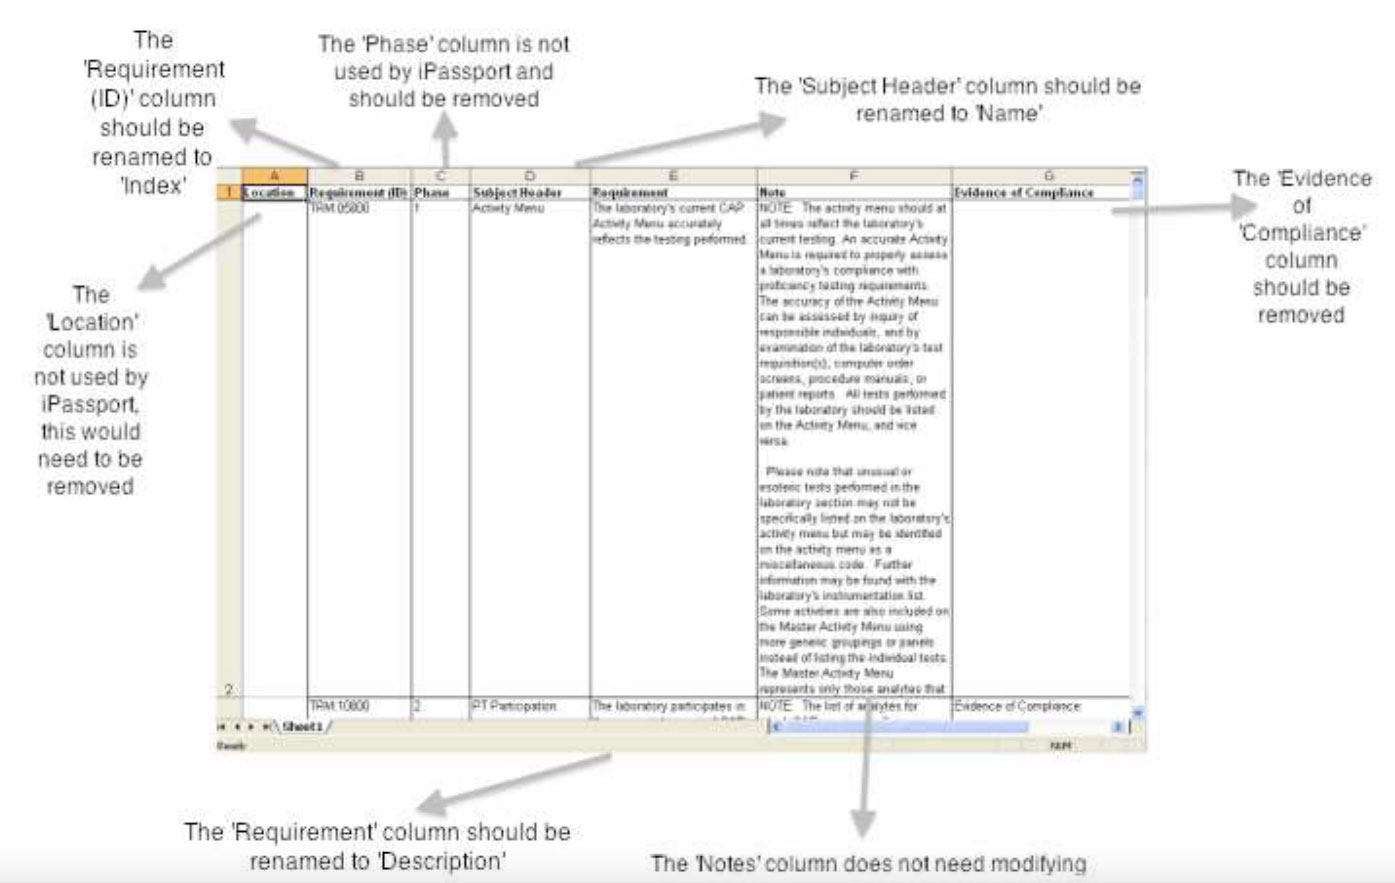
The file should only have 6 columns with the headings: | Requirement (ID) | Phase | Subject Header | Requirement | Note | Evidence of Compliance |
In October 2022 CAP released revised checklists that include an additional column to indicate if a written procedure is required to show compliance. The new CAP 2022 headers are: | Requirement (ID) | Policy/Procedure | Phase | Subject Header | Requirement | Note | Evidence of Compliance |
To import the CAP checklist:
- Navigate to Quality Management > Standards > Import Standards
- Click the Organisational Unit field and select the OU where the standard set will reside
- Enter a Title for the CAP checklist in the field provided
- Enter a Version for the CAP checklist in the field provided
- Click Choose File under Filename to import
- Locate and select the prepared CSV file in the browser that pops up
- Click Import Standard Set
Using the iPassport Custom Template
Genial Compliance developed our own template which can be used to import any standard checklist in the CSV format. Create a new Spreadsheet and enter the following column headings in the first row:
-
parent
-
heading
-
index
-
name
-
description
-
notes
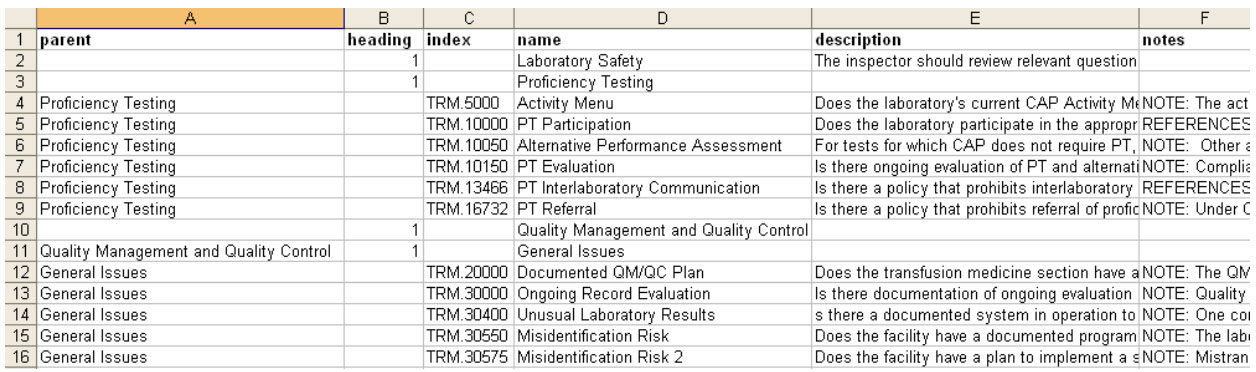
The columns should contain the following information, in the following order:
Parent This should be the parent item of the standard item, this enables a tree view to be formed. For example, the standard item “1.1 - Definitions” might have a parent item of “1 - Introduction”. Similarly, “1.2 - Specifications” might also be a child of “1 - Introduction”, in which case this field should also contain “1 - Introduction” in their parent fields.
If left blank, the item is assumed not to have a parent, and will be added to the main body of standard items. If no tree view is required, this field should be left blank for all items. Acceptable values are the exact value of the ‘name’ field of the parent item (e.g. 1 - Introduction, in the above example). If iPassport cannot find the parent item, an error will be generated.
Heading This denotes whether the listed item is there simply for organisational purposes. If it is, this can be marked as a heading and iPassport will ignore this when compliance is marked. Otherwise, the item is assumed to be a standard item, that is, one which can be verified and compliance checked against.
Acceptable values are one of the following: 1, 0, true, false, yes, no or left blank. 1, true or yes means the item is a heading (i.e. there for organisational purposes only); 0, false, no or a blank value means the item is not. Any other values than those defined will be rejected. If an item is marked as a heading, the name field becomes required. Names must be unique within the current branch, if a tree structure is used. If a tree structure is not required, the parent column should be left blank for all items. If the parent field is not left blank, a tree structure will be assumed.
Index This is the part which identifies the standard item, such as ABC.0001. This might be referred to by other names, such as reference, ID, code, or other such names.
Acceptable values must be fewer than 255 characters. This is a required field for standard items (i.e. items which are not defined as headers). All indexes should be unique within the standard set; iPassport will issue an error if this is not the case.
Name If the standard item is given a definitive title, this should be entered here. Acceptable values must be fewer than 255 characters. This field is optional for standard items, but required for items defined as headings.
Description The main body of the standard item, usually the text that constitutes the actual standard that is verified by an auditor. Acceptable values must be fewer than 64,000 characters (including notes field). This field is required for standard items, but optional for items defined as headings. Please note that formatting will not be retained, though this can be readded within iPassport’s built-in standards editor.
Notes Some types of standard lists provide a field for notes which may include bibliographies or helpful advice. iPassport will import any such notes as an addendum to the description field. Acceptable values must be fewer than 64,000 characters (including description field). This field is optional for all items. This field may be named Notes or Note (i.e. with or without plural). Please note that formatting will once again not be retained.
Editing the files to fit iPassport’s format
Your compliance authority may have issued CSV files which will have slight differences to those that iPassport can read. In order that iPassport can read the files, the original CSV files will need to be modified slightly. This can be done easily within Microsoft Excel, where the document will be presented in a spreadsheet format. In most cases, the modifications will involve adding the parent and heading columns to the left of the spreadsheet and modifying the column header names to match those required by iPassport. Some extra columns which iPassport does not use may also need to be removed; also if the columns are not in the correct order as required by iPassport, these will need to be moved into the correct place.
Note that column header names are not case sensitive, so it does not matter if Name or name is used, for example. Once the modifications are complete, the spreadsheet should be saved (as a CSV file) and can then be imported into iPassport.
Other File Structures
For any other structures, customers can provide the data to us and we will investigate writing it into the importer. Standards should ideally be in a CSV file or similar.
Upgrading Standards
When a new version of the Standards is released, the original standard set can be upgraded. This can either be done manually or by file import.
Manually Create New Version
-
Open up the standard set within iPassport, and select Create New Version from the actions menu (permissions dependent). This will create a new draft version of the set that can be modified. Most authorities have release notes with their standard sets explaining what has changed since the last release. This can be used to modify the parts of the set that have changed, allowing you to retain any linked items and compliance status on any part of the existing set.
-
Once authorised (action menu > Sign off/authorise), the original set will be archived and the new set will now be the current set used. Any other copies of the original set can be easily upgraded from this point - simply enter the set in iPassport and a new option will appear in the action menu to upgrade the set. All modifications made to the originally modified set will be copied to these other versions with all links and compliance statuses kept intact.
Create New Version from File Import
iPassport allows the new version of a Standard Set to be imported directly from a CSV file, as is possible when creating a new Standard Set from an import.
Open the current version of the Standard via the Quality Management / Standards main menu items. Then select Create new version from Import from the Standard’s Actions drop down menu.

The Create New Version lightbox will open.
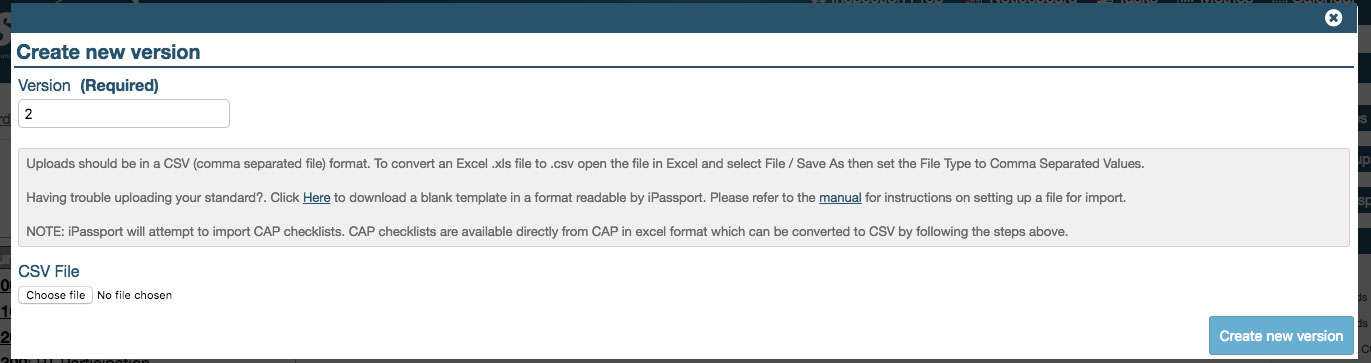
Enter a new version number and select your source csv file then click Create new version. There will be a short delay while iPassport processes the input file, after which the version comparison lightbox will open.
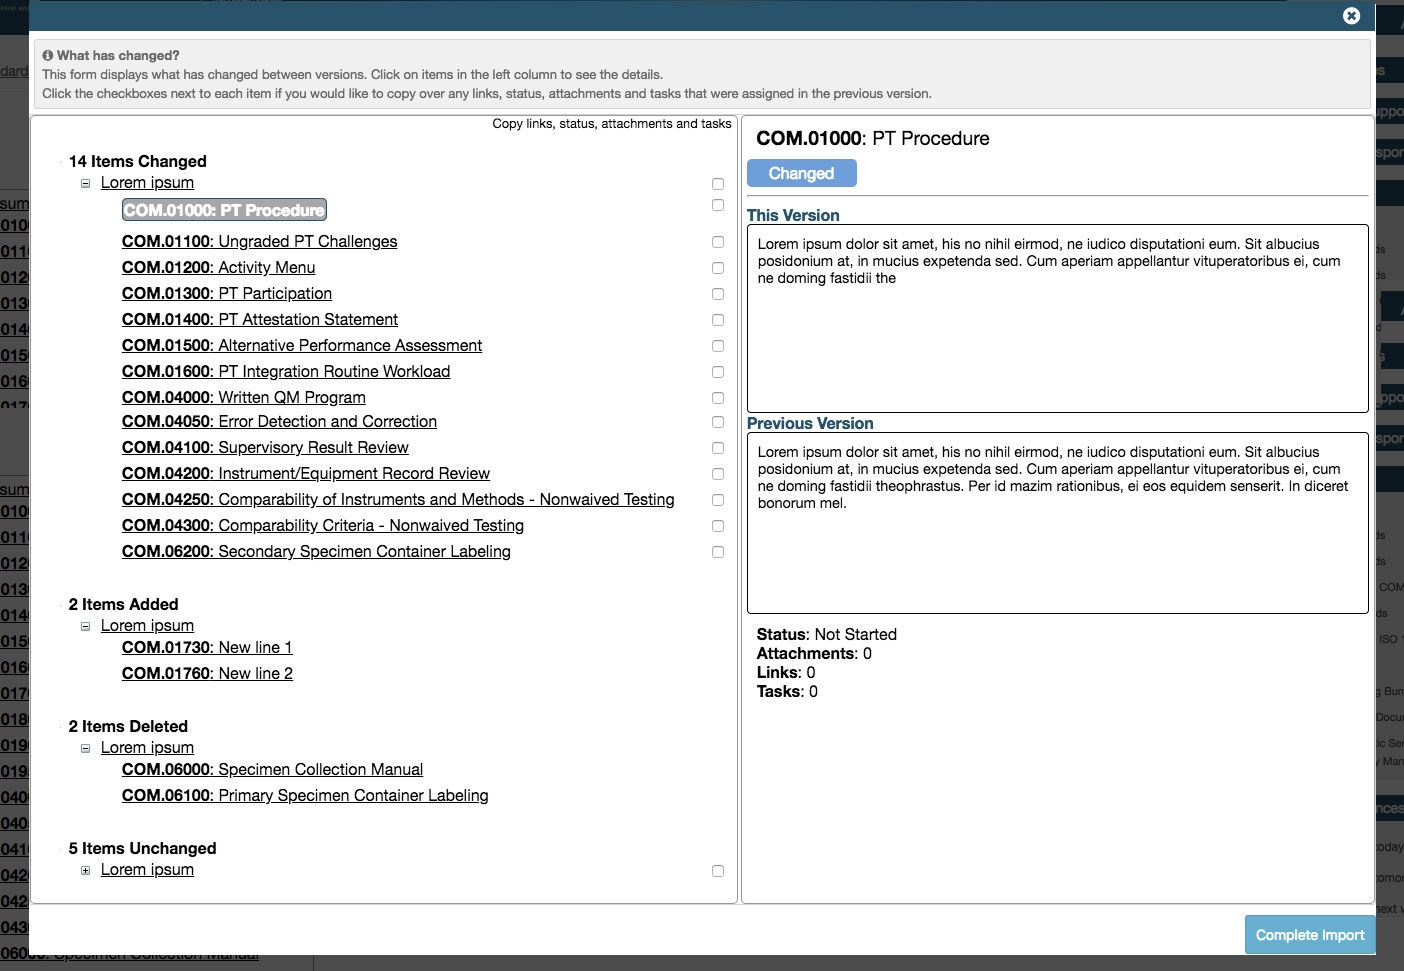
At this point the new version has been successfully created and exists as a Draft Standard Set within iPassport. This version comparison screen details what has changed between versions and allows the opportunity to copy over any links, status, attachments and tasks from the previous version.
Select a row in the left pane to view details about what has changed on this row.
To copy over links, status, attachments and tasks from the previous version check the checkbox next to the appropriate row. Selecting a checkbox in a header row will select/deselect all items within that section.
Click the Complete Import button to complete the process and copy any selected content from the old version to the new draft.