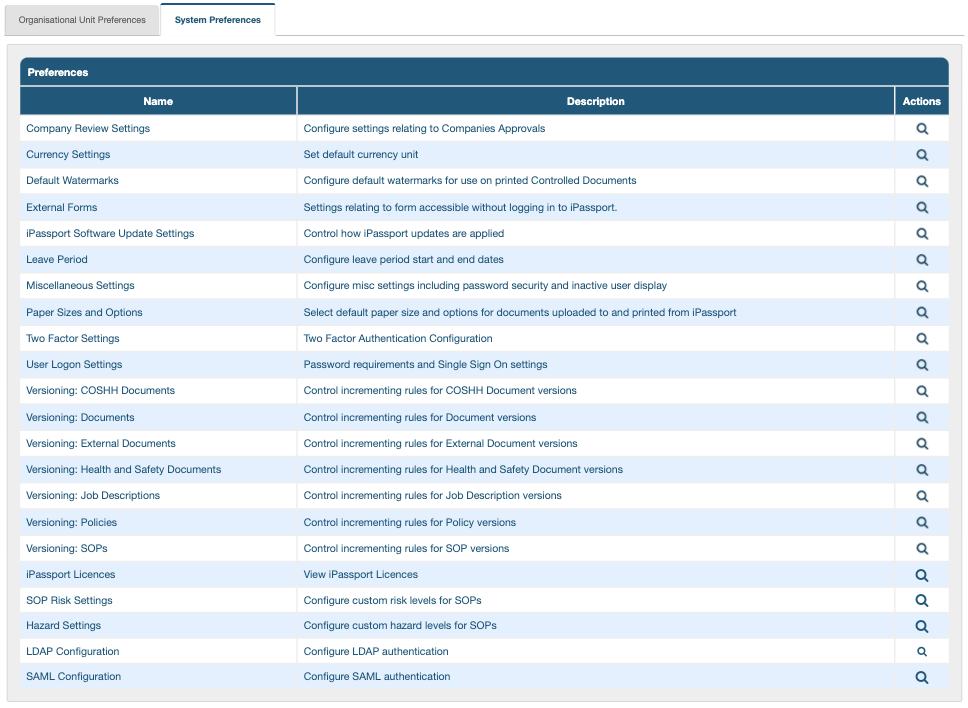
- System Preferences
System Preferences
These preferences are global and affect all records, across all OUs:
- Company Review Settings
- Currency Settings
- Default Watermarks
- External Forms
- Leave Period
- Miscellaneous Settings
- Paper Sizes and Options
- Two Factor Settings
- User Logon Settings
- Versioning: COSHH Documents
- Versioning: Documents
- Versioning: External Documents
- Versioning: Health and Safety Documents
- Versioning: Job Descriptions
- Versioning: Policies
- Versioning: SOPs
- iPassport Licences
- SOP Risk Settings
- Hazard Settings
- LDAP Configuration
- SAML Configuration
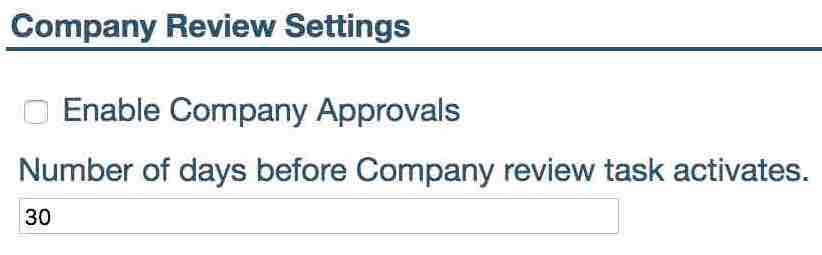
Company Review Settings
The company review settings allows admin to enable the company’s review feature found within the Company record and set-up a company review reminder.
To activate the company reviews feature, simply check the ‘Enable Company Approvals’ option.
‘Number of days before Company review task activates’ determines how many days before a Company Review Task’s due date is activated and starts sending out reminder emails.
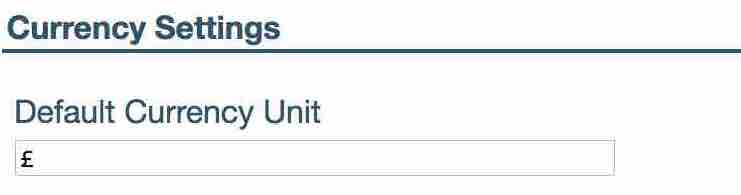
Currency Settings
The currency setting allows admin to set the currency of their system. The currency selected here will be displayed in all of the fields that use a currency within the system.
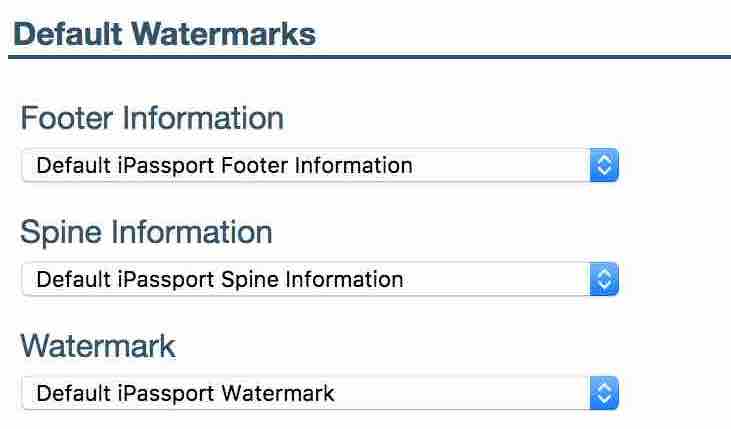
Default Watermarks
The Default Watermarks setting allows admin to choose which watermarks are to be added by default to controlled documents within their account. However, each individual OU can be overridden with their own preference using the Organisational Unit Preferences: Watermark settings
Watermarks are added to the system by the iPassport administration team. Should a different watermark be required, contact support at [email protected].
To select a watermark for a particular area, expand the menu option.
Watermarks are broken down into three elements, all of which are changeable via drop-down lists.
- ‘Footer Information’ appears along the bottom of a document, or at the top of the document depending on settings.
- ‘Spine Information’ appears along the side margin of a document.
- ‘Watermarks’ appear over the top of a document’s text, e.g. displaying ‘draft’ or ‘uncontrolled’ so that these documents cannot be mistaken for authorised, controlled prints.
This setting will only apply to new OUs, or documents that do not already have an option set. Changing this setting will not change any individual options already set in the OU settings area.
External Forms
There are external forms available for users and non-users of iPassport to report Incidents, Non Compliances and Change Control Requests. The forms can be enabled or disabled according to company practices. If they are enabled, it is necessary to declare a default Organisational Unit to ensure all the forms have an initial landing place. The system automatically loads the account’s default OU (assigned when the account is first created) so that no submitted forms are left unattended but, this can be adjusted to suit the organisation’s procedures.
To set up availability of external forms:
- Click inside the field, “Default OU for externally reported…”, according to which of the forms is being enabled
- Select the appropriate OU from the dropdown menu
- Tick the checkbox next to the corresponding option, “Enable External Form for…”
- Click Save before navigating away from the page
The links to the forms can be circulated as required; they are created by adding an extension to the account URL:
- ‘/request_changes’ (e.g., https
:://TestLab.ipassportqms.com/request_changes ) - ‘/report_incident’ (e.g., https
:://TestLab.ipassportqms.com/report_incident ) - ‘/report_non_compliance’ (e.g., https
:://TestLab.ipassportqms.com/report_non_compliance )
 _______
[Back to menu at the top](#system-preferences)
### Leave Period
_______
[Back to menu at the top](#system-preferences)
### Leave Period
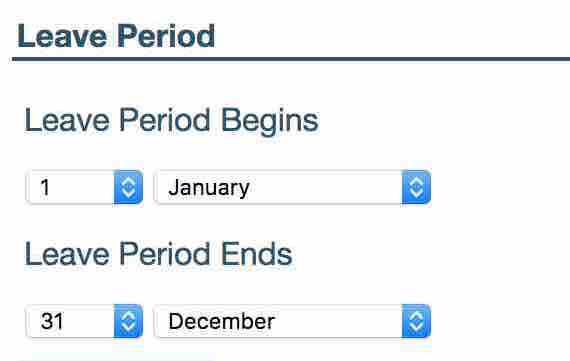
The Leave Period allows users to set when their organisation’s leave calendar begins and ends.
Miscellaneous Settings
The Miscellaneous Settings cover global user settings; there are 11 variables administrators can manage in this section.
The ‘Allow new users to contact Genial Compliance iPassport Support by default’ setting determines whether new users will be able to contact iPassport support by default. The ability to contact iPassport support can be enabled/disabled on existing user accounts via the Can Contact Support? option in the User record.
The ‘Default Time Zone’ setting provides a comprehensive dropdown list of standard time zones. The zone selected will be used to calculate the local time of every transaction logged by the system.
The ‘Disable emailed documents upon download’ setting allows admin to choose if they would like any documents, that they have emailed, to become disabled once the recipient has completed their download. This prevents the recipient from downloading it more than once, assisting in keeping the information secure.
The ‘Display note on login page?’ setting allows adding a message that will be displayed on iPassport’s login page.
The ‘Enable Document Importer’ setting enables a feature that allows importing/uploading multiple documents at once. It’s available to users with permissions to create and authorise documents of the type they wish to import, in the OUs where they intend to place them.
The ‘Enable Local File Links’ setting allows making links to files on the local network of the organisation. These links are static and must be managed by administration if the files are moved to another location.
The ‘Enable option to Request Authorisation’ option must be ticked for the Request Authorisation button to be available. When used, this feature allows an editor to adjust the review settings and inform directors that a document is ready for authorisation. Directors will then only need to click one button to complete the operation.
The ‘Enable Simple View’ setting allows you to specify whether simple view should be available or not across the entire account. This is a cut back view of the system, tailored for ease of use by those who are just wanting to complete a task assigned to them or search for content.
The ‘Require Password to Upload New Signature’ setting adds security to the ‘Signature’ tab on a User record. This tab allows a user to upload a scanned signature, which can then be included on controlled prints etc. With this setting enabled the user must enter their password when uploading a new signature in order to verify their identity. Note that enabling this setting means that only the user will be able to upload their own signature. If an iPassport administrator would like the ability to upload signatures on behalf of users then this setting should be disabled.
The ‘Send all unrouted mail to account administrator’ tells the system that if a user does not have an email address stored, their emails will be sent to the account administrator. This administrator address is stored in the parent system so please contact [email protected] for details.
The ‘Send support requests to’ allows admin to set the recipient email address for any user using the ‘Contact Support’ button in iPassport. This means support requests can be handled internally. The email address can be a group email address.
The ‘Show Inactive Users in lists’ setting allows admin to either show any user that has been inactivated on the system within all users list, or to have these inactivated users excluded from their system user lists. If the box is checked then inactive user will be displayed in the system user lists.
The ‘User Session Timeout’ setting defines the period of inactivity (in minutes) that a user has before the system logs them off automatically.
 _______
[Back to menu at the top](#system-preferences)
### Paper Sizes and Options
_______
[Back to menu at the top](#system-preferences)
### Paper Sizes and Options
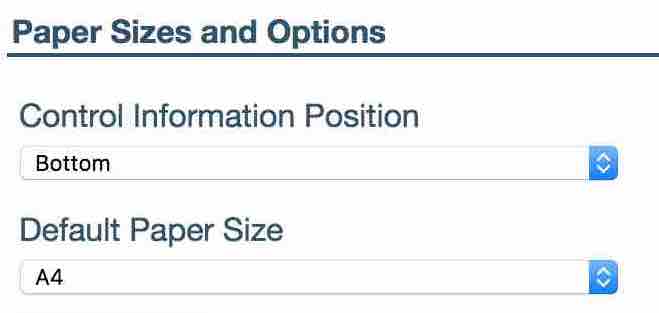
This setting allows admin to choose what paper sizes they are using as their source documents within iPassport. It is possible to move the control information from the footer (default, and traditional) to the header.
Two Factor Settings
Two factor authentication allows an additional level of security to guard against password theft. When logging into iPassport, in addition to entering a username and password, users will have the option of receiving a code via email or through an ‘authenticator’ app. They will then need to copy and paste this code into the field in order to access the system.
To configure this feature, settings need to be adjusted in three places, as detailed below.
System Preferences for Two Factor Settings
When using two factor authentication, administrators can choose to use code validation each time a user logs in or only use it to check after a set number of days. For example, the system can be set to ask users to verify their identity using the 2-factor authentication once a week. The rest of the time they can login normally.
The first step is to enable this feature:
- Navigate to ‘Administration > Settings > System Preferences > User Logon Settings’
- Scroll down to locate the ‘Login Strategy’ field, click it and select ‘2-Factor Authentication Login’ from the dropdown menu
The second step is to adjust the 2-Factor settings:
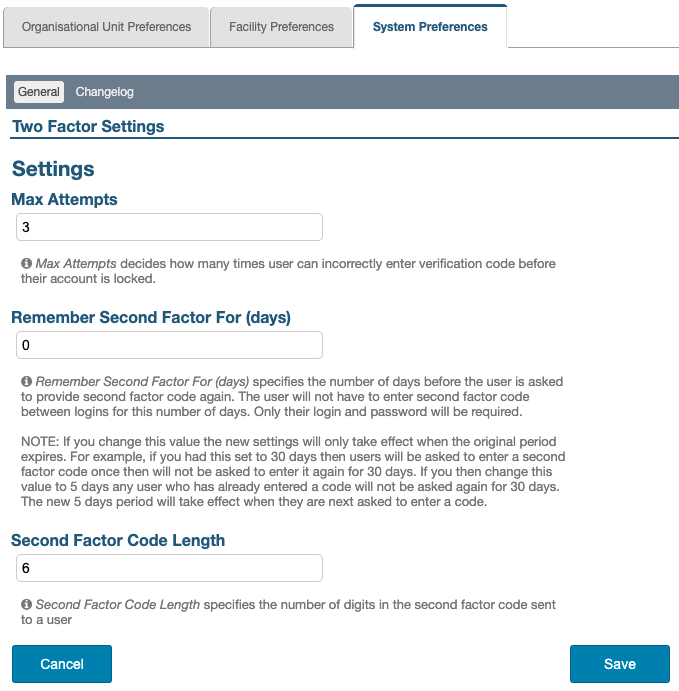
- Navigate to ‘Administration > Settings > System Preferences > Two Factor Settings’
The following preferences are available:
-
‘Max Attempts’ - defines how many times a user can incorrectly enter the verification code before their account is locked
-
‘Remember Second Factor For (days)’ - specifies the number of days before the user is asked to provide second factor code again. The user will not have to enter second factor code between logins for this number of days. Only their login and password will be required.
If this value is changed the new settings will only take effect when the original period expires. For example, if this was set to 30 days then users will be asked to enter a second factor code once and then 30 days later and so on. If admin then change this value to 5 days, any user who has already entered a code will not be asked again for 30 days. The new 5 days period will take effect when they are next asked to enter a code.
-
‘Second Factor Code Length’ - specifies the number of digits in the second factor code sent to a user.
Finally, the third step is for each user to choose whether to receive the validation code by email or through an ‘authenticator’ app.
Configuration of an ‘authenticator’ app in ‘My Profile’
Once the general rules are set up for the whole account, each user can adjust their login strategy in the ‘My Profile’ area. If they do nothing, they will receive an email with the validation code when required; alternatively, they can set up an app to provide the code. Please click the following link to view instructions for this in the ‘Configure 2-Factor Authenticator App’ section of the user guide, ‘Personal Preference Management’.
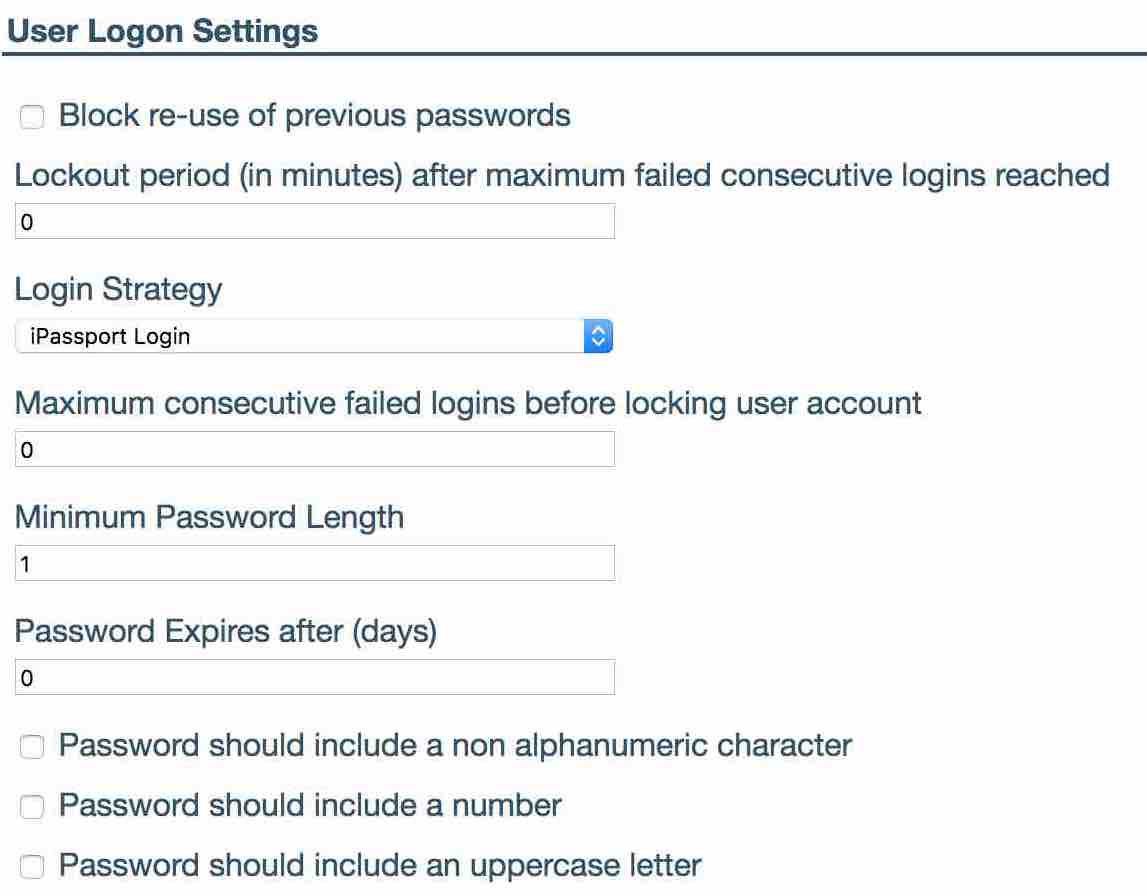
User Logon Settings
-
‘Block re-use of previous password’. Once checked ensures that a user can never use a password that they have previously used within iPassport.
-
‘Lockout period (in minutes) after maximum failed consecutive logins reached’. If a ‘Maximum consecutive failed login before locking user account’ value is set then admin can define here the time period used to lock the user out, after they failed to login after maximum number of times, before allowing them to try again
-
‘Login Strategy’ sets which strategy will be used to log users in. This applies to the whole account.
- iPassport Login - this consists of a username and password as seen before.
- 2-Factor Authentication Login
- LDAP
- SAML/ADFS
-
‘Maximum consecutive failed logins before locking user account’ admin can set how many consecutive failed logins a user can perform before being locked out of the system. If a Lockout period is set then the system will unlock the user’s account after this time has passed or admin can unlock the user.
-
‘Minimum Password Length’ is used to configure the minimum number of characters in a user’s password.
-
‘Password Expires after (days)’ is used to force users to change their passwords after a given number of days. Use 0 if the password should never expire.
-
‘Password should include a non alphanumeric character’ forces the user’s password to contain at least one special character (@&<= etc).
-
‘Password should include a number’ forces a user’s password to contain at least one number.
-
‘Password should include an uppercase letter’ forces a user to have at least one uppercase letter in their password.
Versioning: All Controlled Documents
This feature allows setting the rules to automatically define the next version number of a controlled document. A new version number can follow a major revision or a minor revision of a document. iPassport version numbers consist of a major version (the number left of the decimal point) for major revisions and a minor version (the number right of the decimal point) for minor revisions.
The example used here is for COSHH documents; there is a separate section for each type of document (Versioning: Documents, Versioning: SOPs, etc.).
Following popular convention, the version number looks like a real number but it’s not. The decimal point is only a separator between the Major Version and the Minor Version.
The minor version behaves like a natural number so “ver1.01” is the same as “ver1.1” and (with 0.1 increments) “ver1.9” is followed by “ver1.10”, not “ver2.0”.
These steps describe how to set the versioning of COSHH Documents (the same steps apply for all types of documents):
-
Navigate to Administration > Settings > System Preferences
-
Click in the Versioning: COSHH Documents row to open this section
-
Click the field under Colour of COSHH Document Notices to select the colour of notices for COSHH documents; this is optional, to help differentiate notices automatically created by the system for the Noticeboard
-
The COSHH Review Count allows admin to set how many times a document can undergo a review without requiring a change in version number; if it is left at “0” then there will be no limit to the number of reviews a document can have before the version needs to be incremented
-
The First Version Number can be edited for documents that have been freshly added to iPassport and already carry version numbering that wants to be retained
The default value for the First Version Number is 1.0.
To illustrate this element, an SOP could have already reached version 6.3 before it was first added to iPassport. The First Version Number could then be set to 6.3 (if no changes were made), 6.4 (if a minor revision was made) or 7.0 (if a major revision was made).Numbers entered should avoid trailing zeroes as they are not considered real numbers by the system. This means that the number after the decimal point should be a natural number (1,2,3,…) and not a decimal value like, 01 or 007.
If trailing zeroes are entered, they will be allowed in this section but they won’t pass validation by the system when the document is being authorised. -
Click the Minor Version Increments field to select an increment value of, 0.1, 0.2 or 0.5 for minor revisions
Minor Revisions will only increment the number to the right of the decimal point. For example, with an interval of 0.5, version 1.9 will be followed by version 1.14 and version 3.5 by version 3.10.
For legacy documents, a version number like 1.01, will be interpreted by the system as version 1.1. Therefore, with an increment interval of 0.1, any existing version 1.01 will progress to version 1.2 when next authorised.Major Revisions will only increment to the next whole number (the integer left of the decimal point). For example, version 1.0 will go to 2.0 and version 3.16 will go to 4.0).
-
Click Save before leaving the page
 _______
[Back to menu at the top](#system-preferences)
### iPassport Licences
_______
[Back to menu at the top](#system-preferences)
### iPassport Licences
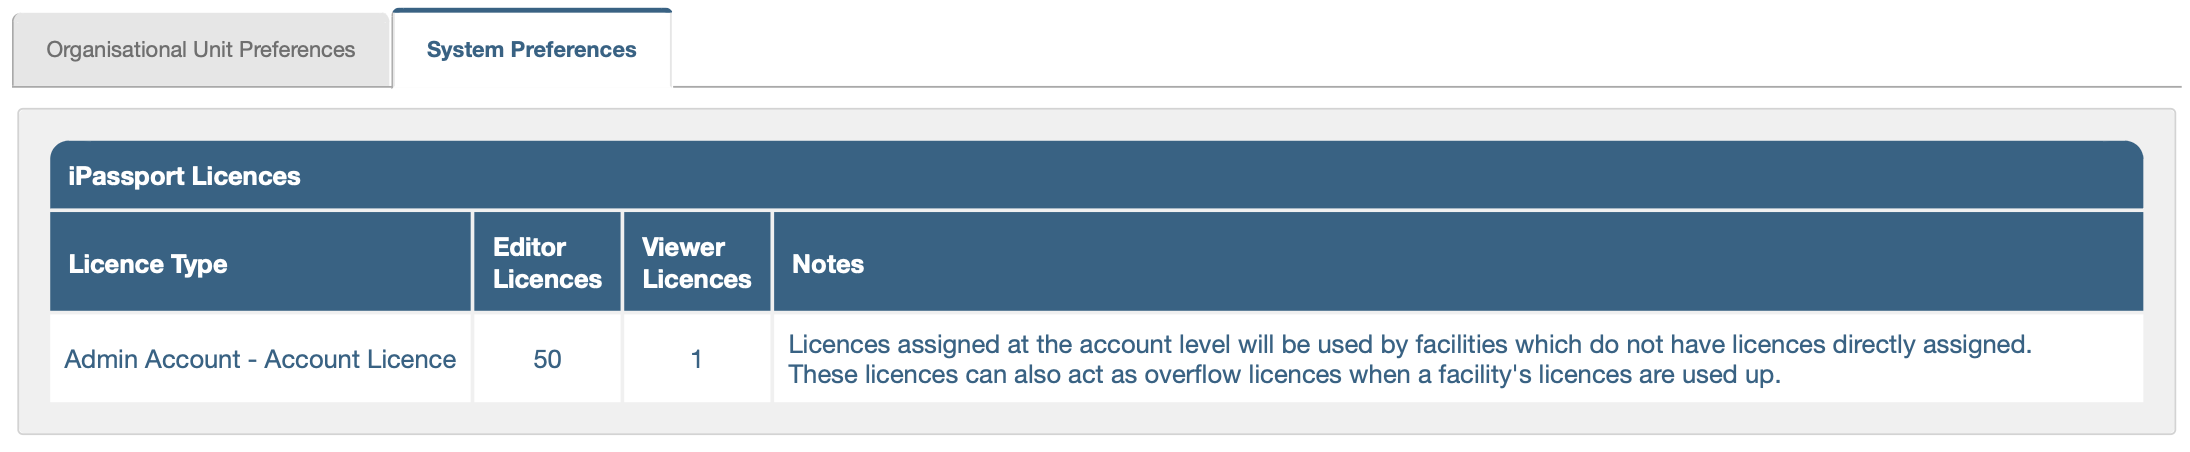
This page provides a summary of the number of licences currently assigned to the account. This is a read-only page and additional editor and viewer licences can be ordered from the Genial Compliance sales team, if required (please contact, [email protected]). The number of licences refers to the number of users that can be concurrently logged into the system; an account can have many more users than licences. Viewer licences can be useful as a lower cost option to provide access to basic users. Also, when all the editor licences are in use, the viewer licences are automatically made available to at least provide reading access to additional editors who log in.
 _______
[Back to menu at the top](#system-preferences)
### SOP Risk Settings
_______
[Back to menu at the top](#system-preferences)
### SOP Risk Settings
The SOP Risk Settings (not to be confused with Change Control, Risk Assessment Settings) allow admin to add and edit risk values, used for all SOPs in their account. These risk ratings are used in conjunction with the hazard settings (ratings) to generate an overall risk assessment for a SOP (a procedural risk assessment).
A user cannot delete system risk ratings on iPassport QMS.
The risk ratings work by having a ‘Risk Name’ and a ‘Risk Level’. The name is visible when trying to select the risk in the SOP, and the value is used to calculate the risk/ hazard assessment within the SOP.
The value is numeric from 1 – 10 with 1 being the lowest risk and 10 being the highest. An associated value is required for each risk name.
The assessment for each step of the overall risk assessment is calculated by the multiplication of the risk with the hazard to gain an assessment for each level (biological, chemical, mechanical and physical).
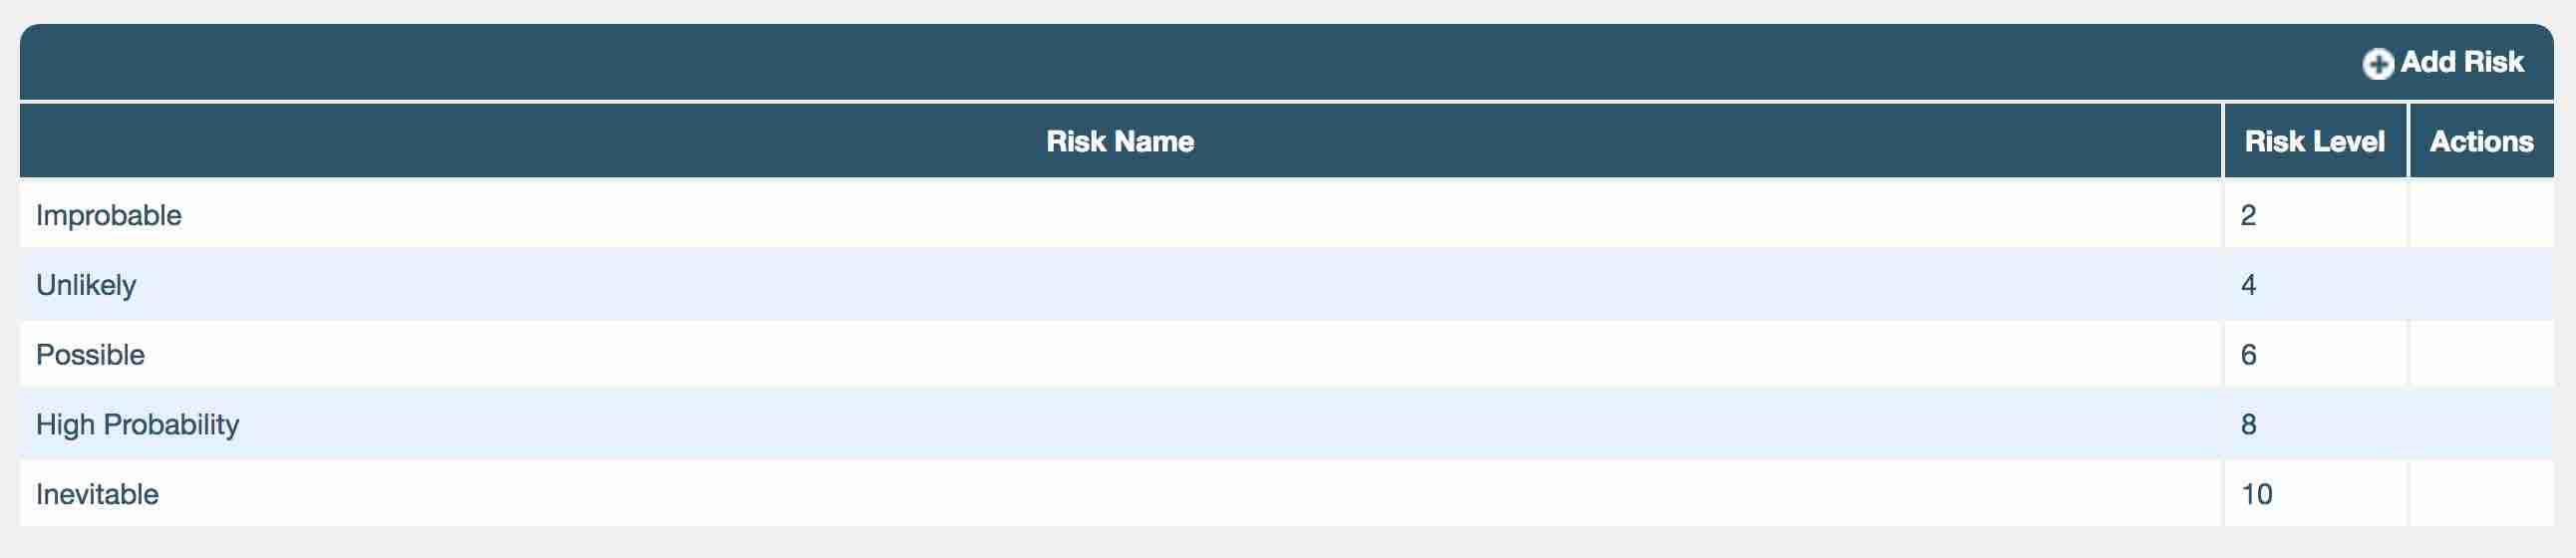
For example: an “inevitable” risk has a value of 10, where a risk rating of “unlikely” might have a value of 4. The user can set both the risk name and the level of all new risks.

Hazard Settings
The hazard ratings are used in conjunction with the risk settings (ratings) to generate a risk assessment for a SOP. The setting allows the user to edit the hazard values used and to add more hazard values.
A user cannot delete system hazard ratings on iPassport QMS.
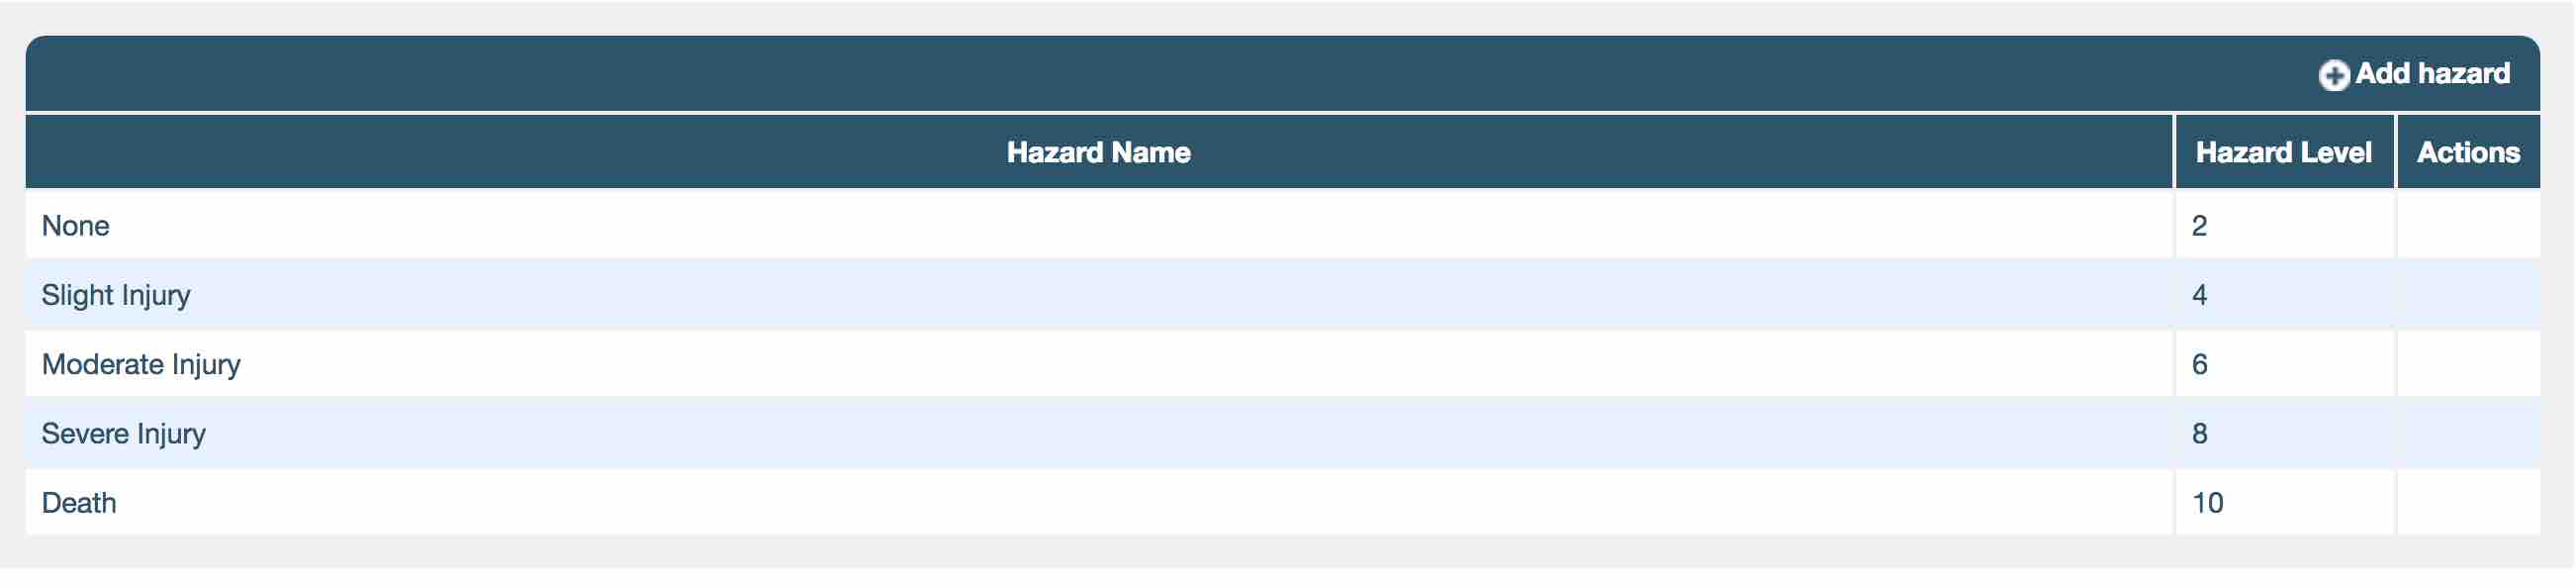
The hazard ratings work by having a ‘Hazard Name’ and a ‘Hazard Level’. The name is visible when trying to select the hazard in the SOP and the value is used to calculate the hazard/ risk assessment within the SOP.
The value is numeric from 1 – 10 with 1 being the lowest possible hazard and 10 being the highest. An associated value is required for hazard name.
For example: a hazard rating of “none” has a value of 1 or 2, where a hazard name of “death” might have a value of 10. The user can set both the hazard name and the level of all new hazards.

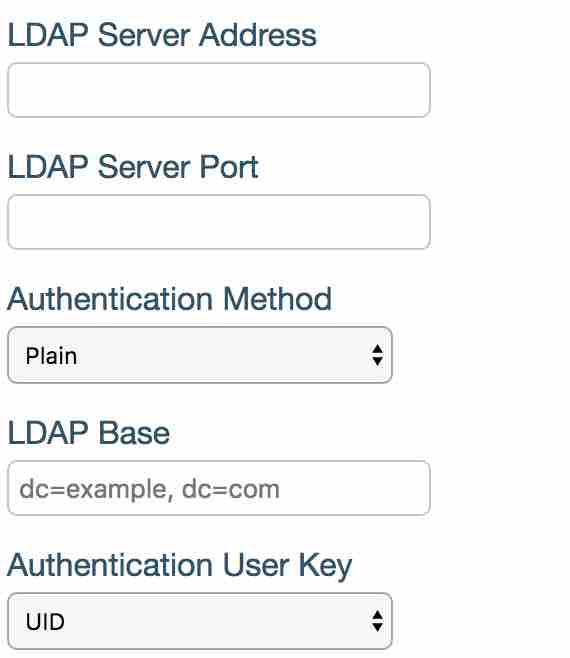
LDAP Configuration
If LDAP is already in use for other services it’s very easy to configure iPassport to also authenticate users.
- ‘LDAP Server Address’ is your LDAP domain name/IP address.
- ‘LDAP Server Port’ is your server’s port number.
- ‘Authentication Method’ is how login details are sent over to the server. ‘Plain’ method sends user name and password in plain text whereas the other two options encrypt the information.
- ‘LDAP Base’ is the base that will be added to user lookup when performing authentication.
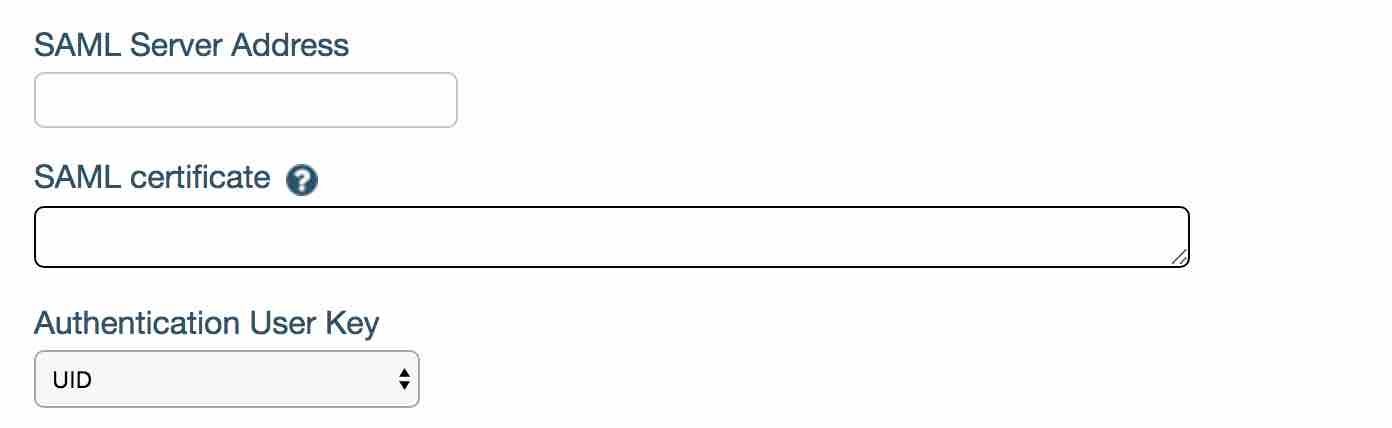
- ‘Authentication User Key’ is the unique user identifier in iPassport.
Please contact Genial Compliance- [email protected] before implementing this feature.
SAML Configuration
Please contact Genial Compliance- [email protected] for more information on this feature.