- NC Actions
Non-Compliance Actions
The normal process to resolve a noncompliance within iPassport is to assign one or more ‘actions’ for users to rectify the issue and prevent it from happening again. A verification step can be added to each action so that someone can confirm it was completed correctly.
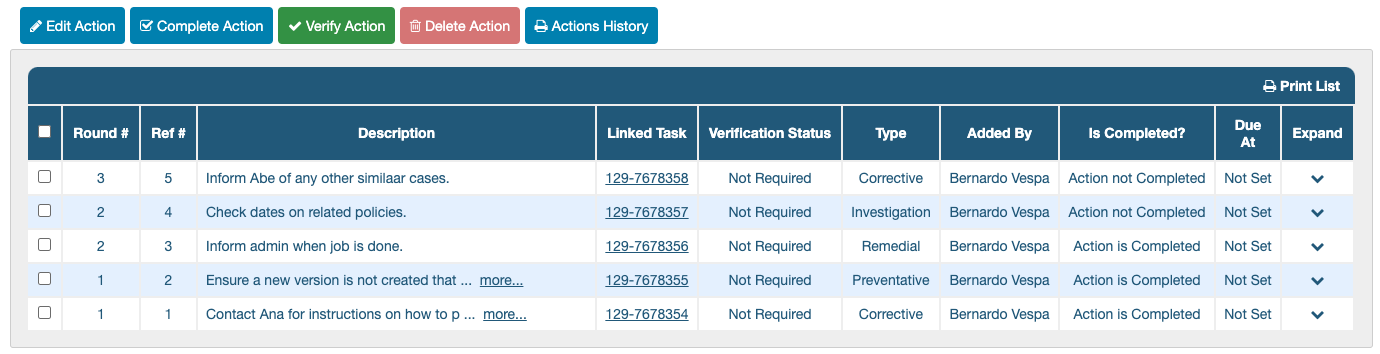
The Actions tab is where all this activity is concentrated.
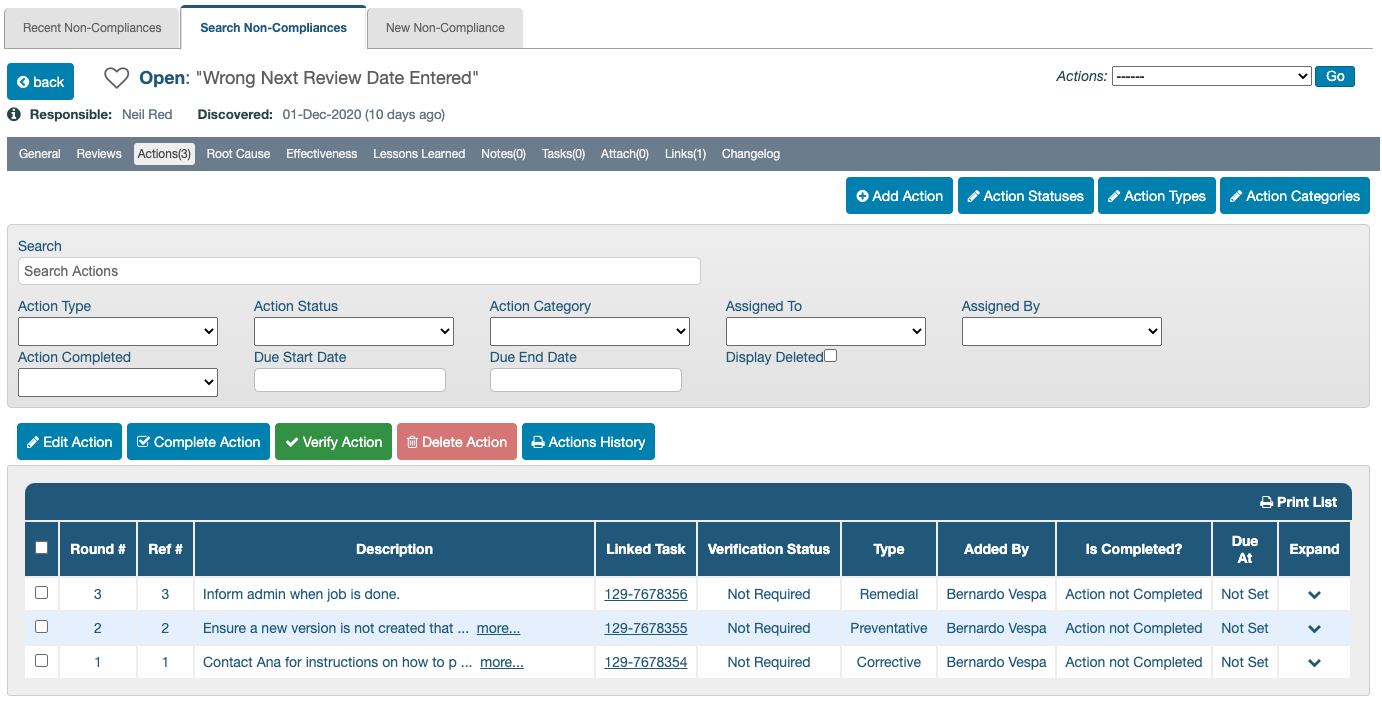
Actions can be organised in successive rounds to set an order of events. These rounds are displayed in an intuitive workflow diagram in the General tab. The name of the person responsible is displayed in every action; clicking it opens a lightbox with details of the action. When an action has been completed, its box turns from blue to green; when all the actions in a round have been completed, it turns green as well. Tasks will be issued for all the actions but the system will prevent users from completing them out of order.

Actions can be classified with three parameters - ‘Action Statuses’, ‘Action Types’ and ‘Action Categories’. These consist of user editable options but both the ‘status’ and ’type’ lists already come with a few basic system default options which can’t be edited. The next section explains their purpose and how to manage them.
Action Statuses, Types and Categories
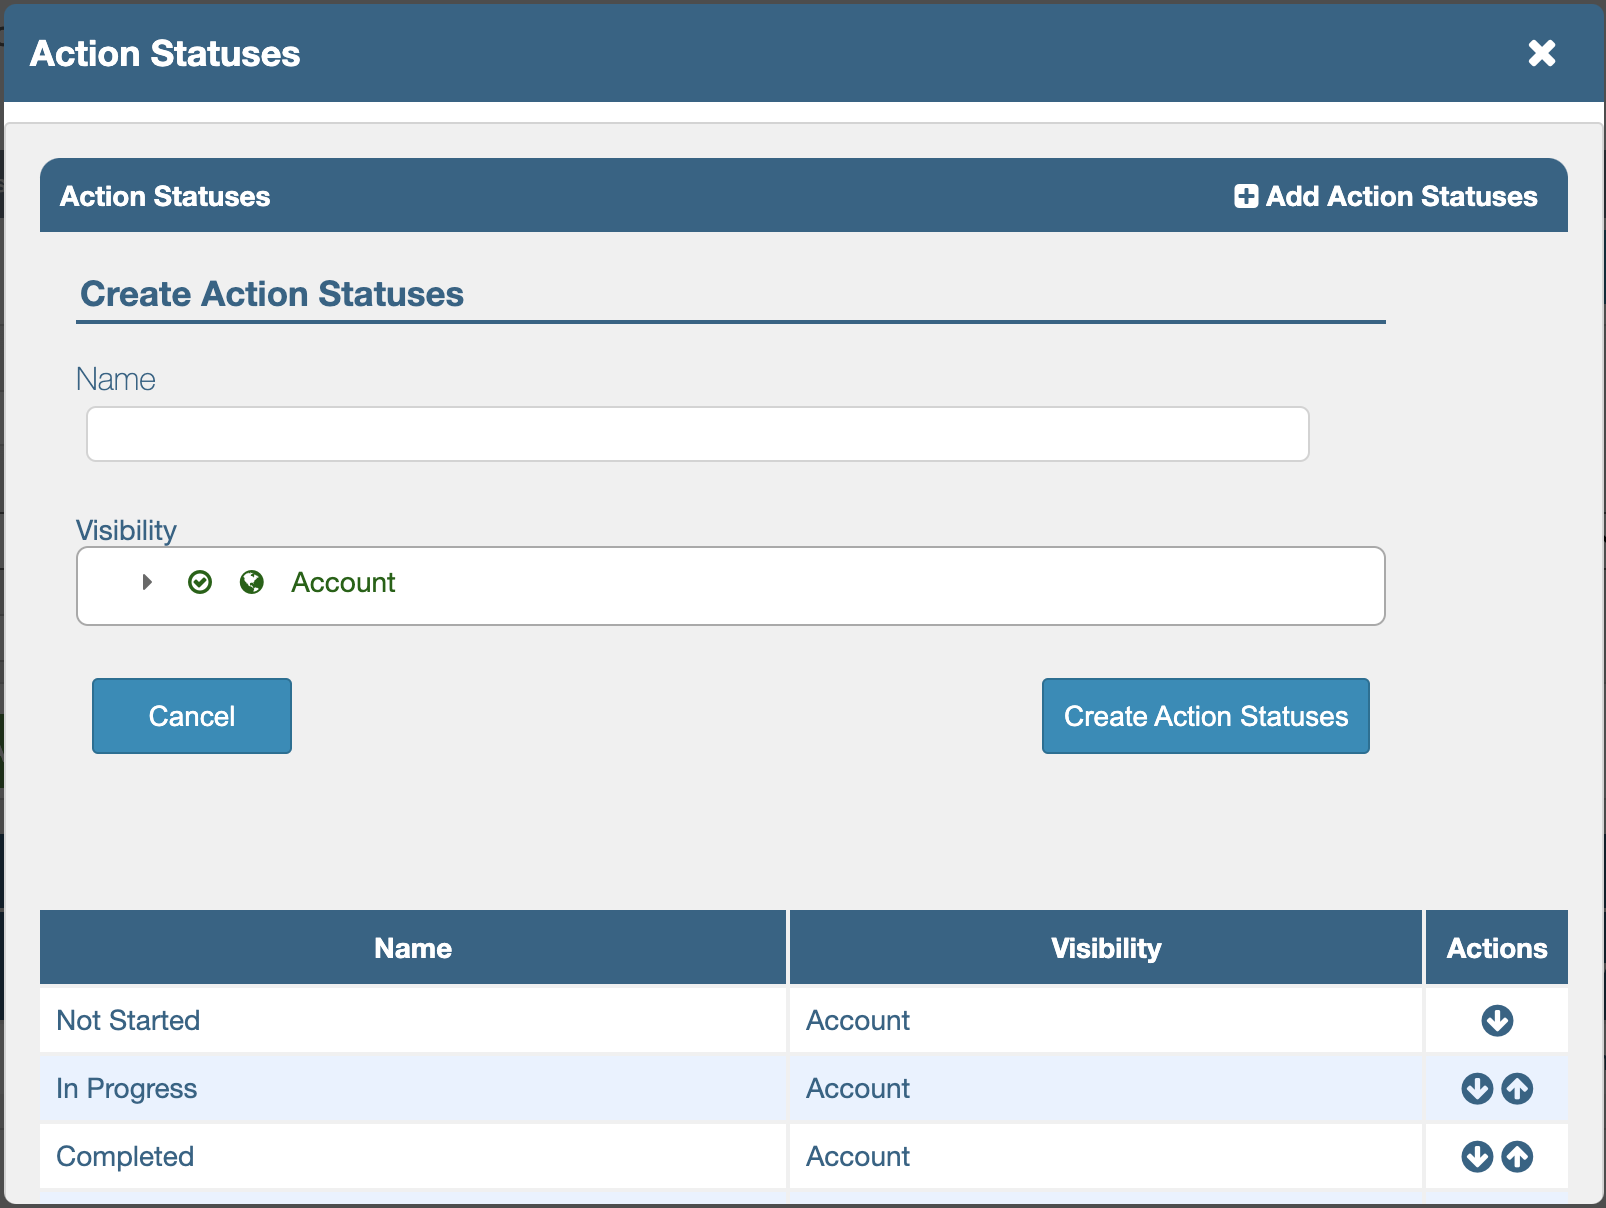
The status of an action allows following its progress; the default options are, “Not Started”, “In Progress” and “Completed”.
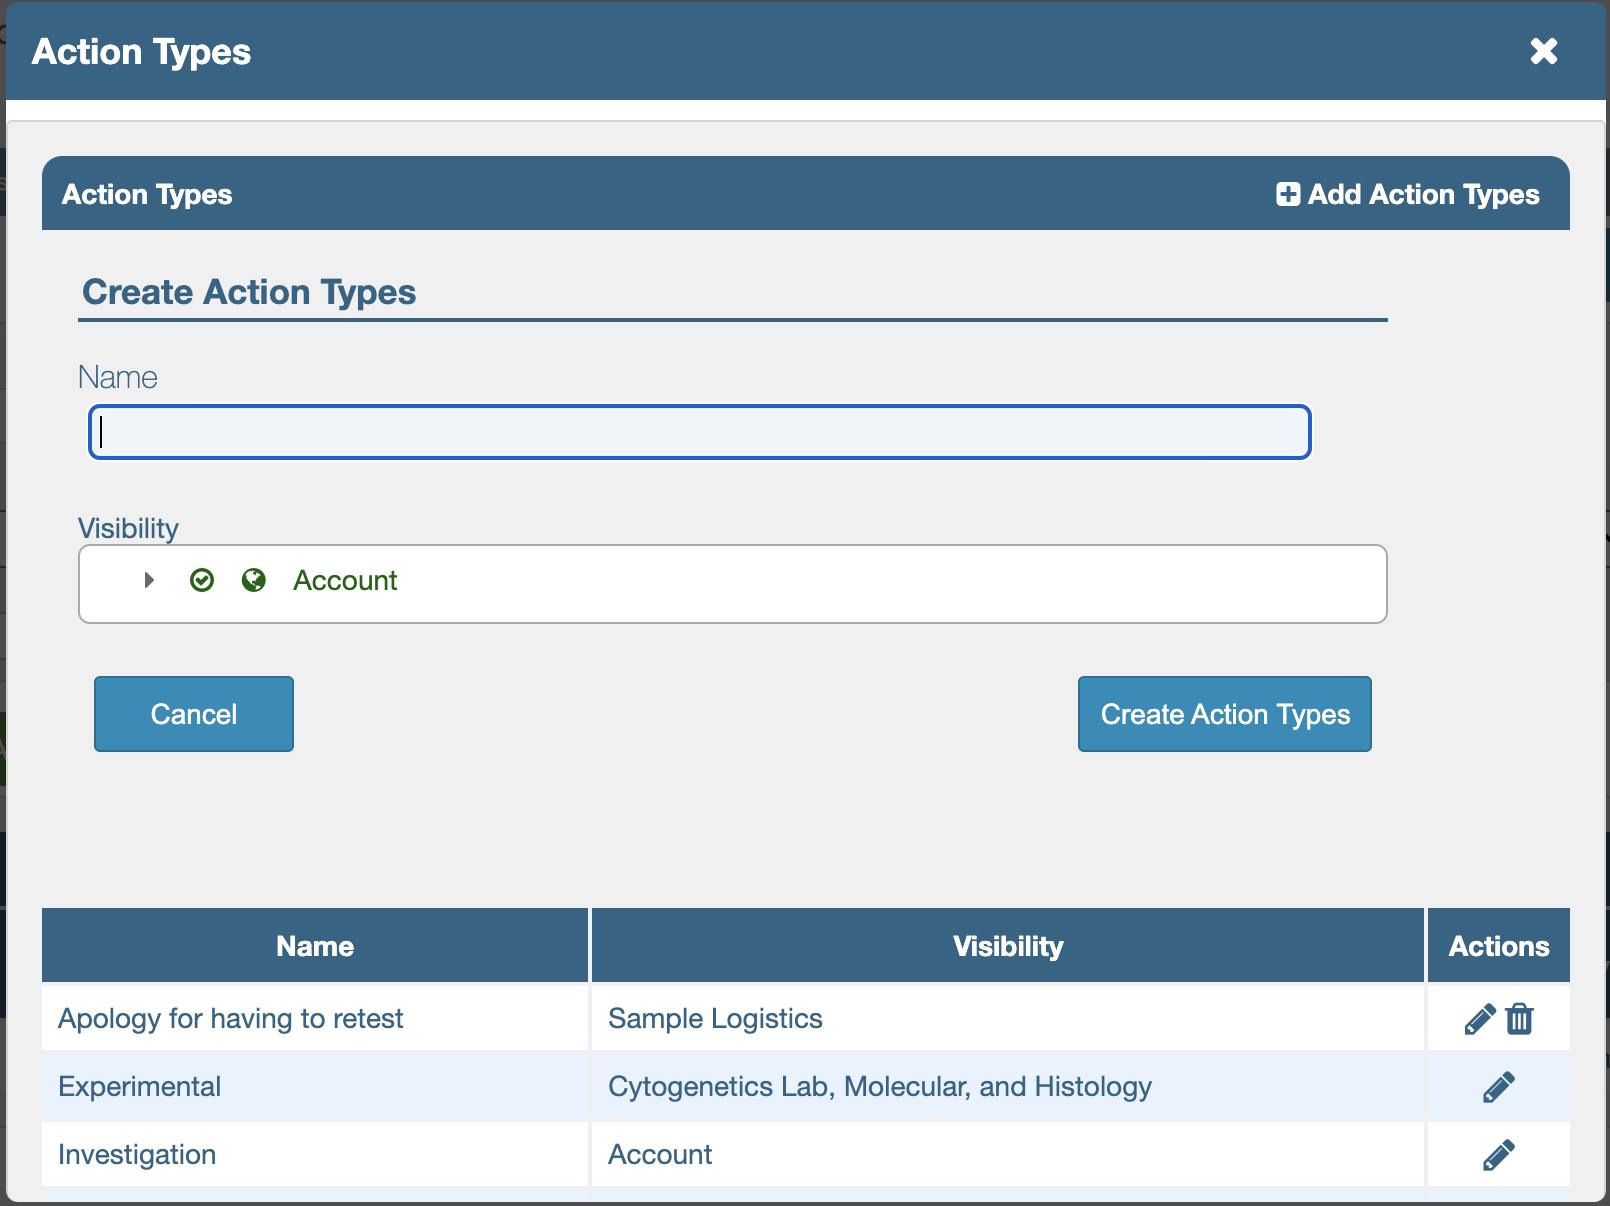
The type of an action defines what it is intended to accomplish; the default options are, “Corrective”, “Preventive” and “Remedial”.
The Category of an action allows further classifying it according to local practices; there are no default options or limits on what options can be added. As an example, categories can include options like, “Equipment”, “Supplier”, “Audit”, “Procedural change”, etc.
Managing Customisable Fields for Non Compliance Actions
This section includes general instructions on how to manage the options in the fields, Action Status, Action Type and Action Category. They all follow the same format for adding, deleting or editing options.
The permission “Non Compliance:Manage Actions” is required to view the ✎Action Categories button. In addition to the ‘manage actions’ permission, “Non Compliance:Manage Action Statuses” is required to view the ✎Action Statuses button and “Non Compliance:Manage Action Types” is required to view the ✎Action Types button. Some items are ‘System Default’ options and can’t be edited or deleted.
To Manage ‘Action Statuses’, ‘Action Types’ and ‘Action Categories’:
Click the corresponding button under the Actions tab to open the appropriate lightbox
- To add an item,
1. Enter a Name for the item in the field provided
2. Click, Add 'item type' (e.g., "Add Status")
- Click the arrow to the left of 'Account' to expand the tree structure of OUs in the account
- Un-select 'Account' and select specific OUs or leave 'Account' selected to make the category visible in all OUs
1. Click the pencil icon in the Actions column
2. Adjust the name
3. Click, Rename 'item type' (e.g., "Rename Status")
1. If a trash/bin icon is available in the Actions column, clicking it will delete the item; if an item is in use, it can't be deleted
Click the “X” in the top right corner to close the lightbox.
Action Statuses can be ordered to help expedite the creation of new actions. The first item on the list will be the default option in the field, Initial Status of the (+)Add Action lightbox. Use the arrows in the “Order” column of the Manage Non Compliance Action’s Statuses lightbox to sort the items as required.
Creating a New Action
The (+)Add Action button allows specifying what needs to be done, by whom and by when, in order to resolve the noncompliance. As many actions as required can be added but in some cases one single action might be enough. All the steps taken are recorded within iPassport as part of the audit trail.
To create noncompliance actions:
-
Click the (+)Add Action button to open the “Add Action to Non Compliance” lightbox
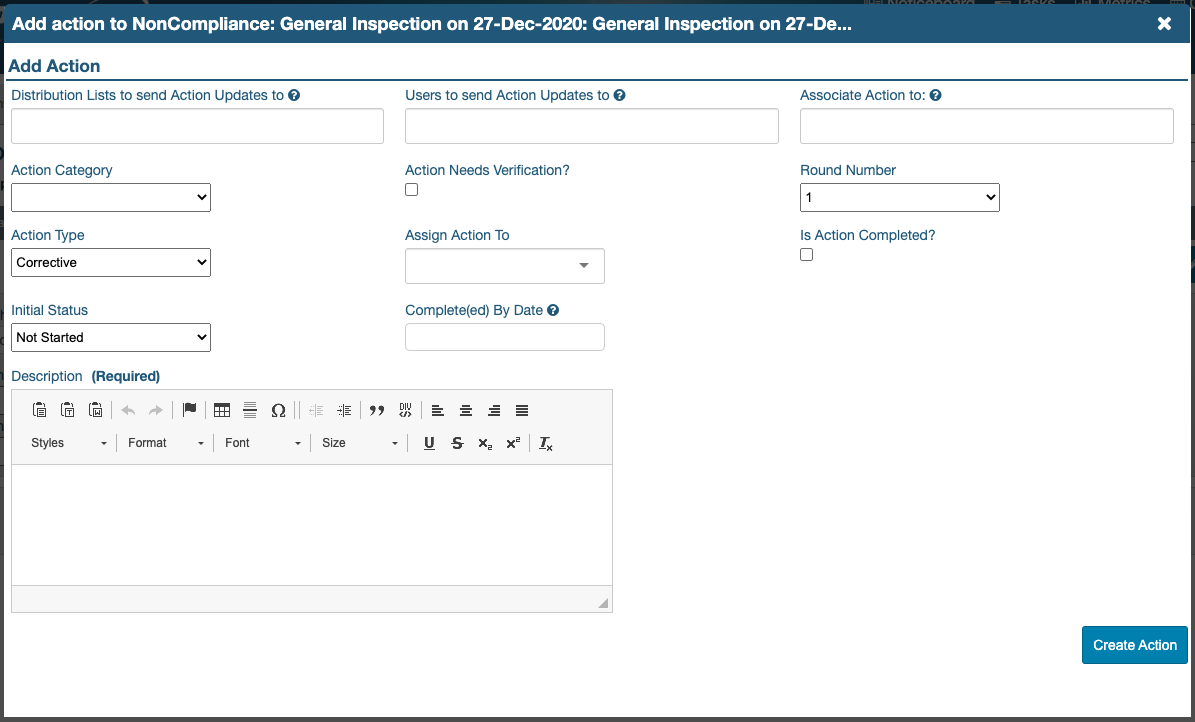
Of the fields below, only the Description is required to create an Action. The action can subsequently be edited to add some fields but not all will be available for editing if they are left empty. In particular, a Verification step can only be set when the action is being created.
-
The field, Distribution Lists to send Action Updates to allows selecting one or more groups of users (distribution lists) in one step; these users will receive emails with updates to this action (provided their personal preferences allow it)
-
Individuals can also be selected to be notified (provided their personal preferences allow it) of any changes to this action; the field, Users to send Action Updates to also has a search-as-you-type multi-select filter
Using Search-As-You-Type Multi-select Filters:
- As a name is entered in the field, the system tries to match it with that of existing users, displaying results in a dropdown menu.
- If the correct match appears, it must be clicked for it to be selected.
- Selected names are displayed in the field, which will expand as necessary. They can be removed by clicking the “x” to the right of the name.
- As a name is entered in the field, the system tries to match it with that of existing users, displaying results in a dropdown menu.
-
The Associate Action to field will display existing actions, which can be selected to indicate this action is connected to them, for reference only (no interdependence is created)
-
The Action Category allows classifying noncompliance actions other than by their type
-
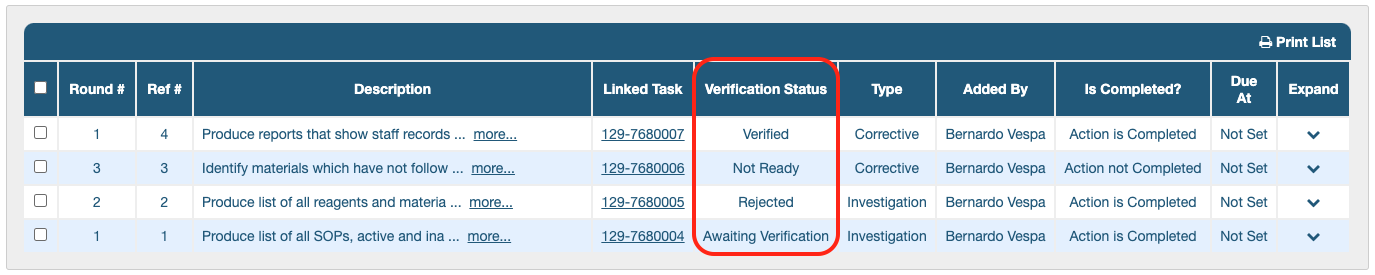
The Action Needs Verification? checkbox button allows a verification step to be specified when the action is being created; the Verification Status column in the Actions table indicates whether a validation step has been set up and its status (e.g., “Awaiting Verification”)
-
The Round Number field keeps track of existing rounds and offers all existing round numbers plus the next successive number so new rounds can be created
-
The Action Type allows a user to describe the action’s purpose; different types can be added to the default options, “Corrective”, “Preventive” and “Remedial”
-
The Assign Action To field is not required but it is advisable to make someone responsible for completing an action
An action can only be assigned to one user - only one task is created. If there are multiple items to be completed, it is advisable to create multiple actions, which can be assigned to different users if appropriate.
-
Ticking the Is Action Completed? checkbox allows adding actions retrospectively; by default, actions are not completed when created
-
The Initial Status can also be selected from a dropdown menu for actions that have already been started; the default option will be the first status in the list, which can be ordered as described above
-
The Complete(ed) By Date can be used as a target completion date or to select a date in the past if the action was already completed
-
The Description of the action is required
-
When all the necessary information above has been added, click Create Action
The user will be returned to the Actions tab and the new action will be displayed.
TASKS & ACTIONS
- A task is automatically created when a new action is added. Its reference number is posted in the Actions table, in the column, Linked Task.
- If the action has not been assigned to any user, it can be opened by clicking its reference number in the Linked Task column. If it hasn’t been completed, it will be editable and a person can be assigned the task there. Such a person won’t appear responsible for the action but when they complete the task, the action will automatically be completed too.
- If a new user is assigned the task by editing the Assign Action To field, the original task will be removed and a new one will be created for the selected user.
- If anyone completes the action, the task will automatically be completed by the system.
- Completing the task, completes the action too.
Search for Actions
When a noncompliance has many actions added to it, the search area provides filters to locate any one of them.

The search filters available are:
- Search - free text which searches in the ‘Description’ field text
- Action Type - explained above
- Action Status - explained above
- Action Category - explained above
- Assigned To - only users who have been assigned actions in this noncompliance are listed
- Assigned By - only users who have been assigned actions in this noncompliance are listed
- Action Completed - options are, ‘blank’ (which selects all), Completed or Outstanding
- Due Start Date - can be selected from the pop-up calendar
- Due End Date - can be selected from the pop-up calendar
- Display Deleted - when the checkbox is ticked, only deleted actions are displayed
The permission, “Non Compliance:View Deleted Actions” is required
Editing an Action
An action can be edited after it has been created, even if it has been completed. The permission, “Non Compliance:Manage Actions” is required.
To edit an action:
-
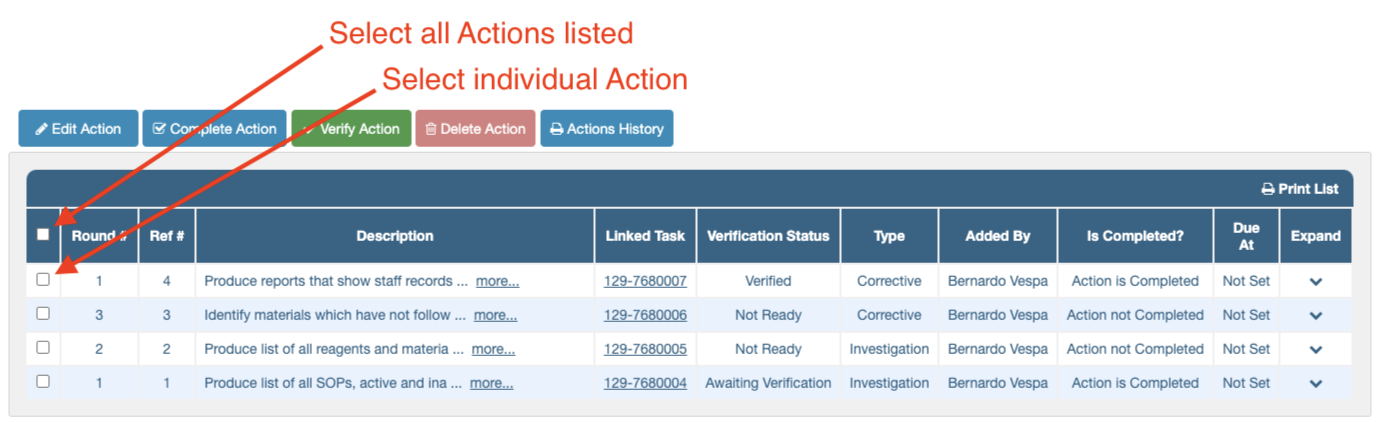
Select the action by ticking its checkbox in the left column of the Actions list/table
All actions can be selected and edited in bulk by ticking the checkbox in the header area.
When multiple actions are edited, text added in the ‘Description’ field and all other parameter changes will be applied to all of the actions.
-
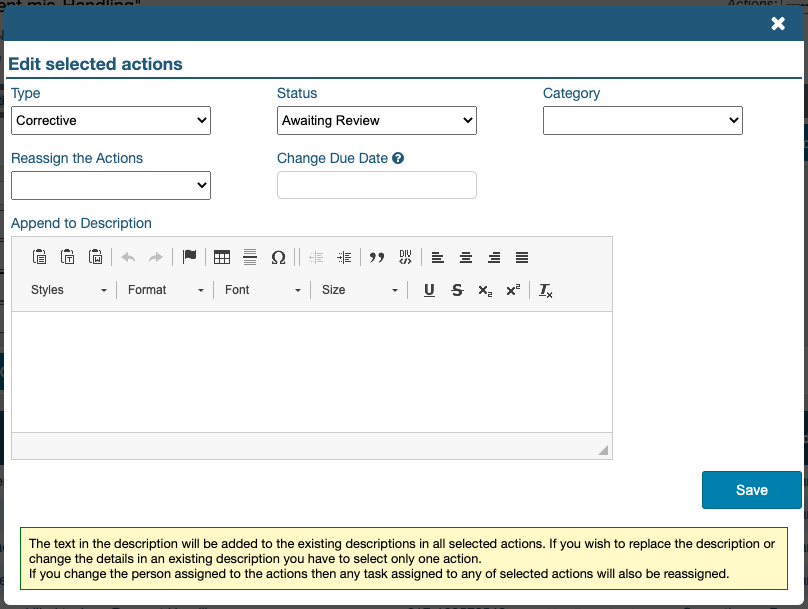
Click the ✎Edit Action button to open the Edit action lightbox
-
The following parameters can be edited:
- Type
- Status
- Category
- Reassign the Action(s) (to another user) - If a person is assigned to multiple actions, any outstanding task associated with any of the selected actions will also be reassigned
- Round Number - this field is not available when multiple actions are selected as choosing any round would move all the actions to the same round
- Change Due Date
- Edit Description or Append to Description (when multiple actions are edited, text entered is added to existing text in each action)
- Click Save to close and apply changes
All edit events are stored in the Actions History area.
Completing an Action
When the linked task is completed, the action is automatically marked as completed. It can also be completed from the Actions tab by users with the permission, “Non Compliance:Manage Actions”.
![]()
To complete one or more actions in the Actions tab:
-
Select the action(s) by ticking the checkbox in the left column of the Actions list/table
All actions can be selected and completed in bulk by ticking the checkbox in the header area.
When multiple actions are completed, the information entered will be applied to all of the actions. -
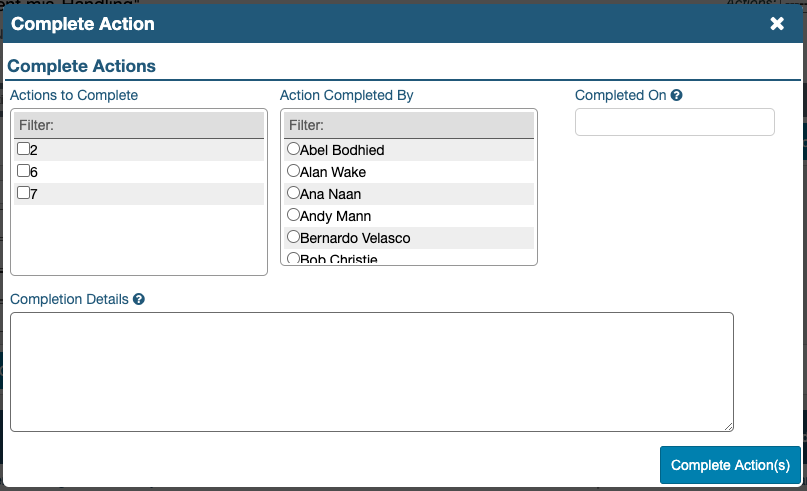
Click the ☑ Complete Action button to open the Complete Action lightbox
-
Confirm which actions to complete in the Actions to Complete select filter by ticking their checkbox (only outstanding actions are listed)
-
Select the user responsible in the Action Completed By filter
-
Select a date from the pop-up calendar in the Completed On field
-
Enter Completion Details in the free text field
-
Click Complete Action(s) to finish
Verifying an Action
If verification is required for an action, it can only be set when the action is created (please see above). Once an action that requires verification is completed, its status will change to “Awaiting Verification”. The button, Verify Action, will only work for users with the permission, “Non Compliance:Verify Actions”; it otherwise brings up a warning that permission is needed to access this area.
To verify actions:
-
Select the action(s) by ticking the checkbox in the left column of the Actions list/table
All actions that require it can be verified together in one step by ticking the checkbox in the header area. When the verification lightbox opens, any actions that require verification will be displayed and selected (ticked).
When multiple actions are verified, the information entered will be applied to all of the actions. -
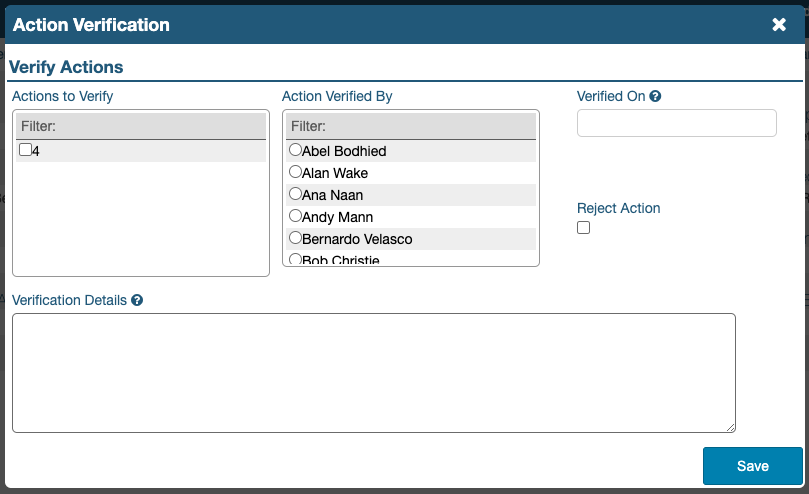
Click the ✓ Verify Action button to open the Verify Actions lightbox
-
Confirm which actions to verify in the Actions to Verify select filter by ticking their checkbox (only actions which require verification are listed)
-
Select the user responsible in the Action Verified By filter
-
Select a date from the pop-up calendar in the Verified On field
-
Tick the Reject Action checkbox if the action completion is not acceptable or no longer required
If a task needs to be redone, create a new action to replace the rejected one.
Rejected actions won’t stop a noncompliance from being closed (marked as ‘corrected’). -
Enter Verification Details in the free text field
-
Click Save to finish
The lightbox will close and return the user to the Actions tab with the action(s) updated.
Deleting an Action
If an action is no longer required, it can be deleted by users with the permission, “Non Compliance:Manage Actions”. The linked task will automatically be completed if it is still due.
![]()
To delete one or more actions:
-
Select the action(s) by ticking the checkbox in the left column of the Actions list/table
All actions can be selected and deleted in bulk by ticking the checkbox in the header area.
When multiple actions are deleted, the information entered will be applied to all of the actions. -
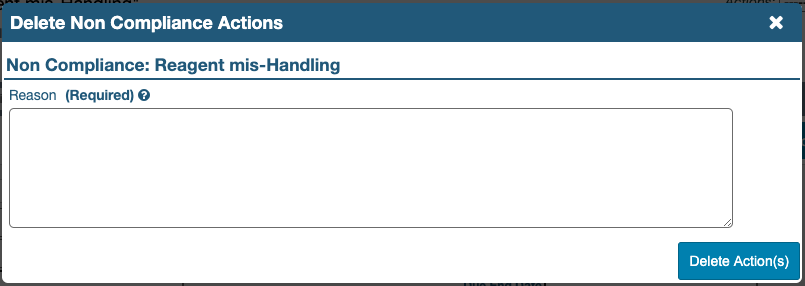
Click the 🗑Delete Action button to open the Delete Non Compliance Actions lightbox
-
A Reason is required
-
Click Delete Action(s)
(Clicking the X in the top right corner of the lightbox, closes and cancels the operation.)
All delete events are stored in the Actions History area.
Actions History
All events associated with the Actions tab are recorded within the Actions History. All other events associated with the noncompliance are stored one level up, in the noncompliance’s Changelog tab.
Clicking the Actions History button brings up the Non Compliance Action History Logs lightbox.
 This pop-up window has its own search facility with filters to help locate any event related to the actions of the current noncompliance. The events are called, “Changes” in the table of results and the person responsible for making them is in the column, “Changed By”.
The search facility includes:
- A Search box where text entered will be searched in all details within the Changes column. This includes text entered as a comment or description during the creation, edition or deletion of an action.
- The Changes Made By field allows selecting individual users to search for action events performed by them.
- The Start Date and End Date allow limiting the search to a given timeframe. The fields have pop-up calendars to select the desired dates.
Lists of all events or of the results from a search can be exported as a PDF document or a CSV spreadsheet by clicking the corresponding buttons between the search and result areas.
Normally, all actions must be completed to allow the noncompliance to be closed. However, there will be occasions where it has to be closed or inactivated before it’s resolved as initially planned. These scenarios have been covered in the previous articles, including the section on, Closing a Non-Compliance.