- Staff Qualifications
Staff Qualifications
Introduction
The Staff Qualifications module allows users to store and keep track of qualifications related to their job and personal professional development. Staff can be tasked to submit specific qualifications and provide evidence by adding attachments like certificates or diplomas, together with their expiry date if applicable. When there is an expiry period for a qualification, the system will keep track of the expiry dates and it will reissue tasks automatically as the dates approach. Verifiers can be assigned to confirm the validity of evidence submitted.
Qualifications and other staff records can be limited to specific Organisational Units (OUs) to protect the privacy of users and contain records within a department when required. Categories can be created and assigned to staff qualifications to further classify them.
Permissions
There are two permissions that govern Staff Qualifications access: Qualifications:Can view Qualifications and Qualifications:Can Create/Edit Qualifications. Both are restricted to the OUs where they are applied.
The ‘view’ permission is included in the system roles:
- Global Viewer (excluding admin)
- Global Editor (excluding admin)
- Personnel Management Editor
- Personnel Management Viewer
SPECIAL PERMISSION FOR QUALIFICATION VERIFIERS:
As a special condition to streamline the permission structure in iPassport, when a user is nominated as a verifier in the field, ‘Require verification from’, they will be automatically granted permission to view the qualifications submitted. Permission would normally be required in the home OU of the staff whose qualification entries were being approved.
The ‘create/edit’ permission, as well as the ‘view’ permission, are included in the system roles:
- Global Editor (excluding admin)
- Personnel Management Editor
Site Admins always have these permissions in every OU.
Settings
There are currently no global or OU specific preferences to adjust staff qualification settings.
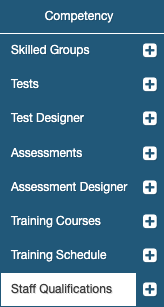
Viewing Staff Qualifications
Staff Qualifications are found under the main menu, Competency. In addition, each user’s staff profile (Personnel Management > Staff Profiles) has a Qualifications tab where the records pertaining to that person are kept. In the Competency area, they are organised by the name of the qualification and the staff who hold them are listed under each qualification created in the system.
Searching Qualifications
The Competency > Staff Qualifications > Staff Qualifications tab has a search area with the following filters:
- Search - a free text field which accepts codes or names of qualifications
- Category - an option can be selected from a user created list of categories (information about managing them can be found below)
- Order Results by - offers the following options to sort the results:
- Name A-Z
- Name Z-A
- Index A-Z
- Index Z-A
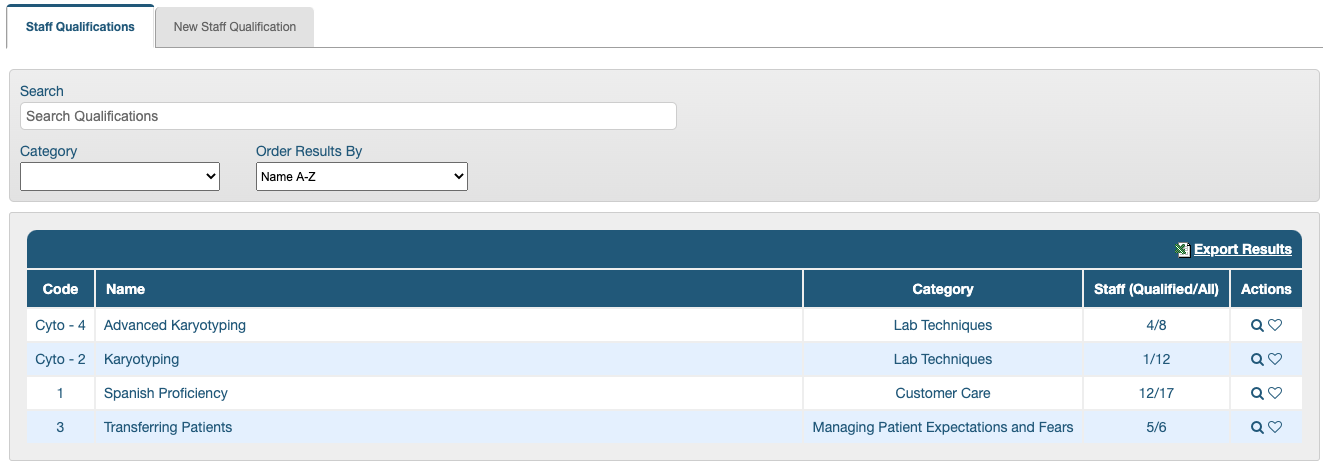
The results appear below, displaying the Code, Name, Category and number of qualified Staff. The Staff(Qualified/All) column shows a fraction of the number of qualified staff over the total number of staff added to that qualification. The Actions column on the far right contains familiar icons to view the record (magnifying glass icon) and to mark it as a favourite (heart icon).
Results can be exported in CSV (Excel™ compatible) format.
Managing Qualification Categories
This is one of iPassport’s user configurable lists of options which can be edited when the spanner/wrench icon is visible next to the field.
Instructions on how to manage this configurable look-up field can be found by clicking this LINK.
Qualification Record tabs
The nature of a qualification is detailed in the General tab. The users who have been asked to confirm they hold that particular qualification are listed under the Staff tab. The Organisational Units tab allows limiting the scope of the qualification to selected OUs.
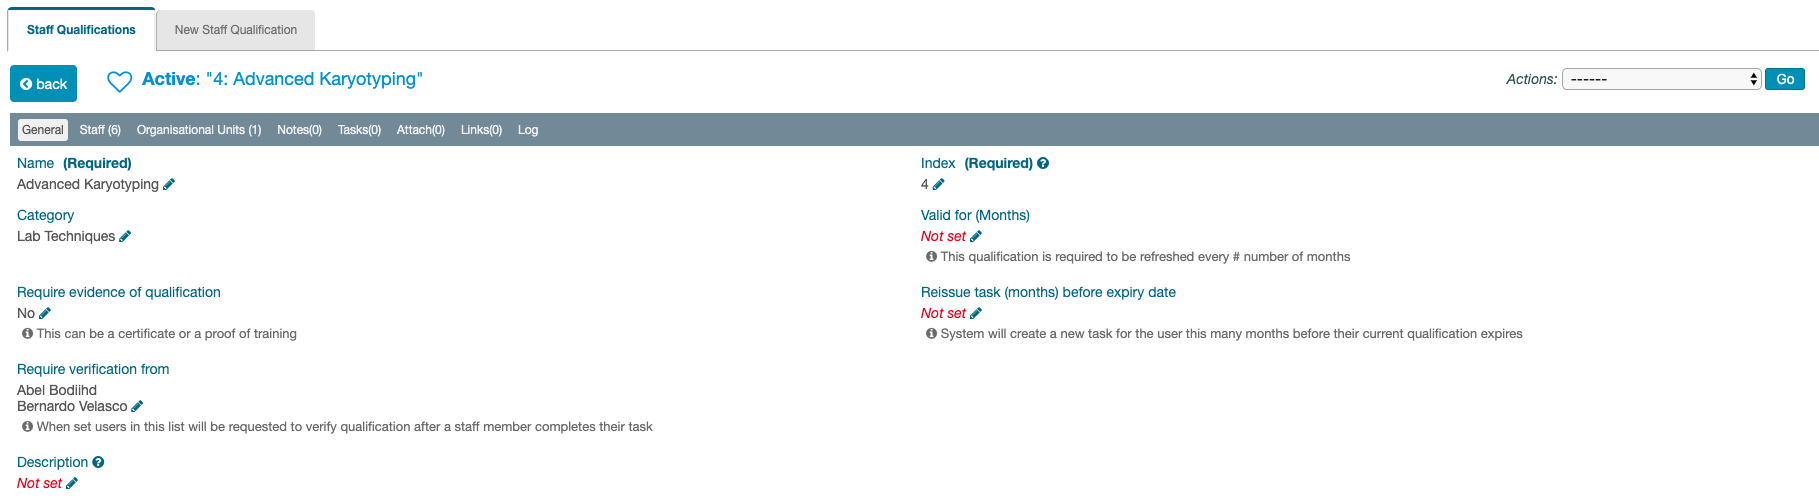
General tab
Each qualification record has a General tab where the main information is gathered (detailed below in the Creating Qualifications section).
Staff tab
The second tab along lists Staff associated with the qualification. The number in brackets next to the tab title corresponds to the total number of staff members associated. There is a search facility that allows selecting already added staff members from a dropdown menu (Search Staff Member).
The results can also be filtered by Status, which include:
- Current - the latest instance, leaving out previous qualifications
- Awaiting Verification - if verification is required and pending
- Pending - if the staff member hasn’t completed a task to submit a new qualification
- Qualified - if the qualification is valid and hasn’t expired
- Not Qualified - all assigned staff who do not hold a current, in-date record for this qualification. Groups the statuses Awaiting Verification, Pending, Expired and Overdue
- Expired - if the qualification has an expiry period and it has lapsed
- Overdue - if the task assigned has not been completed within the stipulated time
An Order Results By field is available (Staff Name A-Z or Staff Name Z-A) and results can be exported in CSV (Excel compatible) format from this page as well.
A pie chart gives a quick view of the portion of currently qualified staff.
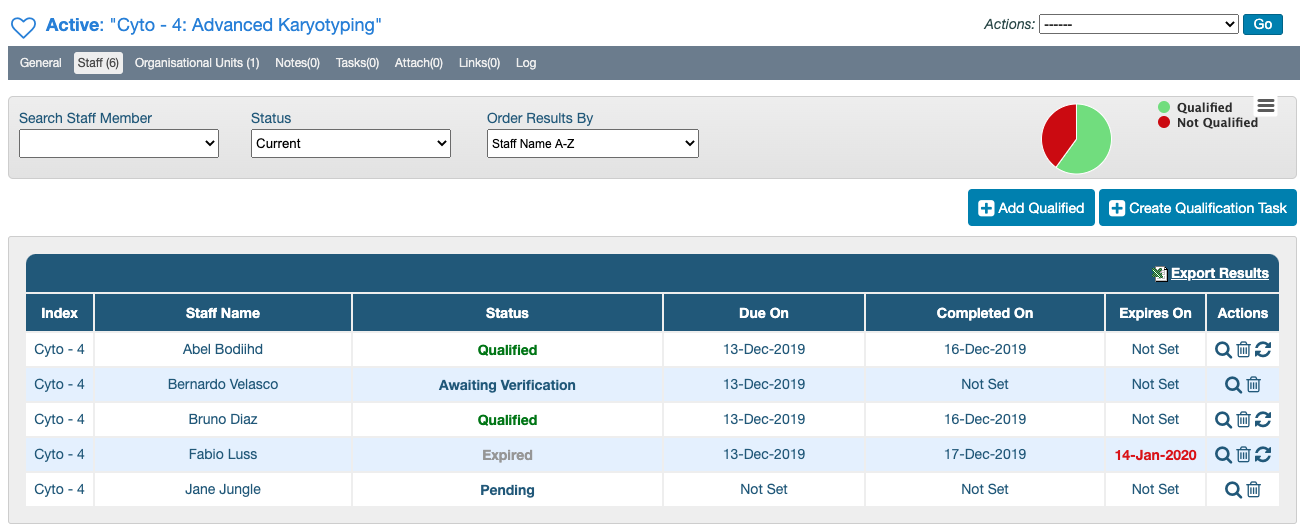
The results area shows an overview of each staff member’s standing, providing information about the status of their qualification (as detailed above), a due date, a completion date and an expiry date.
The Actions column includes:
- a magnifying glass icon to display the person’s record in a lightbox (pop-up window), which also contains a Changelog button to view the history of that qualification instance and lists any attachments added (only to that instance)
- a trash/bin icon to delete the qualification instance is available when the user has the permission, Qualifications:Can Create/Edit Qualifications
- an icon to reissue a qualification confirmation task (two arrows forming a circle), which shows if the current status is ‘qualified’ or ‘expired’ and there isn’t a newer version of it (pending or not)
Organisational Units tab
The number in brackets next to the tab title corresponds to the total number of OUs to which the qualification is restricted. Only staff members whose Home OU is one of the OUs declared in this area will be allowed to be entered. Also, only users who have access to view qualifications in one of the OUs declared will be able to see them.
Staff Profile > Qualifications tab
The Qualifications tab under a person’s Staff Profile stores all their qualifications. The number in brackets next to the tab title corresponds to the total number of qualifications added (whether valid or not).
The search area for this page includes Search, Status and Order Results By fields, plus a Qualification dropdown filter that only displays qualifications associated with the staff member in reference.
The results area below displays an overview of the staff member’s qualifications, including the following details: Code, Name, Status, Completed On, Expires On ("Not Set" if not applicable) and an Actions column which can show the magnifying glass, trash/bin and reissue icons as described above.
Creating Qualifications
A qualification record must be created before users can be requested to confirm they hold it. Only a Name, Index and Category are required to create one but, other information can be added to specify whether evidence is required (in the form of certificates, diplomas, etc.), whether the qualification must be renewed periodically and whether a verifier is required to check submitted qualifications. This information can also be added after the record is created.
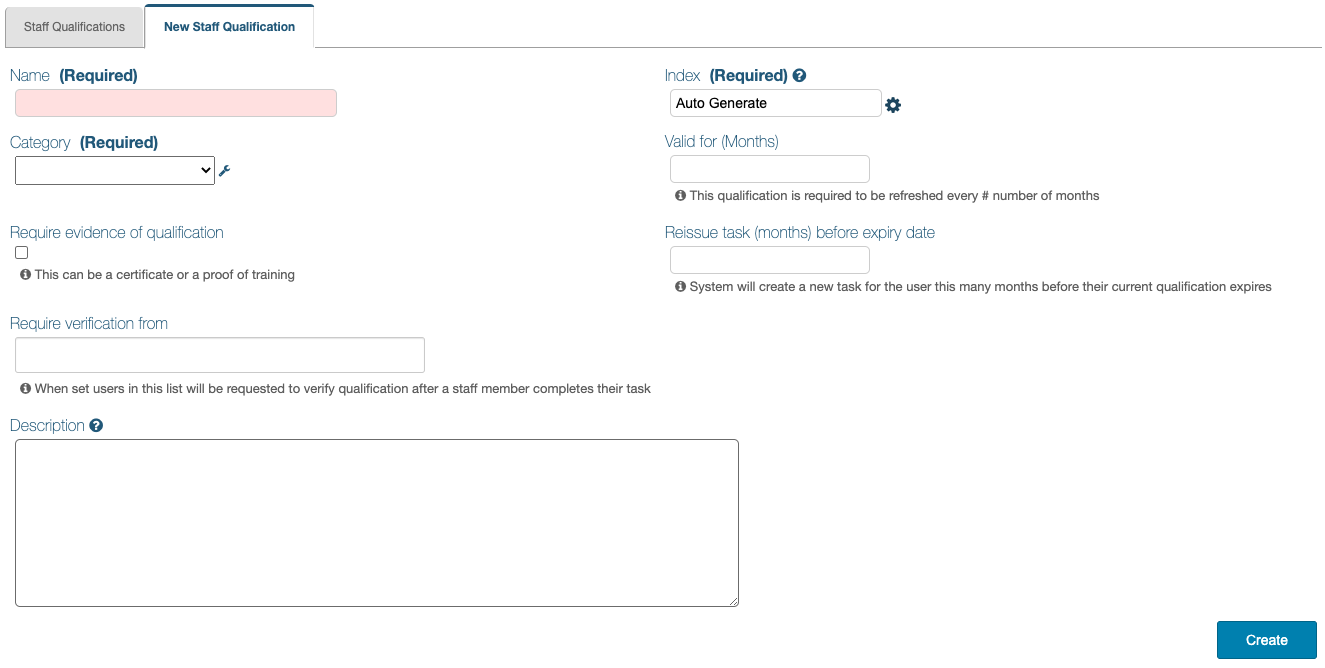
To create a new staff qualification:
-
Click the New Staff Qualification tab.
-
Enter a Name for the qualification.
-
A unique Index can be generated automatically by the system or the user can enter a custom index by clicking the cog and entering it manually; the system will validate custom indices to ensure they are unique.
-
Select a Category from the dropdown menu provided (information on managing categories can be found above).
-
If applicable, enter a number of months by which the qualification must be renewed in the field, Valid for (Months). When a value is entered in this field, users will have to enter an expiry date for the qualification being submitted. The number of months is quoted in the form (under the ‘Expires On’ field), to remind users how long the qualification should be valid for. It’s not used to calculate the next renewal; the system uses the expiry date to calculate when to issue the next task.
-
Enter the number of months needed by users to renew their qualifications before validity expires in the field, Reissue task (months) before expiry date; a task will be issued to remind the user to renew their qualification when this time arrives. If this field is left as, ‘Not set’ , no tasks will be generated to remind users to renew their qualification. If it is set to ‘0’, the task will be issued the day after the qualification expires.
-
Tick the checkbox of the field, Require evidence of qualification, if some form of certification is required to prove the user has successfully achieved a qualification.
-
Select a user in the field, Require verification from, when evidence submitted needs to be checked by someone.
Selecting a Verifier:
When a verifier is selected, they will receive a task to verify every qualification submitted.
A user will not be tasked (and therefore won’t be able) to verify their own qualification.
If this is likely to happen, it’s advisable to appoint more than one verifier.
Once one of the verifiers approves a qualification, the task disappears for the others.
As stated above, verifiers gain automatic access to the records they need to verify, regardless of their permissions.Using Search-As-You-Type Multi-select Filters:
- As a name is entered in the field, the system tries to match it with that of existing users, displaying results in a dropdown menu.
- If the correct match appears, it must be clicked for it to be selected.
- Selected names are displayed in the field, which will expand as necessary. They can be removed by clicking the “x” to the right of the name.
- As a name is entered in the field, the system tries to match it with that of existing users, displaying results in a dropdown menu.
-
Enter a Description of the qualification
-
Click Create
Adding Staff to Qualifications
Staff can be added to qualifications (as already qualified) directly by a person with appropriate permissions and with all the information required. Alternatively, tasks can be created to request staff to provide evidence and/or expiry dates of their qualifications.
Two buttons are available in the Staff tab of a qualification record: [+]Add Qualified and [+]Create Qualification Task. The permission, Qualifications:Can Create/Edit Qualifications, is required to make them visible. Already qualified staff can be added without generating a task if any required evidence and expiry dates are available to the user doing it. Alternatively, when a staff member is requested to add their qualifications, tasks are generated which must be completed to gain the accreditation.
If a qualification is limited to a given OU, only users with the same ‘Home OU’ will be listed to pick from. Please read below for an alternative process to add users from different OUs.
To add qualified staff in the Competency area:
-
Click the [+]Add Qualified button to open the Select Staff Members lightbox
-
Click in the Select Staff field and start typing the name of the staff member (if it’s not already showing in the dropdown menu that appears)
-
Click the name of the staff member when it becomes visible
Only one staff member at a time can be added in this screen as each one might have different evidence and expiry dates.
-
Click in the Completed On field and select the appropriate date from the calendar that pops up. This date corresponds to the date when the qualification was granted.
-
If the qualification has an expiry period declared, click in the Expires On field and select the staff member’s qualification expiry date from the calendar that pops up.
-
Attachments such as certificates can be added by dragging them into the dotted area marked, Drop or browse files here, or by clicking in the area, browsing for the qualification and clicking the Open/Choose button (according to the browser used)
-
Click Create
To create qualification tasks in the Competency area:
-
Click the [+]Create Qualification Task button to open the Select Staff Members/Add staff to confirm qualification lightbox
-
Click in the Select Staff Members field and start typing the name of a staff member (if it’s not already showing in the dropdown menu that appears)
-
Click the name of the staff member when it becomes visible
More than one staff member can be added in this screen as each one will add their own evidence and expiry dates when they complete the task.
-
Repeat the two steps above to add more staff members
-
Since multiple staff members can be added, the field, Select Distribution Lists can be clicked to select a group of staff members, collected in a distribution list
-
A Due Date can be selected from the pop-up calendar if required
-
Text can be added to the Task Description area if applicable
-
Click Create
Adding Qualifications in Staff Profiles
Users with access to staff profiles can add qualifications under the Qualifications tab of a staff member’s profile. Every user has access to their own staff profile (under My Profile in the sidebar) and can add or review their own qualifications there. This allows hiding the Staff Qualifications area from users who don’t need to manage them for others.
If certain qualifications need to be kept private, they can be restricted to an OU which has limited access. Users who add qualifications for others will only be able to select users with the same ‘Home OU’ when they add them in the Staff Qualifications area. However, in staff profiles, the Add Qualification lightbox allows selecting any qualification, regardless of its OU settings. This permits qualifications to be added for users from different OUs while keeping the qualification records private in the Competency module.
Verifying and Editing Submitted Qualifications
Once a user completes a Qualification Confirmation task, if verification has been specified, a Qualification Verification task is created for the appointed verifiers.
If there is more than one verifier, the first one to complete the task will automatically invalidate it for the others.
When a qualification is approved, it’s status displays as, “Qualified”.
Recurring Tasks
If the qualification has a validity period, the system will calculate when to issue the next task, starting from the user’s last declared expiry date and subtracting the time entered in the field, “Reissue task (months) before expiry date”.
As stated above:
- If the field ‘Valid For (Months)’ is left as ‘Not set’, no expiry date will be required.
- If the field, Reissue task (months) before expiry date is left as, ‘Not set’ , no tasks will be generated to remind users to renew their qualification.
- If it is set to ‘0’, the task will be issued the day after the qualification expires because the system only runs a scheduled task at the end of every day to calculate if any tasks need to be generated.
Editing Qualifications
- Submitted qualification records can be edited by users with the permission, ‘Qualifications:Can Create/Edit Qualifications’.
- Users without this permission can only update their own qualifications, giving them the opportunity to correct their own errors or upload additional attachments.
- If the verification step is used, users can be prevented from editing their own qualifications by verifying them.
- If verifiers wish to edit a submitted qualification before approving it, they must first open the record under the ‘Staff’ tab of the qualification, make the changes and then open the task from the ‘My Tasks’ area to complete the verification task.