- Authentication
Authentication
Introduction
iPassport allows each account to customise their password complexity settings to force users to include a non-alphanumeric character, number or uppercase letter in their passwords. The settings can be found in ‘User Logon Settings’.
When a user is changing their password the system will notify them if their new password does not match the requirements. After the password preferences have been changed, the system will also inform users when they log into the system if their password does not match the new requirements and will prompt them to update it.
User Logon Setting
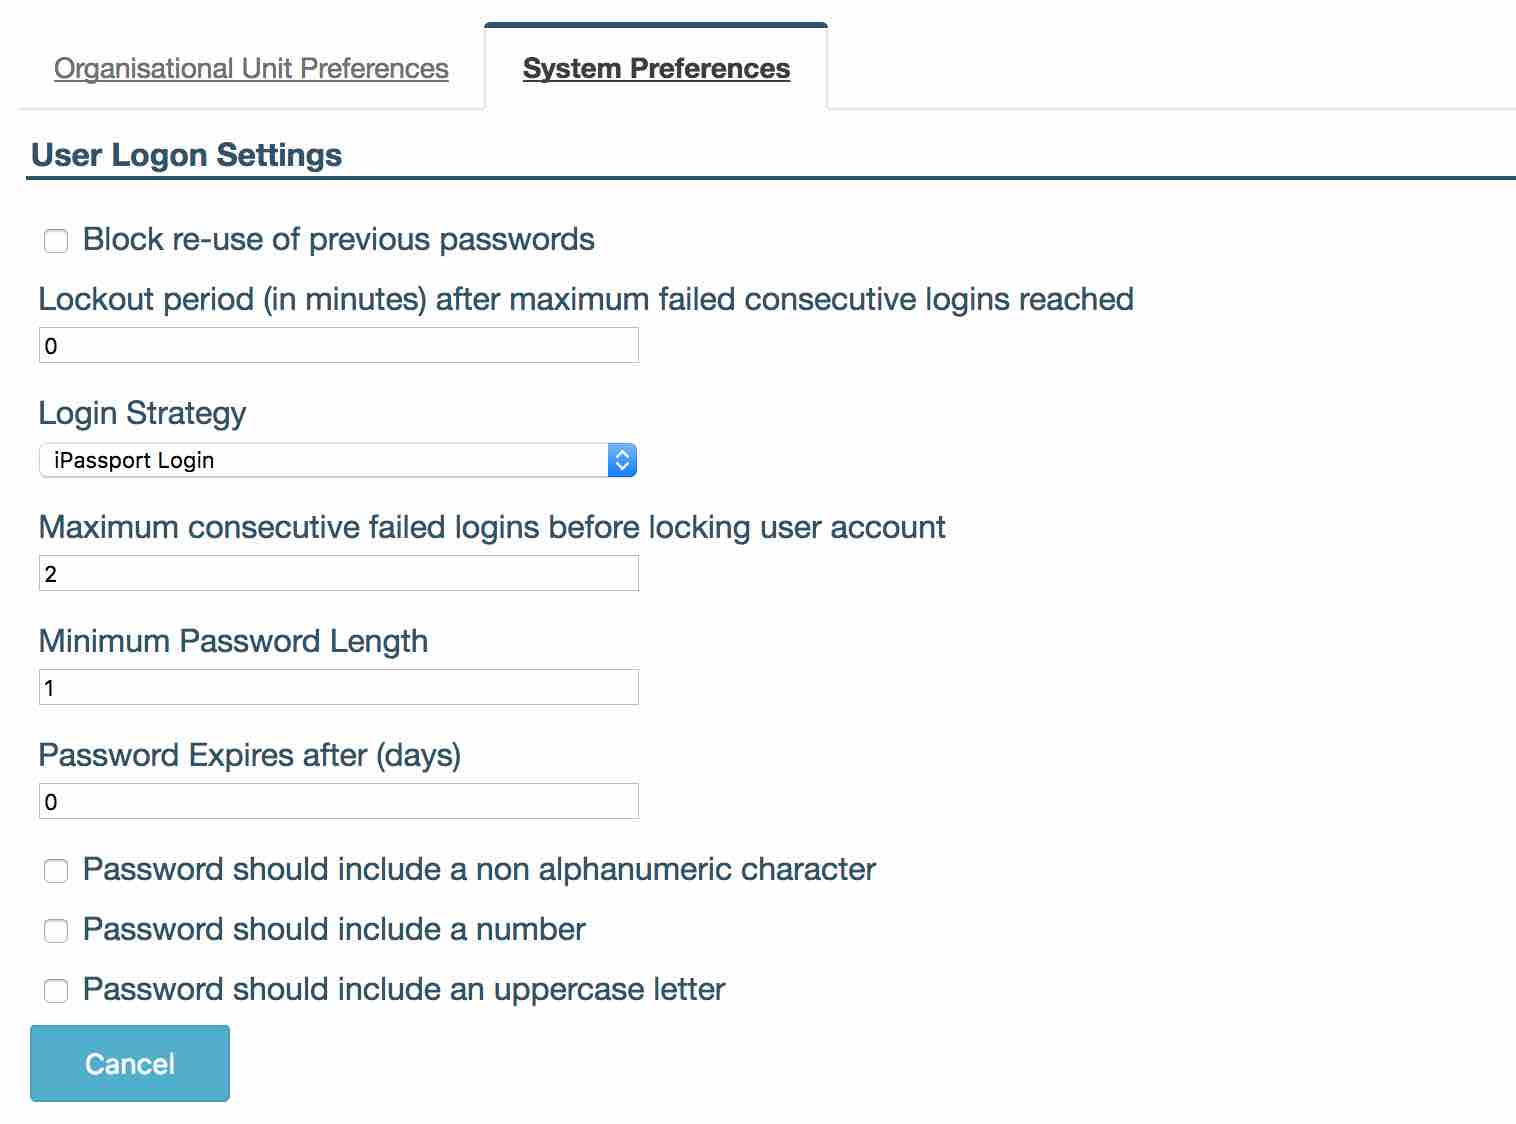
Navigate to Administration -> Settings -> System Settings -> User Logon Settings.
-
‘Block re-use of previous password’. Once checked ensures that a user can never use a password that they have previously used within iPassport.
-
‘Lockout period (in minutes) after maximum failed consecutive logins reached’. If a ‘Maximum consecutive failed login before locking user account’ value is set then admin can define here the time period used to lock the user out, after they failed to login after maximum number of times, before allowing them to try again
-
‘Login Strategy’ sets which strategy will be used to log users in. This applies to the whole account.
-
iPassport Login - this consists of a username and password as seen before.
-
-
‘Maximum consecutive failed logins before locking user account’ admin can set how many consecutive failed logins a user can perform before being locked out of the system. If a Lockout period is set then the system will unlock the user’s account after this time has passed or admin can unlock the user.
-
‘Minimum Password Length’ is used to configure the minimum number of characters in a user’s password.
-
‘Password Expires after (days)’ is used to force users to change their passwords after a given number of days. Use 0 if the password should never expire.
-
‘Password should include a non alphanumeric character’ forces the user’s password to contain at least one special character (@&<= etc).
-
‘Password should include a number’ forces a user’s password to contain at least one number.
-
‘Password should include an uppercase letter’ forces a user to have at least one uppercase letter in their password.
Unlocking Users
Permission required: User Accounts:Enable/Disable- Allow a user to enable and disable user accounts information on this feature.
If the system has a locked out user, admin with permission above will be able to unlock the user by navigating to Administration -> Users -> Search Users and using the ‘Filter Locked/Not locked ’ set to ‘Locked’.
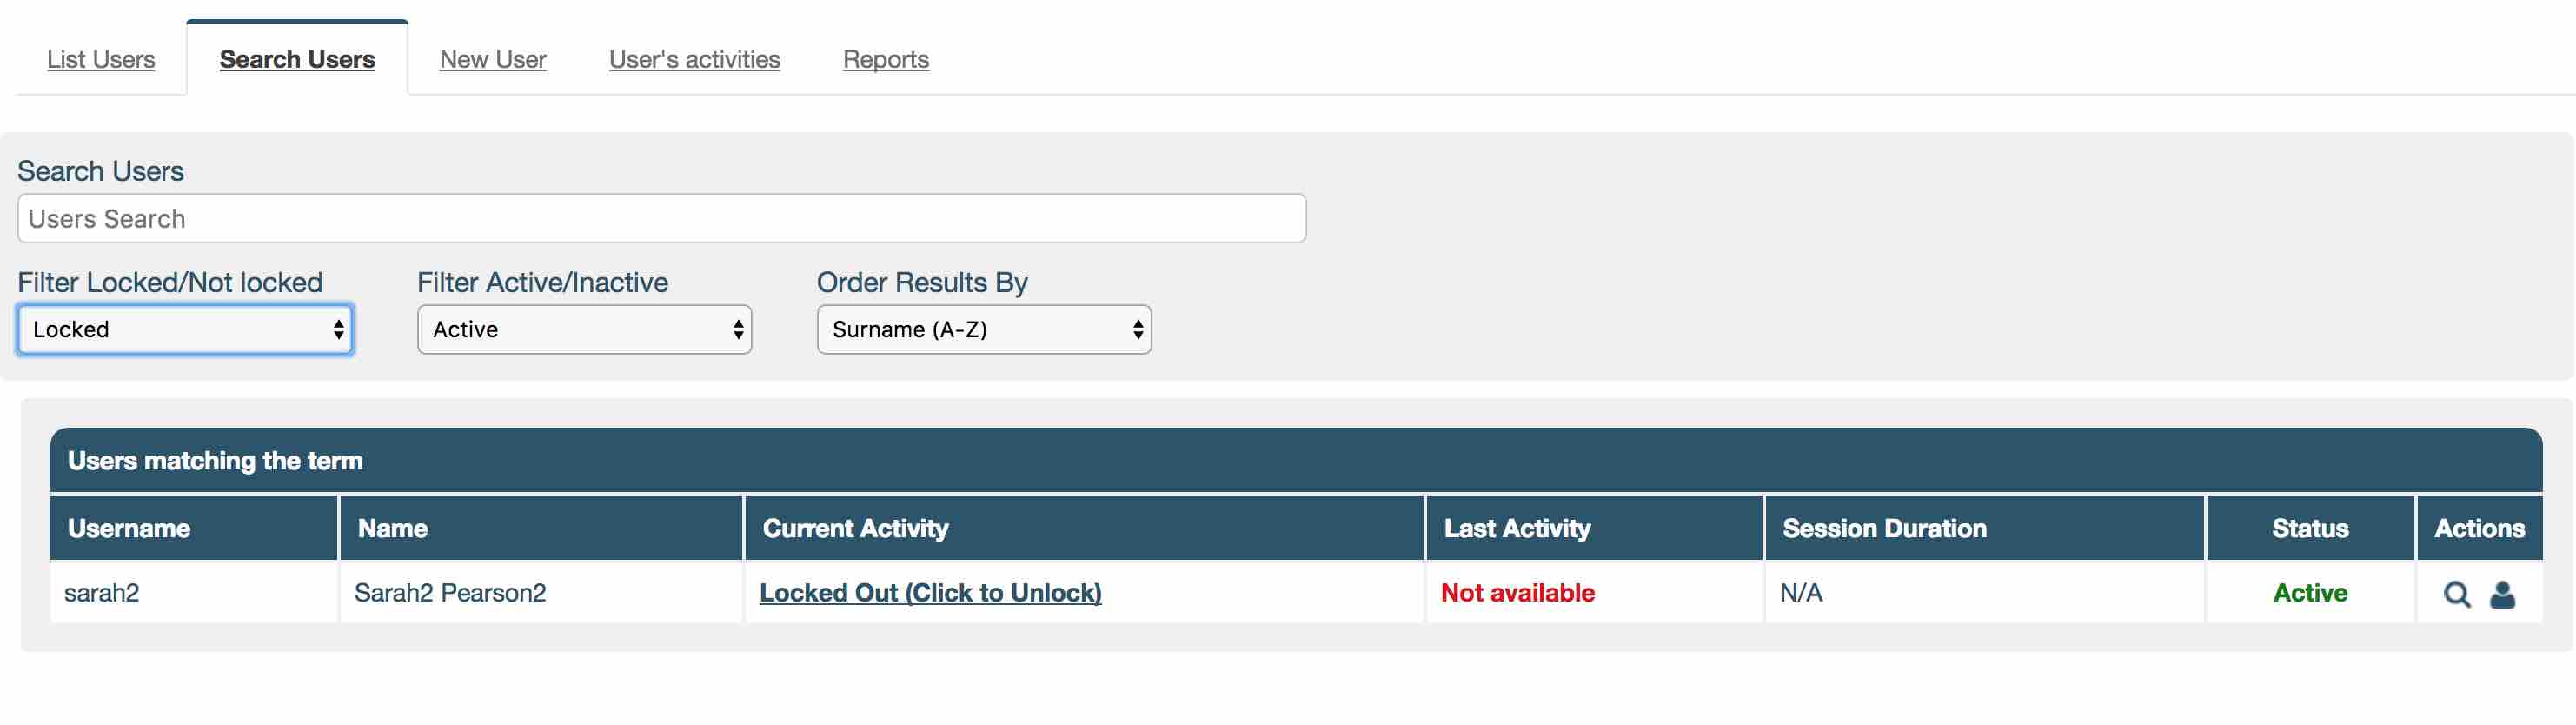
To unlock a user click on ‘Locked Out (Click to Unlock)’ in the ‘Current Activity’ column. The system will ask if admin are sure they want to unlock the user, click ‘OK’ and a green banner will appear confirming the user is now unlocked.

Two Factor Setting
Two factor authentication allows an additional level of security to guard against password theft. When logging into iPassport, in addition to entering a username and password, users will be sent a code via email. Copy and paste this code into the field in order to access the system.
When using two factor authentication admin can choose to use code validation each time a user logs in or use the additional code validation to check after a set number of days. For example, admin could ask their users to verify their identity using the email code once a week. The rest of the time they would login normally.
To enable this feature, navigate to Administration -> Settings -> System Settings -> User Logon Settings -> ‘Login Strategy’ dropdown field and select ‘2-Factor Authentication Login’.
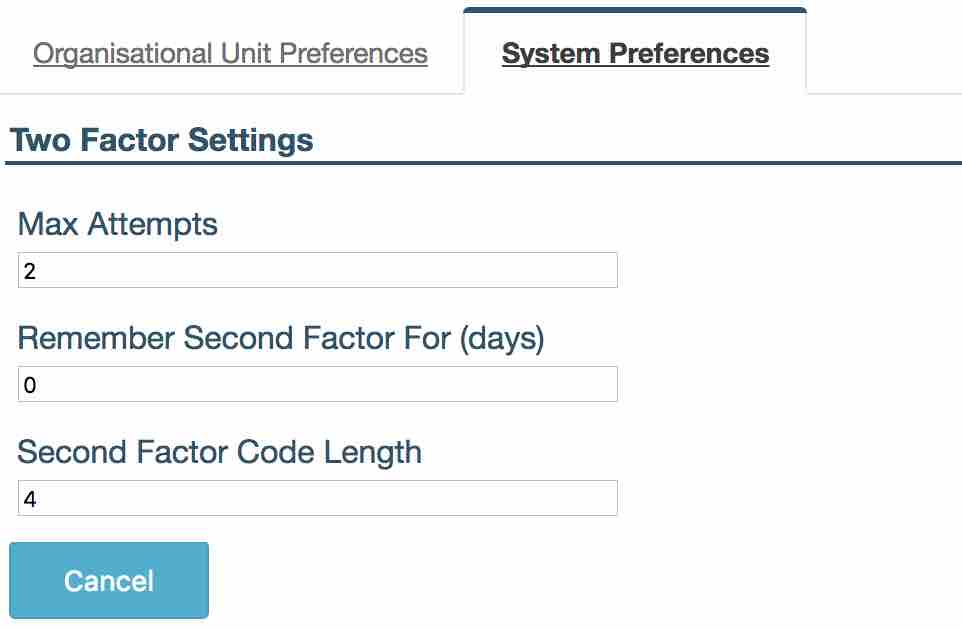
Navigate to Administration -> Settings -> System Settings -> Two Factor Settings.
-
‘Max Attempts’ decides how many times user can incorrectly enter verification code before their account is locked.
-
‘Remember Second Factor For (days)’ specifies the number of days before the user is asked to provide second factor code again. The user will not have to enter second factor code between logins for this number of days. Only their login and password will be required.
If admin change this value the new settings will only take effect when the original period expires. For example, if this was set to 30 days then users will be asked to enter a second factor code once and then 30 days later and so on. If admin then change this value to 5 days, any user who has already entered a code will not be asked again for 30 days. The new 5 days period will take effect when they are next asked to enter a code.
- ‘Second Factor Code Length’ specifies the number of digits in the second factor code sent to a user.
LDAP Configuration
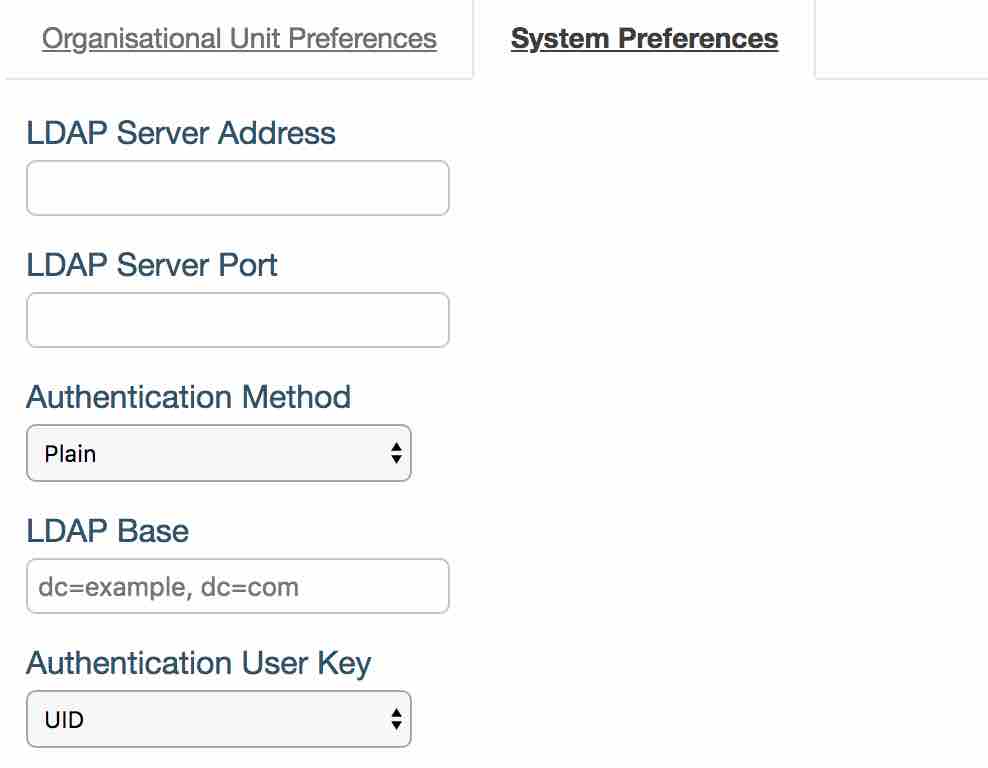
Navigate to Administration -> Settings -> System Settings -> LDAP Configuration
If LDAP is already in use for other services it’s very easy to configure iPassport to also authenticate users.
- ‘LDAP Server Address’ is your LDAP domain name/IP address.
- ‘LDAP Server Port’ is your server’s port number.
- ‘Authentication Method’ is how login details are sent over to the server. ‘Plain’ method sends user name and password in plain text whereas the other two options encrypt the information.
- ‘LDAP Base’ is the base that will be added to user lookup when performing authentication.
- ‘Authentication User Key’ is the unique user identifier in iPassport.
Please contact Genial Compliance- [email protected] before implementing this feature.
SAML/ADFS
What is SAML
SAML is an authentication method that allows you to integrate your Single Sign-On solution with different Service Providers, for example iPassport. This then let’s you control who can and cannot log into your iPassport instance. In addition to this your users only have to remember one password which reduces a chance of the password being forgotten.
Using SAML allows you to easily restrict access to the linked service when a member of staff leaves, as your IT will only have to disable their SAML account to stop the user from logging into iPassport.
Please Note: The user account in iPassport will not be set as disabled automatically and this will have to be done by your iPassport administrator, but the user will not be able to login once their SAML account is suspended.
Identity Provider SAML Configuration Metadata
If you want to start using SAML as your authentication method in iPassport, you’ll have to first configure your SSO solution to allow iPassport to authenticate users. Each iPassport customer has their own unique configuration and the easiest way to configure your Identity Provider is to upload the XML metadata file. The metadata can be found by entering the following URL in your browser:
https://<YOUR ACCOUNT DOMAIN>.ipassportqms.com/user/auth/saml/metadata
For example, if your account domain is tgh, then the link you’ll enter is
https://tgh.ipassportqms.com/user/auth/saml/metadata
Once your IT department configures the Identity Provider (IdP) you’ll be able to configure the iPassport side.
Configure iPassport to use SAML
Navigate to Administration > Settings > System Settings > SAML Configuration
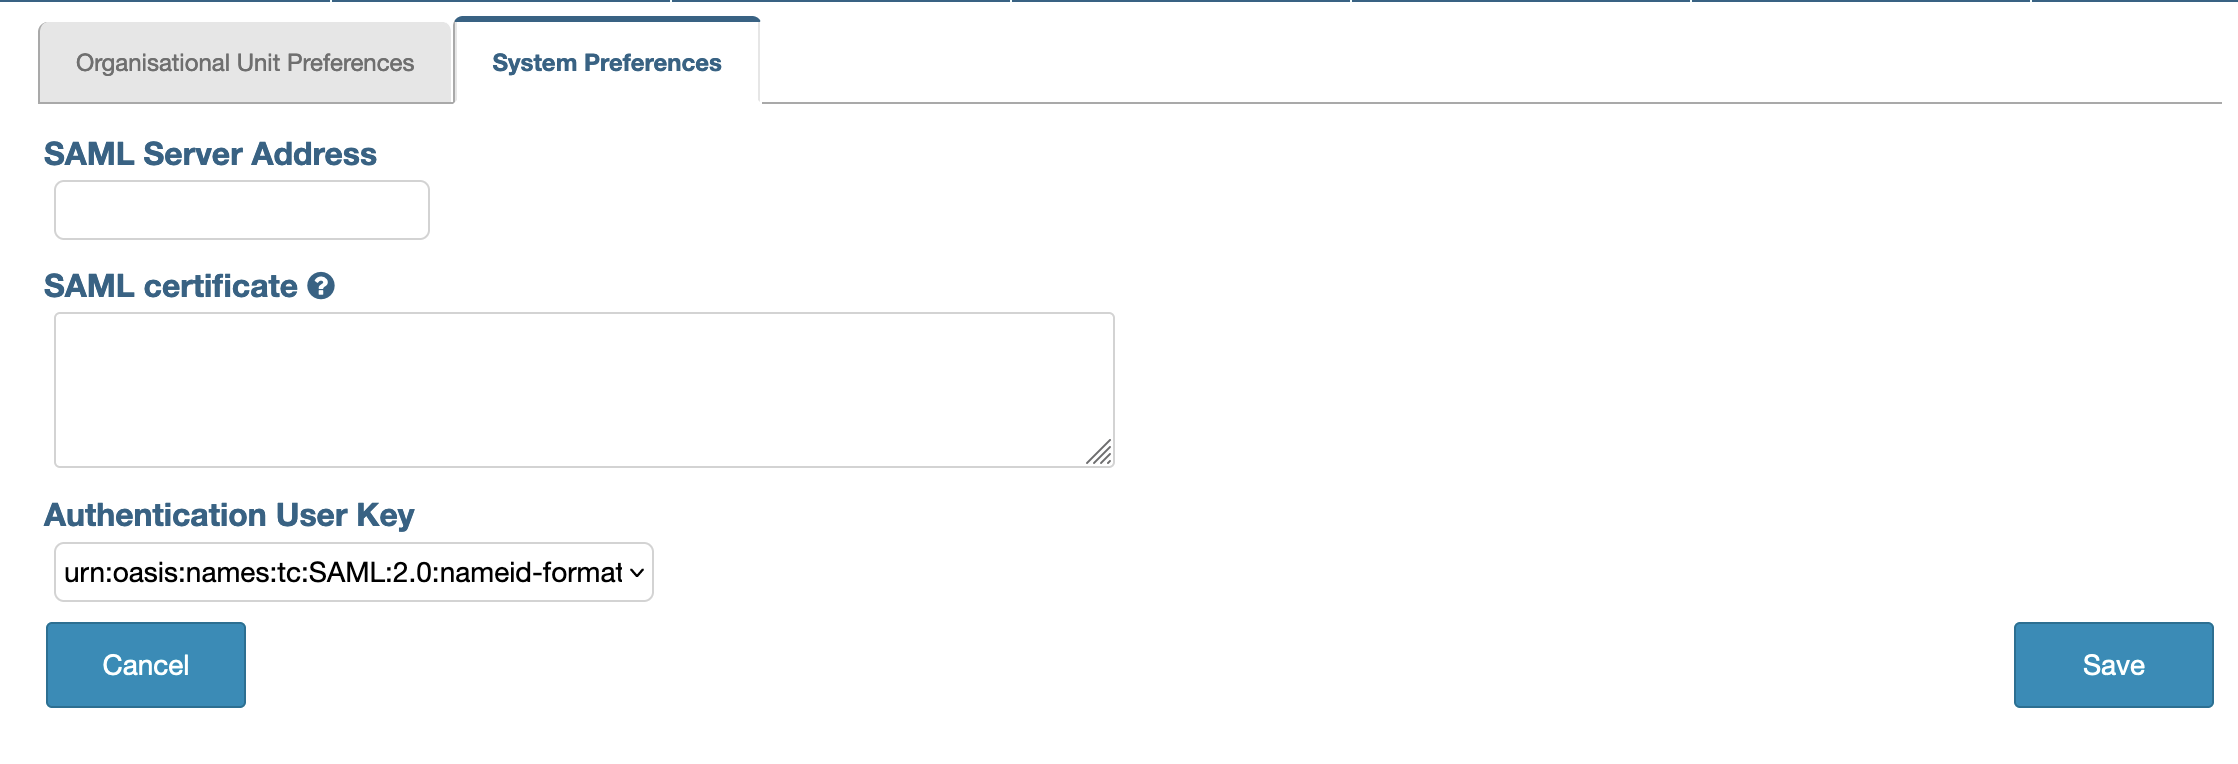
In here you can see 3 fields. All of them are required to configure SAML as an authentication method.
- The field SAML Server Address is either the IP address or the URL to your IdP server
- The field SAML Certificate is the certificate used to verify the SAML request and response
- The field Authentication User Key tells iPassport which attribute to use when identifying the user
There are 3 options to select when choosing Authentication User Key
urn:oasis:names:tc:SAML:2.0:nameid-format:persistenturn:oasis:names:tc:SAML:1.1:attrname-format:unspecifiedurn:oasis:names:tc:SAML:1.1:nameid-format:emailAddress
When persistent or unspecified field is selected this will tell iPassport to find the user with the matching Unique User Identifier within their user profile.
When emailAddress is select then user will be identified by their email address registered in iPassport.
Usually, the email address is used as the user identifier since each user already has their own unique address.
Which option you choose will depend on how your IT have configured the IdP and which fields it will send to iPassport after a user is authenticated. Please consult this with your IT.
SAML Certificate
The certificate is required to verify requests and responses from IdP. Your IT should be able to provide the valid certificate. It will be created as one of the steps when setting up your IdP to allow iPassport to authenticate users.
The certificate has to be in the X.509 format. An example is shown below:
-----BEGIN CERTIFICATE-----
MIIF3TCCBMWgAwIBAgIQCgQ6BG0WwL8iiNfFFrzB9DANBgkqhkiG9w0BAQsFADBG
MQswCQYDVQQGEwJVUzEPMA0GA1UEChMGQW1hem9uMRUwEwYDVQQLEwxTZXJ2ZXIg
Q0EgMUIxDzANBgNVBAMTBkFtYXpvbjAeFw0yMjA5MzAwMDAwMDBaFw0yMzEwMzAy
MzU5NTlaMB0xGzAZBgNVBAMMEiouaXBhc3Nwb3J0cW1zLmNvbTCCASIwDQYJKoZI
hvcNAQEBBQADggEPADCCAQoCggEBAKhy4ADiYTTuBb8CMXMDyFl+Qs/KxwLdE9Dj
bHPIq6rCjnwiDWHGLgptsEBt2LWGPoD2FDOkO9HVnkNiMW6Z4z4bHKjYxiaiH4IM
uAozOD8rCRYuoXrW2Fl72vTvabI8+heP5CQ39/rz15VBsO0JfTIx39naUfbD4Wmm
Xi5s7VF4Kr8f36EUcKGoWl6bgpq23IQf2TIrSvtzFvyhY4WMOvT4QuM5C5+0ok1Z
Mut2oSae7tHj6yKPYcBbRIG+LaQpuTLCbf3HdrEGNTBDkZwQlonrMtcEgSIrXAmb
fsbeB4lRura9OEMLQJ/wByF5A4eZ+Lki/+cGKfPFidW5Rzv8XGMCAwEAAaOCAu4w
ggLqMB8GA1UdIwQYMBaAFFmkZgZSoHuVkjyjlAcnlnRb+T3QMB0GA1UdDgQWBBRX
k4AttltzDsFnvyJYe8p5Fl3saTAdBgNVHREEFjAUghIqLmlwYXNzcG9ydHFtcy5j
b20wDgYDVR0PAQH/BAQDAgWgMB0GA1UdJQQWMBQGCCsGAQUFBwMBBggrBgEFBQcD
AjA9BgNVHR8ENjA0MDKgMKAuhixodHRwOi8vY3JsLnNjYTFiLmFtYXpvbnRydXN0
LmNvbS9zY2ExYi0xLmNybDATBgNVHSAEDDAKMAgGBmeBDAECATB1BggrBgEFBQcB
AQRpMGcwLQYIKwYBBQUHMAGGIWh0dHA6Ly9vY3NwLnNjYTFiLmFtYXpvbnRydXN0
LmNvbTA2BggrBgEFBQcwAoYqaHR0cDovL2NydC5zY2ExYi5hbWF6b250cnVzdC5j
b20vc2NhMWIuY3J0MAwGA1UdEwEB/wQCMAAwggF/BgorBgEEAdZ5AgQCBIIBbwSC
AWsBaQB3AOg+0No+9QY1MudXKLyJa8kD08vREWvs62nhd31tBr1uAAABg4wz/8gA
AAQDAEgwRgIhAPb99SXNHf7Sg3jzCjk6qsvR28trpnxyw0Q7EZqKbxy3AiEAh4yf
zFbIu8iLeQSjSlRRYXUylkfA5isi8vVjYjF4aYcAdgCzc3cH4YRQ+GOG1gWp3BEJ
SnktsWcMC4fc8AMOeTalmgAAAYOMNAAfAAAEAwBHMEUCIBhPsQKvBoiBi23M9J81
iILzsXDI5INYI6U+xlPMXWK+AiEA89MQc/hvkdl6QIp5fqvcmxinkDBwY7g1lXni
L9aJEj8AdgC3Pvsk35xNunXyOcW6WPRsXfxCz3qfNcSeHQmBJe20mQAAAYOMM//y
AAAEAwBHMEUCIEWDIyWiKmVUjxcq5BIOKKtI99I2nIRaYhdUGaiEK6AKAiEAyJuU
C6hyg5Hh8fYhnJM41oBEleH9NQtegCwxXJ6NKZgwDQYJKoZIhvcNAQELBQADggEB
ACFo6MBzKUuoU4QeFcU8KNt38A2R62GVXH+B83PG++vUxIvekCntFMa3DDx5VQ9v
5eVnQ6iOb/nfo0wXX1CJ6B1/aeO8jO5JZVZcCnQZPebcIrITrfUBa90ygicYYTho
Ze0HpHTspfpdbuo5f/eKTKusWMrsQghKR8QAxJkBynXlsLrphvOI7vvxuAUj57XP
mVmjUahjZWblYwQWniiVMLZqGDmsMobnCMmYpTOrYYL8zHZQO31fFTejmY9dvs/h
gVbMTr4qLH4sMnN6aSb7YgyRpE9gIKjQHClZVh1oXdtfJBrSBoqa+l1B9k1vLR4O
LmtJ4Z7sHWwEga2+bN9luNY=
-----END CERTIFICATE-----
Once you have configured and saved the SAML Settings navigate to Administration > Settings > User Logon Settings.
Here, from the Login Strategy dropdown select the SAML/ADFS option and click the “Save” button.
If the changes are saved correctly you can now test the login.
If the changes were not saved it means some of the requirement to enable SAML were not met. Check the error message at the top of the page for details.
When doing any changes to the SAML configuration it’s a good idea to use 2 different browsers, or the “Incognito” mode in your browser.
That way you can log in to iPassport and update the settings in one browser/window and test them in the other without logging out. If there are any issues with the changes you’ve just made you will be able to use the current open session in iPassport to revert them without locking yourself out of iPassport.
You can also ask a colleague to test the login after you’ve made the changes.
If during your testing you can’t log in and see the error message Invalid ticket then it may mean that there is an issue with the configuration in iPassport. Most likely the certificate is invalid or the “Authentication User Key” is set to the incorrect option. Please double check that the certificate includes the -----BEGIN CERTIFICATE----- and the -----END CERTIFICATE----- blocks and that the number of dashes (-) is correct.
If you just updated your certificate as it was expiring you may have to wait a few minutes for your IdP to propagate the new certificate.
Changes in iPassport are immediate and don’t require any time to propagate.