- Booking and Cancelling Leave
This guide covers assigning a leave allowance to a staff member, requesting/cancelling leave and approving/rejecting it.
Notifying a Management Group of Leave affairs
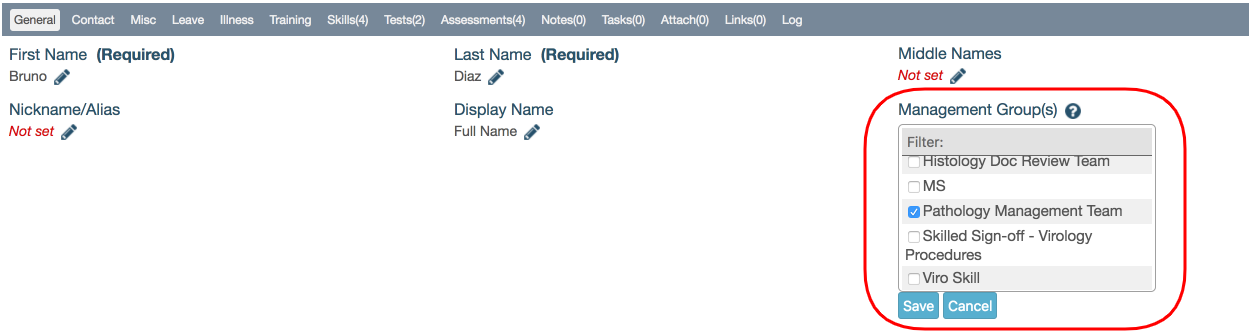 When a leave request is submitted, approved, rejected or cancelled, these matters can be copied to one or more Management Groups. Management Groups are designed to allow multiple managers to be kept informed of staff absences; they are selected from within the staff profile but have to be created as a Distribution List. To select a Distribution List as a Management Group simply click the edit (pencil) icon to the right of the field. This then opens the edit option which is a list of all available Distribution Lists (or Management Group(s)). From here you can select the one you want and then click the Save button.
Once this has been done any alteration to the staff member’s leave would be copied to each member of the group.
Distribution Lists are created via: Laboratory Management > Distribution Lists > New Distribution List
Home OU

Management Groups get notified but staff with appropriate permissions can also view others’ Leave details. To protect users’ privacy, every staff member has a Home OU assigned. If one isn’t declared upon user creation, the system assigns the default OU in the account (the field can’t be left blank). This restricts visibility of the user’s personal details, including Leave and Illness information, to staff members who have permission to view them within that person’s Organisational Unit.
The Home OU doesn’t limit a user’s access to that Organisational Unit. It’s purpose is to limit the visibility of staff members’ records to key users with access to that OU.
In other words, ‘Home OU’ membership doesn’t determine what a user can access but who can access that user’s records.
Leave Allowance
Before a user can book leave within iPassport they need to have a leave allowance allocated to them.
Setting Leave Allowance
Depending on the permissions the user has, they may not be able to do this themselves as it is stored within their staff profile. All users have access to their personnel record through Desktop > Profile (on the top right of the screen) but not all are allowed to edit every detail.
Only users with “Staff Records:View Leave " permission on the staff member’s home OU can see the Staff Member Leave tab and Leave record.
 To set Leave:
- Go to Personnel Management > Staff Profiles > Search Staff
- Type the user’s name in the Search field (partial entries start narrowing the results below)
- Click the row of the user in the results list below to open the user’s profile
- Find the label, Leave; it includes two fields with pencil icons
- Click the edit (pencil) icon on the right of “Not Set” to choose a time unit
- Select a unit of time (days or hours)
- When selecting ‘Days’, a leave request of 1 day will be equivalent to 8 hours
- When selecting ‘Hours’, a leave request of 1 day will be equivalent to 24 hours
- There are time fields to refine the total requested time in the ‘Request Leave’ section
- Click the edit (pencil) icon on the right of “0.0” to set the total annual leave allowance
- Enter a value according to the unit of time and click Save
Once you are happy with the selection simply leave the personnel record, this is then the leave allocation for the staff member concerned.
Requesting Leave
Once a staff member has leave allocated to them they are free to book it within iPassport.
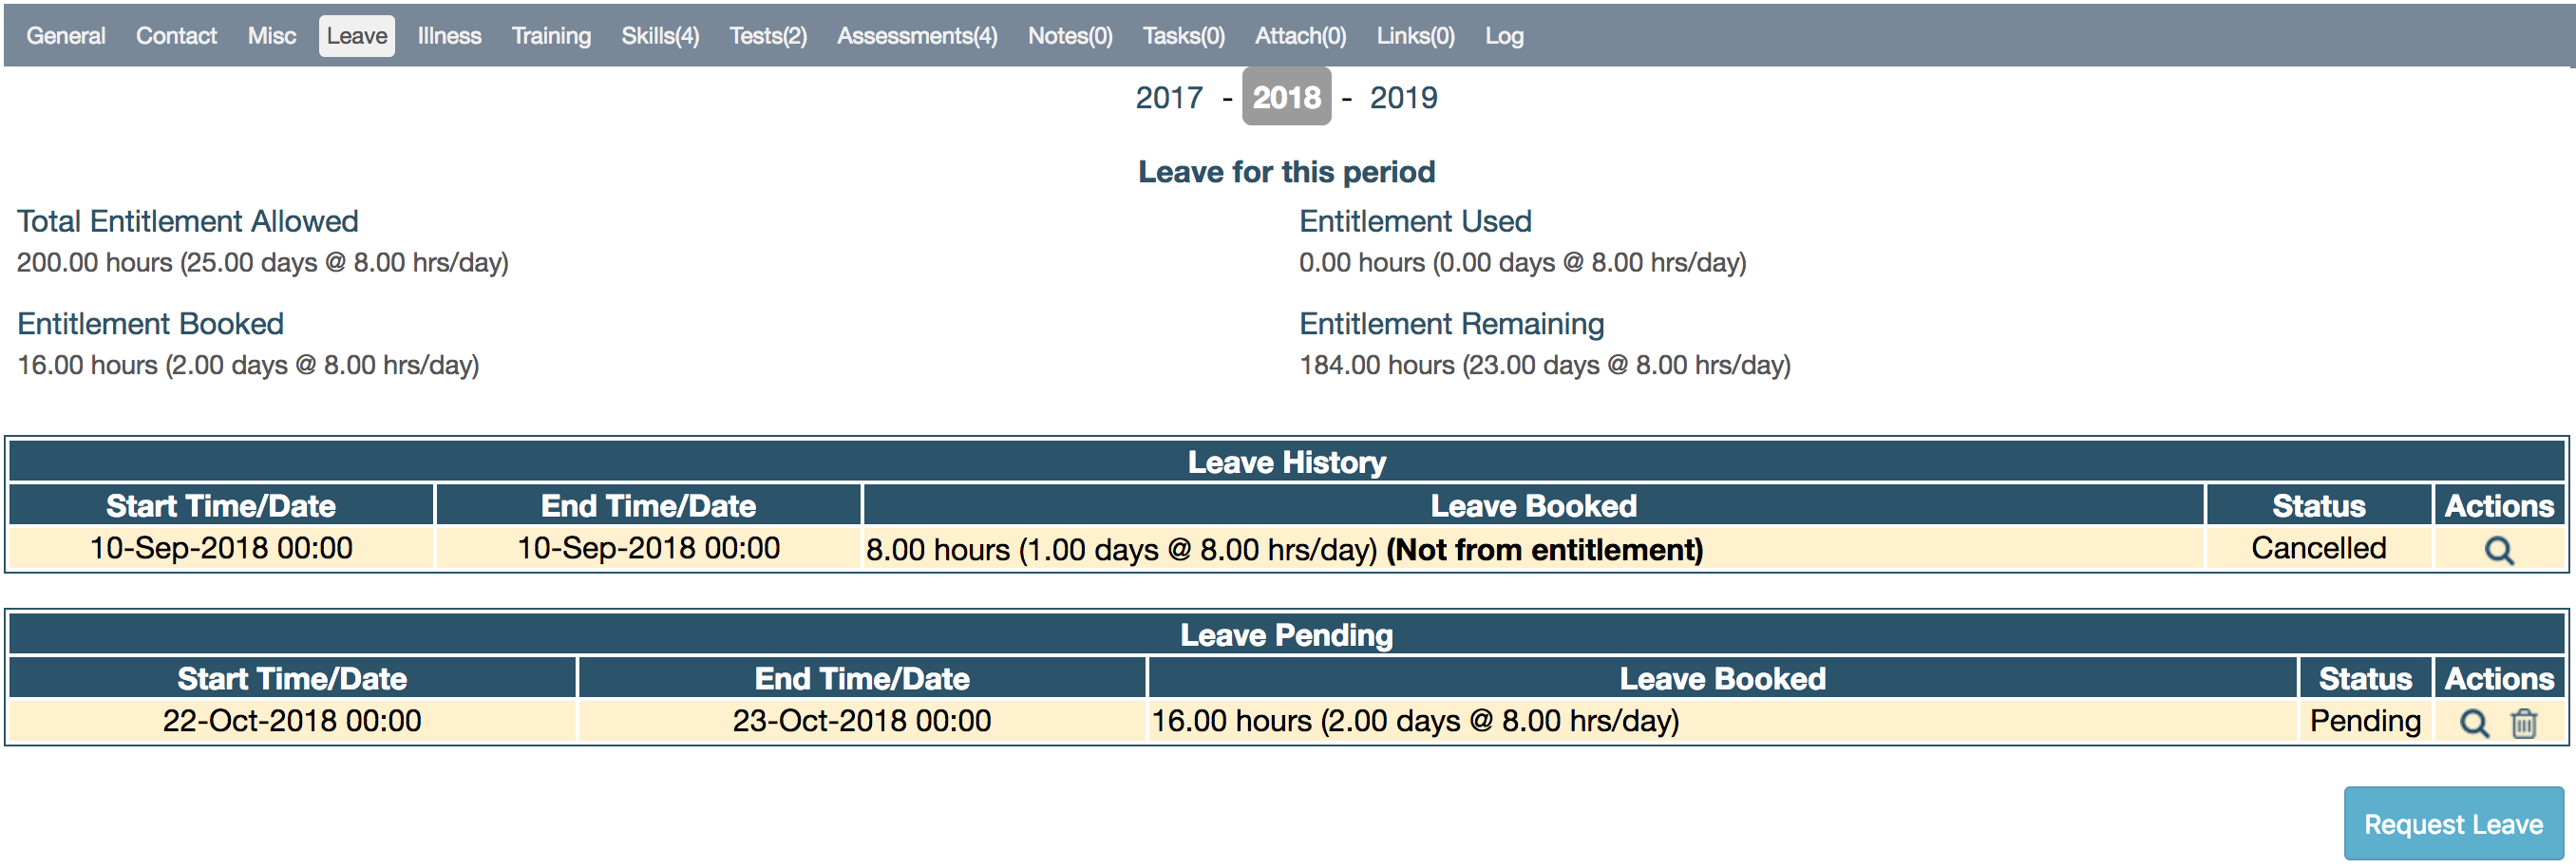 To access the personal leave summary, go to: Desktop > Profile > Leave (shown above).
The view filter automatically defaults to show the current year leave allocation (above is shown as 2018). The Leave tab also provides an outline of Total Entitlement Allowed, Entitlement Used, Entitlement Booked and Entitlement Remaining. The staff member and the manager can see the same details (via different screens).
The Leave History information panel shows previous leave taken and leave cancelled, while the Leave Pending information panel shows leave that has been requested but not approved.
 To request leave:
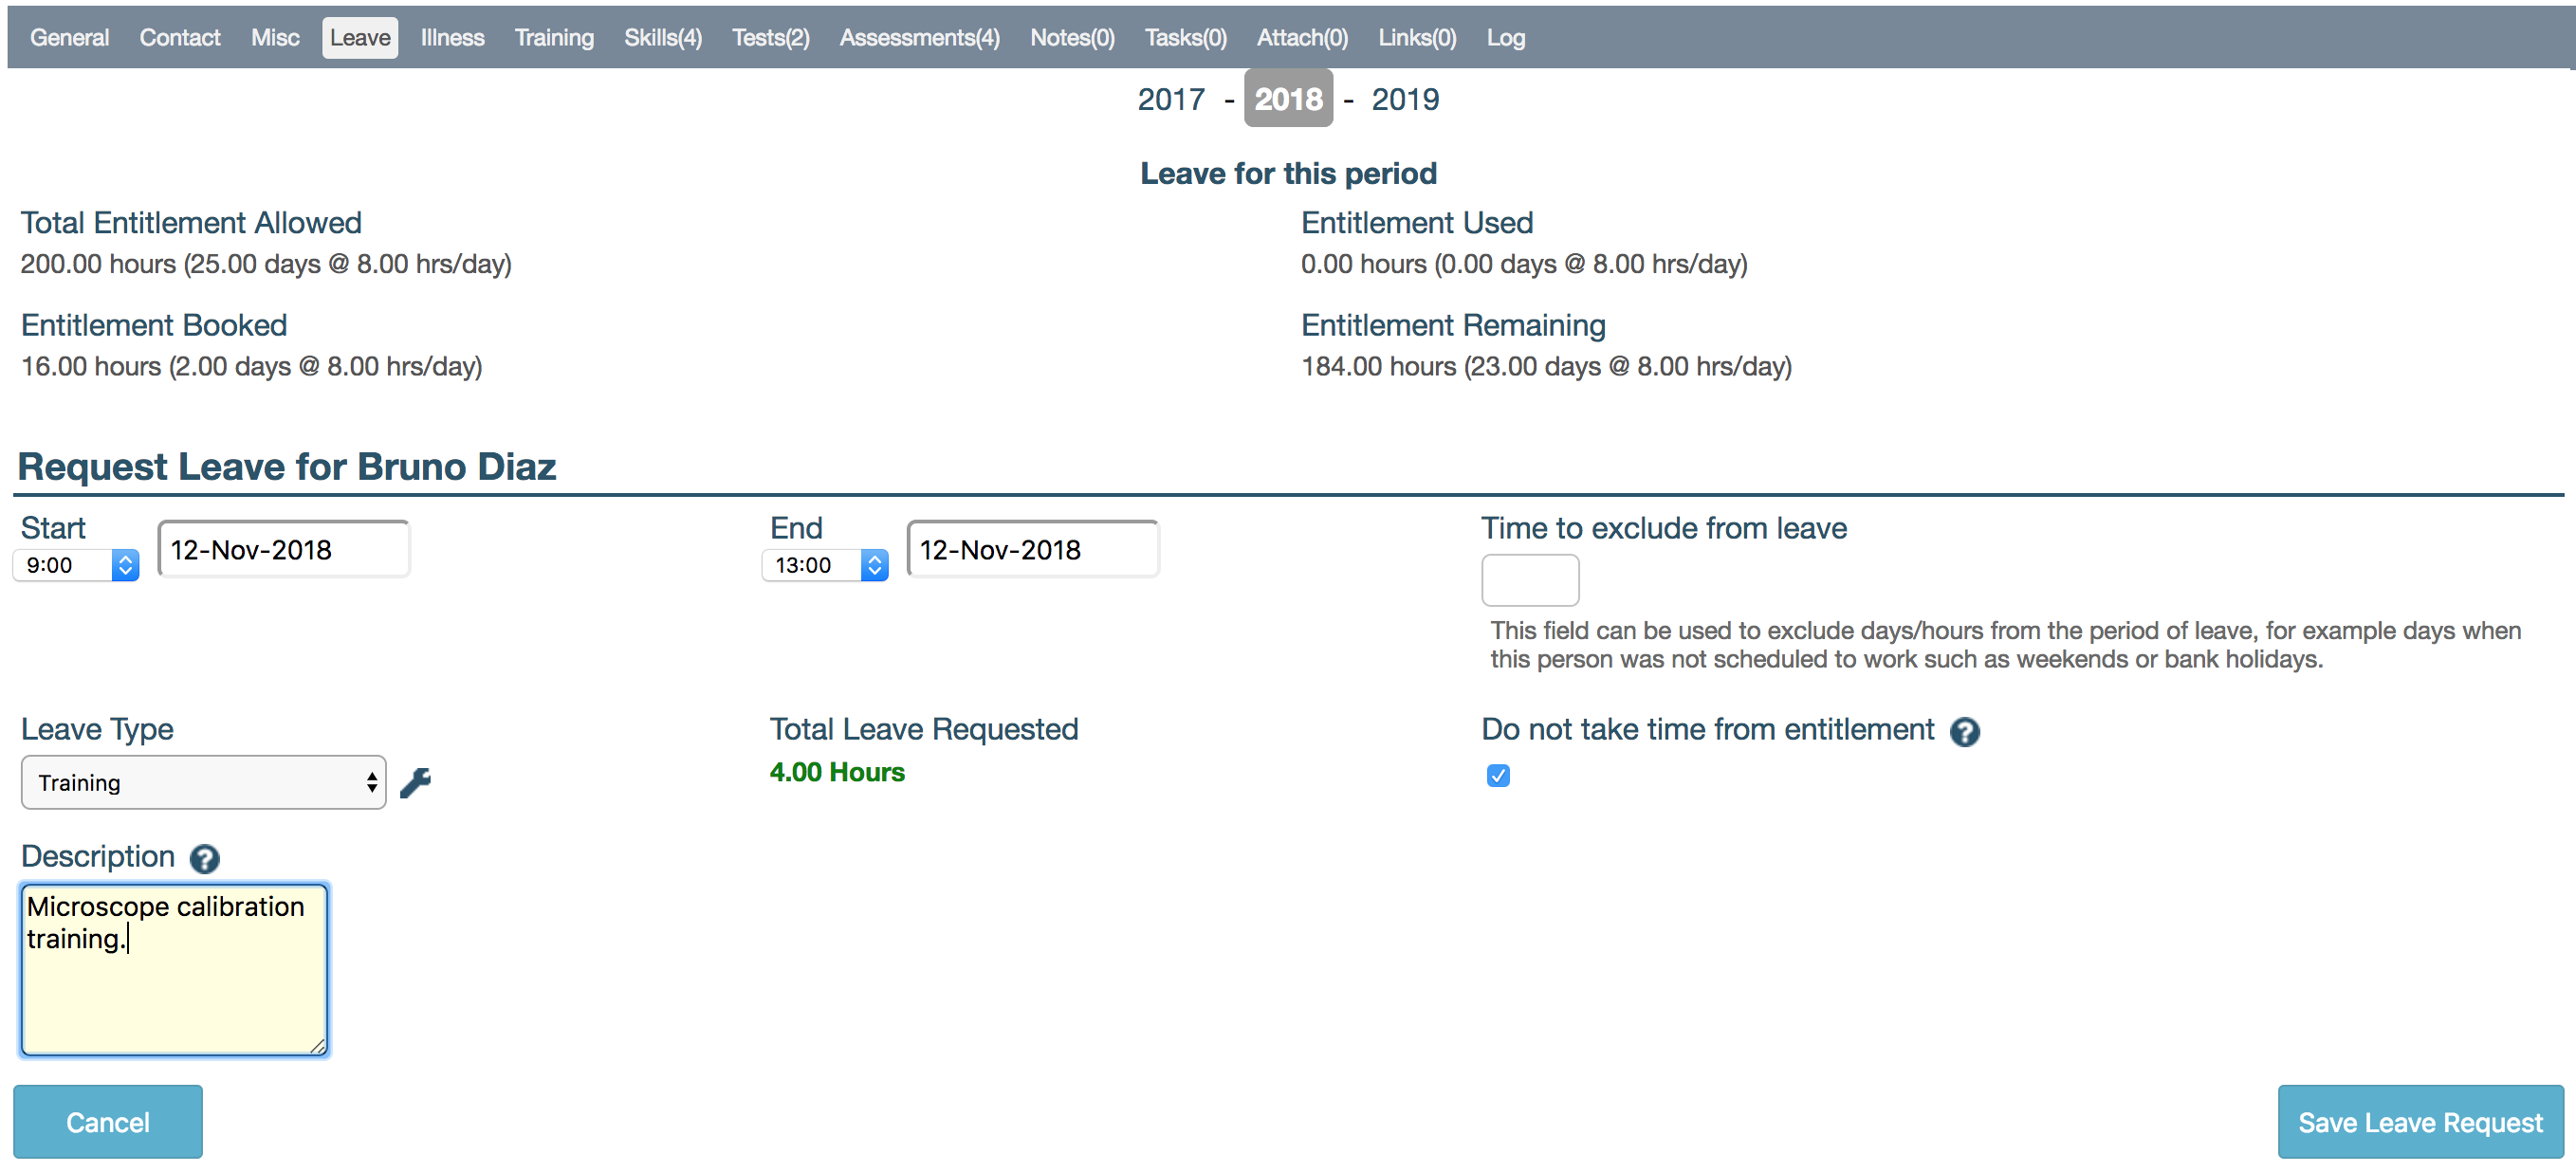
- Click the Request Leave button in the lower right of the screen
- Click inside the text-box to the right of Start and select a start date from the calendar tool
- Click inside the text-box to the right of End and select an end date from the calendar tool
- If the leave allowance is set in hours, you can edit the “All Day” fields by clicking them and selecting specific times
- You can also use the time fields if an absence is requested for a portion of a day
- If appropriate, enter a value for the Time to exclude from leave (e.g. weekends)
- Check the Total Leave Requested field to confirm the calculation matches the request
- If appropriate, tick the checkbox next to Do not take time from entitlement (e.g. leave for training)
- Click the text-box under Leave Type to select a reason (this is a required field)
- With appropriate permissions (Staff Records:Edit Leave Types), a spanner icon will be visible to the right. This allows adding “Leave Types” to the list available (see details below)
- A Description can be optionally added by clicking the field below the caption
- Click the Save Leave Request button to submit details for approval
 The requested leave should appear in the section, “Leave Pending”. The details can be viewed by clicking the magnifying glass under Actions. A user can view the status of their Leave request at any point, via: Desktop > Profile > Leave > Leave Pending.
Adding a Leave Type
 To add a Leave Type (within Request Leave area):
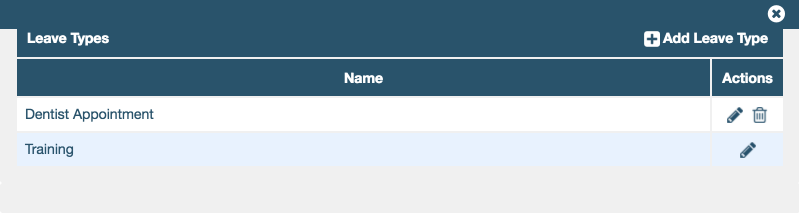
- Click the settings (spanner) icon to the right of the text-box
- Click [+] Add Leave Type in the lightbox that pops up
- Enter the type of leave in the Name field that appears
- Click Create Leave Type to add it to the list in the lightbox
- If required, you can use the edit (pencil) and the delete (bin/trash) icons under Actions to modify the list
- If a leave type is in use, the delete (bin/trash) icon will not be visible
- Click the close (X) icon on the top left to exit the lightbox
Cancelling a Leave Request
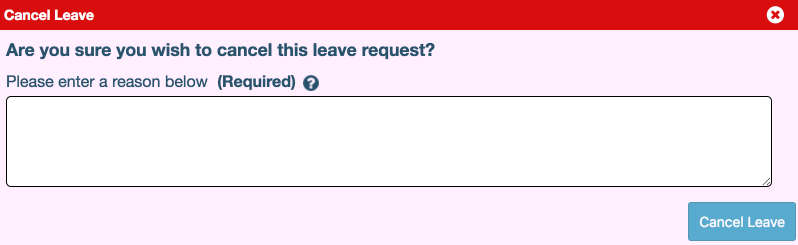 To cancel a leave request:
- Click the delete (trash) icon in the Actions column of the Leave Pending area to open the Cancel Leave lightbox
- You are required to provide a comment in the Please enter a reason below field for the records
- Click the Cancel Leave button in the lower right corner of the lightbox
When the Cancel Leave button is clicked, iPassport sends an email confirmation of the cancellation to the user and all those in the Management Group(s) within the staff record.
Approving and Rejecting Leave
The preference Notify me when my leave requests are updated, determines whether emails notifying you of changes to your request are sent to you; if this has been disabled then no email notification is distributed. All leave updates are recorded in the Leave tab of a user’s Profile.
If the person approving the leave is also the person that requested the leave then no email is distributed, regardless of the preference.
 To approve/reject leave requests:
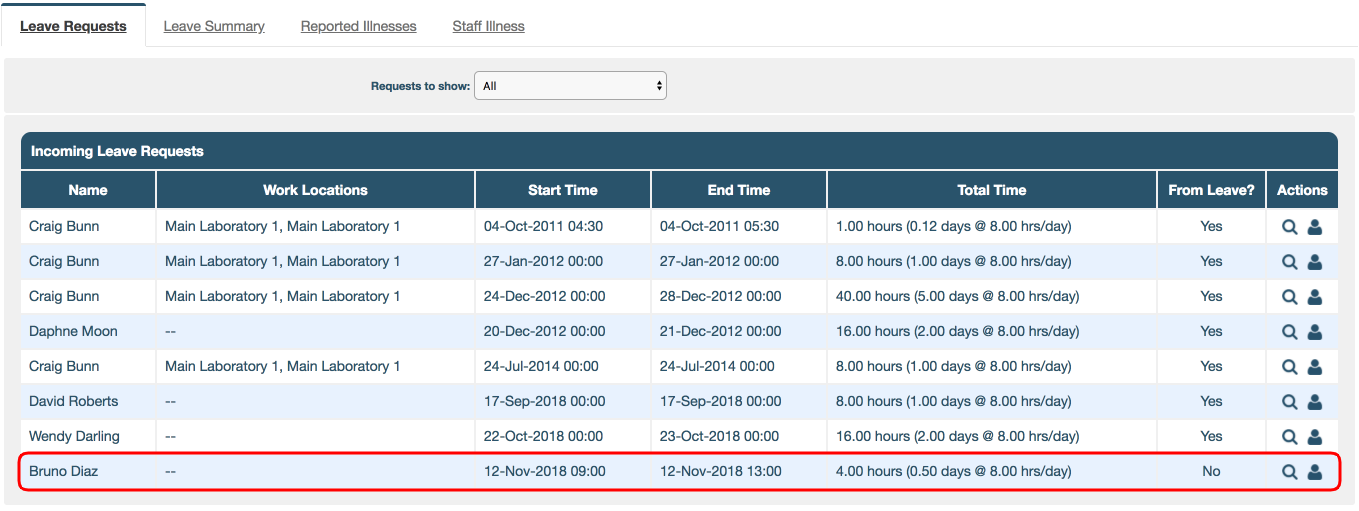
- Go to Personnel Management > Staff Absence > Leave Requests
- Click the row of the request to open the “Leave Request for
” lightbox - To approve, click Approve Leave; no comments required
- To reject, a comment must be entered, then click Refuse Leave
In both cases, a record is made but no time is deducted from the Leave Allowance if the request is rejected.
Checking Leave Records (as Personnel Manager)
To view leave records:
- Go to Personnel Management > Staff Absence > Leave Summary
- Use filters to search for particular records:
- Filter by User - a dropdown list of all users with leave history; type the first few letters to jump to the name
- Filter By Status - narrow results down to Approved, Cancelled or Refused
- Filter by Year - type in a year to only bring up those records
- Order Results By - choices are -
- Name (Surname A-Z)
- Name (Surname Z-A)
- Start Time (Oldest first)
- Start Time (Newest first)
- End Time (Oldest first)
- End Time (Newest first)
- Status (A-Z)
- Status (Z-A)
Checking Personal Leave Records (as user)
To view personal leave records go to Profile > Leave
There are two sections, Leave History and Leave Pending. You can cancel approved leave here, following the same steps from, Cancelling a Leave Request.
Cancelling Approved Leave for Other Users
Personnel managers can also cancel approved leave if required in the same way as pending requests.
To cancel approved leave:
- Go to Personnel Management > Staff Absence
- Find the record by following the steps from Checking Leave Records (as Personnel Manager)
- Follow the steps from Cancelling a Leave Request