- Creating Equipment
Creating New Equipment Records
To create a new equipment record navigate to Laboratory Records > Equipment > New Equipment or click Laboratory Records and click the plus (+) button next to Equipment.
There are a total of four steps to complete when creating a new equipment record.
Step One - General

The first step collects the general information about the piece of equipment being added:
- Organisational Unit - the OU where the equipment record belongs
Clicking the field opens a dropdown menu displaying all the OUs available for selection. Only the OUs the user has access to will be displayed. Once the equipment record has been created, it is possible to move it to another OU assuming the user has permission to do so. - Name (Required) - the name is a required field and has to be unique on an OU level
For example, if a system has multiple items with the same name, it is recommended that the name is supplemented with a numerical value (e.g., Beckman Synchron LX20, Beckman Synchron LX20 – 1, Beckman Synchron LX20 – 2). - Code - free text field to enter an internal code, not generated by the system
- Model Number - free text field to enter manufacturer’s information
- Equipment Type - allows classifying equipment with a user created tag
Within iPassport there is no limit to the number of equipment types that can be created, although an equipment record can only have one. Currently, ‘Equipment Types’ are shared between OUs, so if there are items displayed here that look unfamiliar, they might have been created in another OU. Please see below how to manage equipment types. - User Responsible - a person can be put in charge of a piece of equipment
Select a user by entering (even partially) their name in the field and clicking it when it appears in the dropdown menu of names matching the string of text entered. - Equipment Manufacturer - if the manufacturing company has been added to the Companies section (under Laboratory Management), it can be found in the same was as the ‘User Responsible’
- Manufacturer Serial Number - free text field to enter the item’s serial number
- Capital Equipment - only two options are available “Is Capital Equipment” or “Is NOT Capital Equipment”
- Internal Serial Number - available free text field, if required
- Asset Registration Number - free text field for additional information
- Department Asset Registration Number - free text field for use if required
- Warranty Cover (months) - a number field which refers to the number of months the equipment is under warranty cover
- Warranty End Date - a pop up calendar appears when clicking the field; the date selected is used to trigger a reminder for the ‘user responsible’, one month ahead of the expiry date
- Service Contract Provider - this is also a look-up field which will search for companies added to the Companies section (under Laboratory Management)
- User Manual ID - available free text field, if required
- Description - available free text field, if required
- Comments - available free text field, if required
Once the necessary information has been entered in this step, click the Next Step button. The next steps will have a Previous Step button to return and edit fields; the OU field is the only one that can’t be edited once this page is left.
Managing Equipment Types
This is one of iPassport’s user configurable list of options which can be edited when the spanner/wrench icon is visible next to the field.
Instructions on how to manage this configurable look-up field can be found by clicking this LINK.
Step Two - Locations
The second step (which is optional) allows a user to select one or more Storage Locations and/or Usage Locations for the equipment piece. Both are used to define where the item can be checked in and out; if none are declared, there will be no restriction on where a piece of equipment can be located.
‘Storage Location(s)’ are particularly useful when the equipment is taken out of service. It is possible to edit these fields at any point, once the equipment record has been created. It may be useful to inactivate the equipment record if it is being retired.
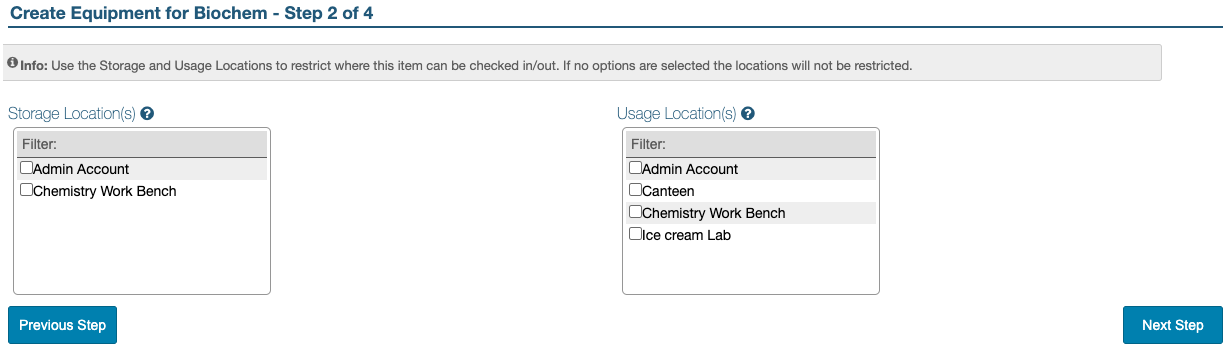
Click the Next Step button when the details have been entered.
Managing Locations
Locations can only be managed in the Administration area. Only locations that have been tagged with the same OU will be available for selection in this equipment creation step and in equipment records.
To create a new location:
1. Navigate to Administration > Locations > New Location or to Administration and click the plus (+) sign next to Locations
2. Add a Short Name (Required) and a Long Name (Required) for the new location; the rest of the information is optional
3. Click Create Location
4. In the new record, click the OUs & Tags tab
5. Select the appropriate OU(s) by clicking the pencil icon under Organisational Units
6. Select the Tags, General and Storage if required
Step Three - Delivery
The third step (which is optional) allows a user to add details about the delivery of the piece of equipment. This includes, the staff member(s) who received the equipment, when it arrived, its condition, its cost and estimated replacement date and cost.
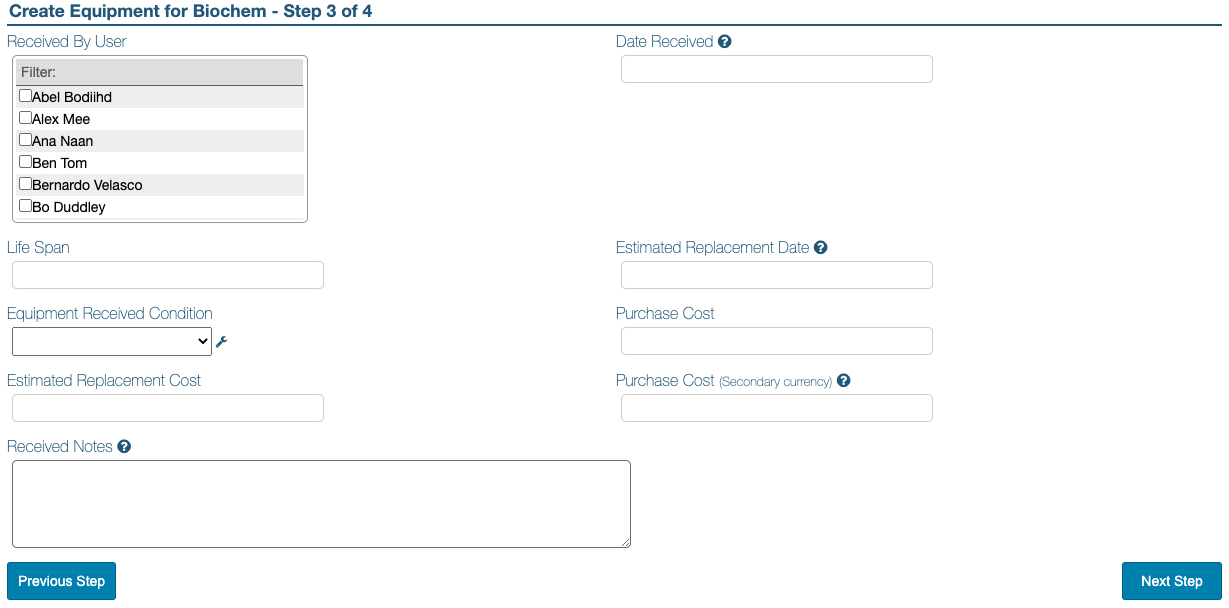
- Received By User - this is a multiple select field, allowing to select one or more users
- Date Received - can be selected from a pop-up calendar and is editable afterwards
- Life Span - a free text field, not used for calculations
- Estimated Replacement Date - can be selected from a pop-up calendar and is editable afterwards
- Equipment Received Condition - allows selecting a condition from a user created list; please see how to manage ‘Equipment Received Conditions’ below
- Purchase Cost, Purchase Cost (Secondary currency), Estimated Replacement Cost and Received Notes - are all free text fields to add any pertinent information
Click the Next Step button when the details have been entered.
Managing Equipment Received Conditions
This is one of iPassport’s user configurable list of options which can be edited when the spanner/wrench icon is visible next to the field.
Instructions on how to manage this configurable look-up field can be found by clicking this LINK.
Step Four - Installation
The fourth and final step (which is optional) allows a user to add details of the staff member(s) who installed or supervised the installation of the equipment.
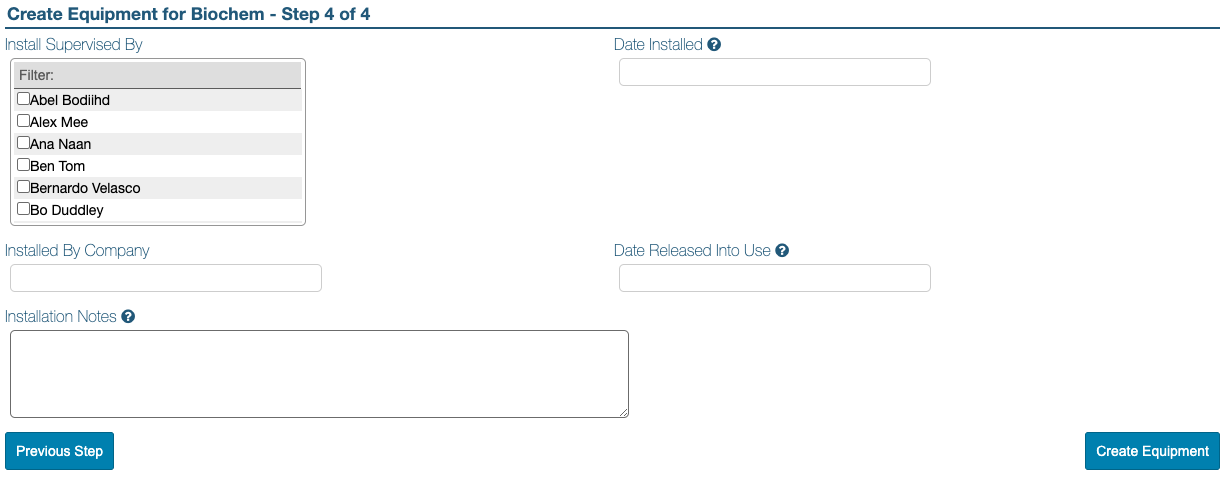
- Install Supervised By - a multiple select field allows selecting one or more users
- Date Installed - a pop-up calendar allows selecting the installation date
- Installed By Company - this field uses a smart search tool too; it does not allow a user to add free text information
When a user starts to type in this field it searches the companies on the system. If the manufacturing company has been added to the Companies section (under Laboratory Management), it can be found in the same was as the ‘Equipment Manufacturer’ above.
If a company is not available on the list then it is not on the system yet.
To add one, navigate to Laboratory Management > Companies > New Company, where only a name is initially required to create the record.
- Date Released Into Use - a pop-up calendar allows selecting the implementation date
- Installation Notes - a free text field allows a user to add further information
Once the fields required have been completed, click the Create Equipment button in the lower right corner.
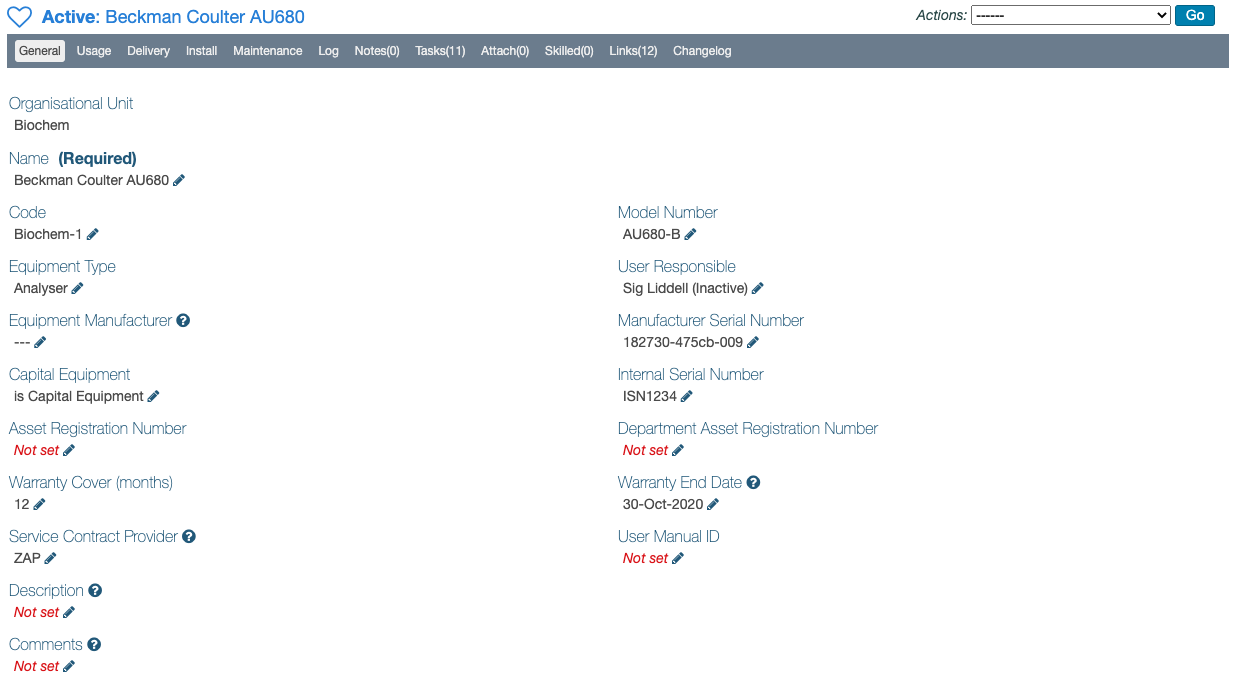
The screen should refresh to display the new equipment record.
NEXT STEP:
The next article covers Managing Equipment Records.
PREVIOUS STEP:
The previous article covers Equipment Permissions.