- Organisational Units, User Groups, Roles and Permissions
Organisational Units, User Groups, Roles and Permissions within iPassport
Introduction
If you are setting up your account for the first time, you should start by making the following considerations:
- Decide upon the Organisational Units (OUs) to be created
- Decide how to classify the staff into User Groups
- Assign Roles to each user group to grant relevant permissions within specific OUs
- Decide on Locations (Locations and Sections), which are linked to OUs to help control the flow of information
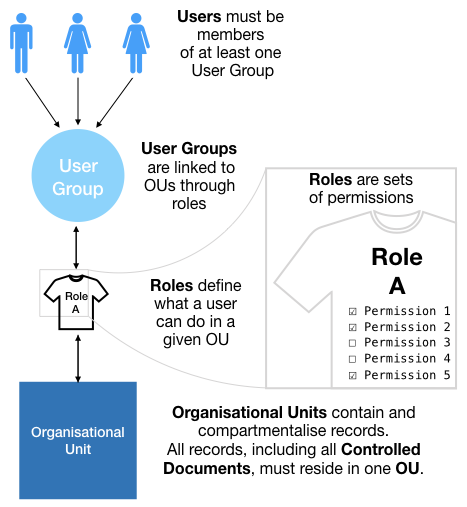
The basis of documentation access is built on three pillars: Organisational Units, User Groups, and Roles.
What are Organisational Units?
An Organisational Unit (OU) is defined as a means of grouping records into a collection so they can be managed and shared securely, according to the permissions associated with it. It can be thought of as a folder where records can be stored and which only users with appropriate permissions can access. Records include policies, procedures, checklists, standards, equipment records, competency records, incident reports, non-conforming events, etc. Access rights (permissions) vary in rank so for example, a user might be able to access a record to view it but not to edit it. OUs can be designed to reflect the departments of an organisation, like Pathology, Microbiology, etc, but they can also be used as repositories of records that are shared by more than one department, say, All Staff Policies or General Admin.
What are User Groups?
User groups allow establishing specific access permissions to their members. A user group can include any number of individuals and there can be as many user groups as required. Each user group can have different sets of permissions (roles) that only apply in designated OUs. Therefore, a member of a user group might have high level permissions in one OU and none at all in another. In fact, if a user does not have permission via a user group to access an OU, then the OU won’t be visible to them within the iPassport account. This makes the system used by iPassport an excellent way to keep details out of view from those who don’t need to see them. Typical User Groups may include System Administrators, Super Users, Managers, Technical Staff, etc.
What are Roles?
Roles are sets of permissions that define the authority a user can have in a given area. Roles are added to user groups but only in connection to specified OUs so members of a given user group can have different roles in different OUs. To accommodate a wide range of organisational structures, iPassport has a comprehensive list of permissions which can be combined in any way. To make life easier, a set of predefined (factory set) roles are available with generic functions that can help set the system up quickly. These roles can later be used as a basis to create new roles, tailored to the structure of the company. Typical examples of our pre-populated system roles include, Policy Editor, SOP Viewer, Competency Assessor, etc.
| Basic Structure in iPassport: | Allows Creating Complex Organisations: |
|---|---|
 |
 |
Creating Organisational Units
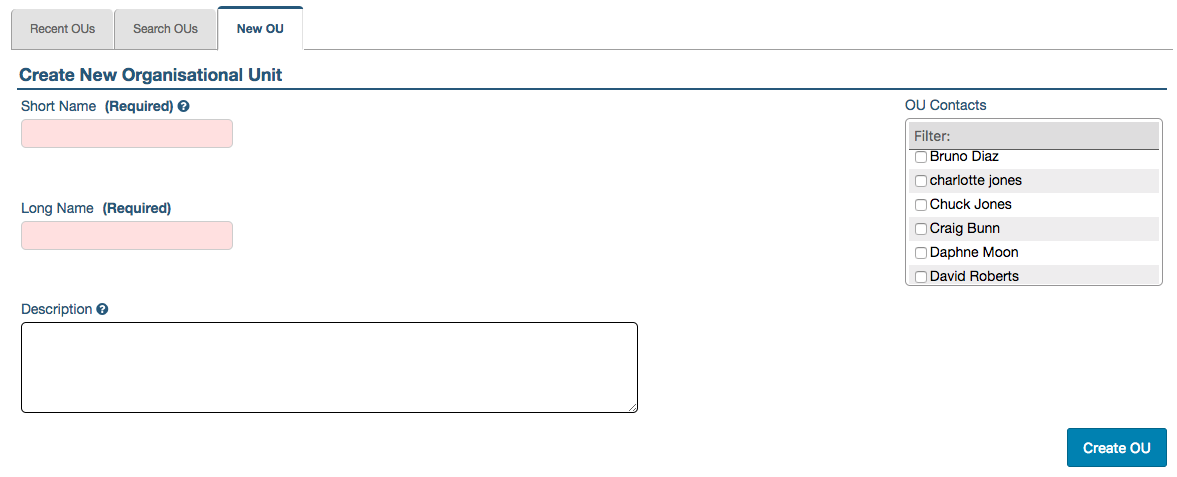
To create an OU:
- Go to Administration > Organisational Units > New OU (or, click the plus sign [+] next to Organisational Units, as a shortcut)
- Enter a Short Name for the new OU; as the help text indicates, ideally choose an abbreviation that is easily identifiable
- Enter a Long Name for the new OU (this can be more descriptive as it’s generally only displayed when hovering over the short name)
- Optionally, enter a Description of the new OU
- Optionally, enter OU Contacts at this stage but this can be done later and it’s explained below
- Click Create OU
Once the OU has been created it is then possible to create groups that can be associated with it.
Adding OU Contacts
Ou Contacts are the people (generally administrators with sufficient training) who can help other colleagues in that OU. These names will appear listed under Help > Who Can Help Me, arranged by OU so that larger organisations can offer local support in each department. Only eligible users (those who have the permission, ‘Desktop:Show Users Menu Item’) for that particular OU will appear in the dropdown list where they can be picked.
To add OU Contacts:
- Click the edit (pencil) icon under OU Contacts
- Tick or untick the checkboxes by each user to add or remove them from the list (the Filter field can be used to search for names)
- Click Save to finish
Creating User Groups
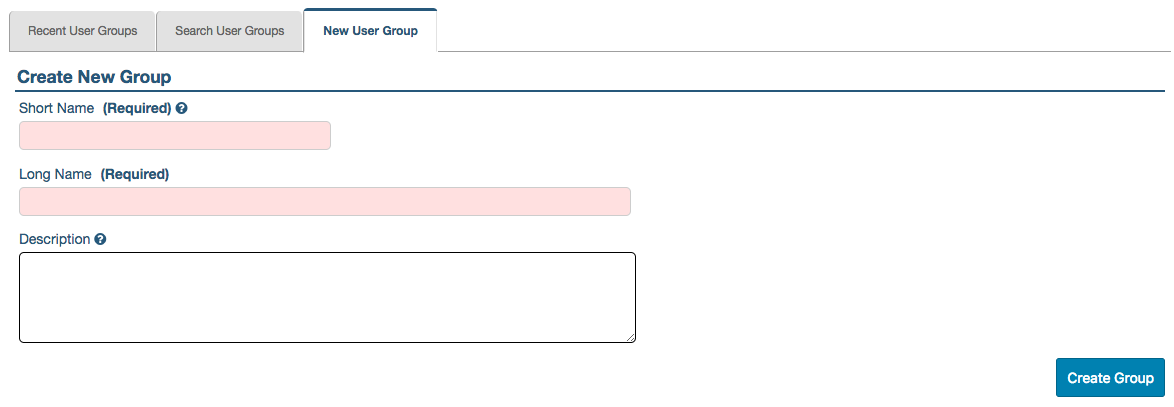
To create a User Group:
- Go to Administration > User Groups > New User Group (or, click the plus sign (+) next to User Groups, as a shortcut)
- Enter a Short Name for the new User Group; as the help text indicates, ideally choose an abbreviation that is easily identifiable
- Enter a Long Name for the new User Group (this can be more descriptive as it’s generally only displayed when hovering over the short name)
- Optionally, enter a Description of the new User Group
- Click Create Group
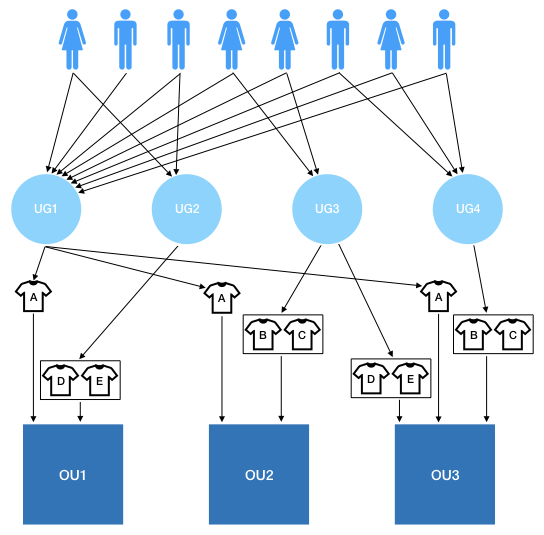
It is possible to have multiple groups associated with an OU; each user group can have different permissions assigned to it for the same OU. On the other hand and from experience, though it’s possible to have multiple OUs linked to one user group, we strongly recommend that each user group is only associated with one OU to avoid confusion over what permissions a user has.
Adding and removing users to User Groups
All users in one user group will share the same permissions, based on the roles they get assigned within a given OU. They can be members of more than one user group so that different responsibilities can be assigned to reflect the structure of the organisation. For example, only some administrators may be responsible for managing personnel so an additional user group can be created for them, rather than giving all administrators that role (Personnel Management Editor).
Users can be added and removed from a user group at any time.
To assign users to a User Group:
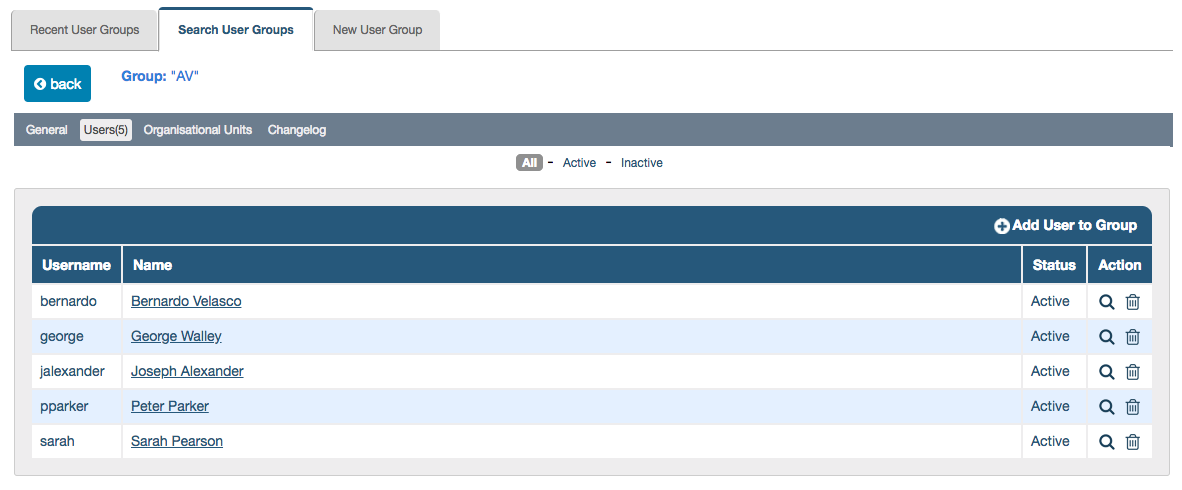
- Open the user group from the list under Administration > User Groups > Search User Groups by clicking its row or its magnifying glass under Actions
- Click the Users tab (the number in brackets indicates the number of users already added, both active and inactive - e.g., Users(7))
- Click (+) Add User to Group, found on the top right of the user list section, to open the Add user to group lightbox
- Under Add Users, tick the checkboxes by each user to add them to the list (the Filter field can be used to search for names) or,
- Optionally, if all the names to add are already collected in a Distribution List, select the distribution list under Distribution Lists
- Click Add Users
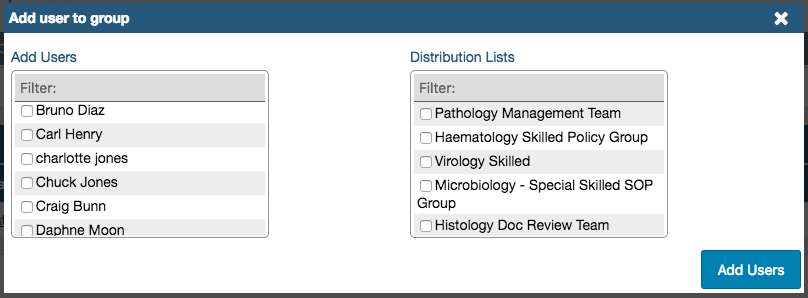
You can see what members a Distribution List has by hovering over it - a black pop-up window with its list of names will appear.
To remove users from a user group:
- Open the user group to the Users tab as described in steps 1 and 2, above
- Click the delete (trash/bin) icon under Actions on the rows of those to be taken out
At this point, the users will not have access to any OUs from the user group just created. Two more steps are required. First, OUs must be associated with the user group (we recommend only adding one OU to each user group) and then, roles need to be assigned to specify which permissions the members will be granted within that OU.
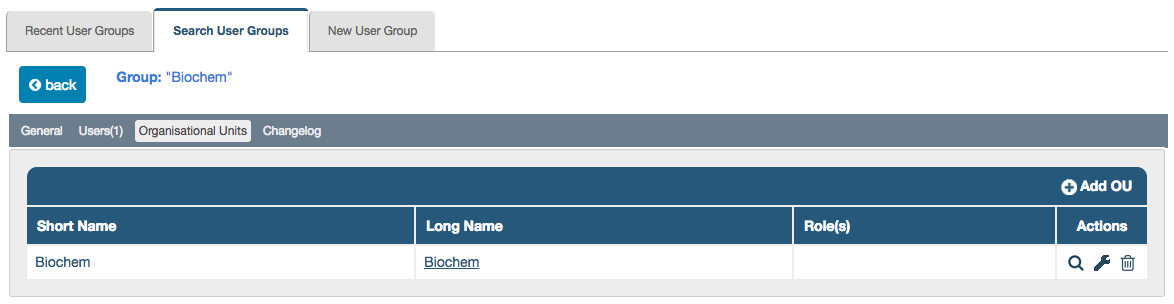
Linking an OU to a User Group
- Open the user group from the list under Administration > User Groups > Search User Groups by clicking its row or its magnifying glass under Actions
- Click the Organisational Units tab
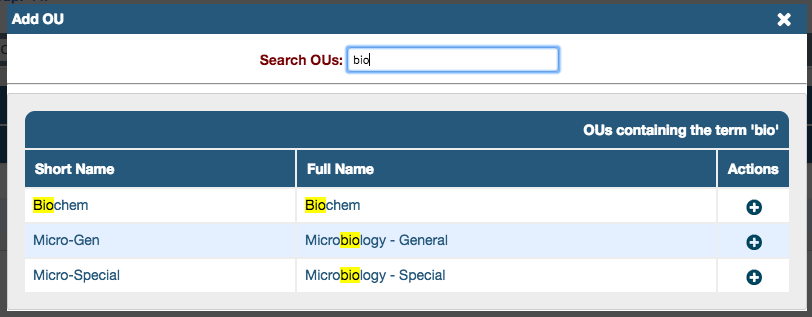
- Click (+) Add OU, found on the top right of the OU list section, to open the Add OU lightbox
- Start typing the name of the OU in the field, Search OUs
- Once the OU appears in the list below, click the add (+) sign on its row, under Actions
It is also possible to link user groups to OUs from within the OU records (under Administration > Organisational Units > Search OUs, select the OU and click the Group Roles tab).
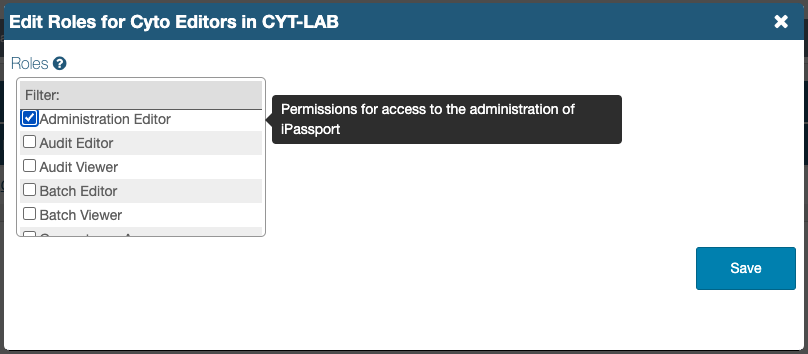
Applying roles to User Groups within OUs (adding Roles)
The last step to set up a user’s access to certain areas of an OU is to apply roles to their group within that OU. Multiple roles can be added so that all the members of the user group can perform different functions within the designated OU. This is another good reason to keep things simple by only assigning one OU to each user group. If the staff or their functions change over time, it will be easier to maintain the permission setup.
To add roles to an OU within a User Group:
- Open the user group from the list under Administration > User Groups > Search User Groups by clicking its row or its magnifying glass under Actions
- Click the Organisational Units tab
- Click the manage (spanner/wrench) icon under Actions in the row of the OU, to open the Edit Roles lightbox
- Tick or untick the checkboxes by each role to add or remove them from the list (the Filter field can be used to search for roles); a message pops up on the right to describe the purpose of the role, as you hover over each of them.
- Click Save
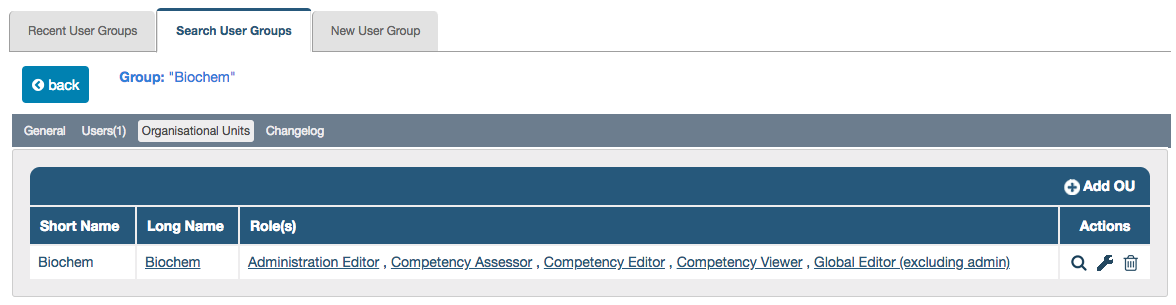
Every OU listed under a User Group should have at least one Role visible in its row to make it accessible by its members:
Managing Roles
iPassport is supplied with predefined (system) Roles to facilitate initial set up. System roles are not editable. In most cases they will be adequate but it is possible to create new roles (which can be based on existing ones) to refine the set of permissions that will be assigned to a user group.
Roles tend to be designed to cover permissions that are specific to a certain area of the system and to provide a certain rank to its users, such as viewer, editor or administrator.
The pool of permissions is classified by sections to search and identify them easily. For example, for controlled documents like policies, the permissions, Policies:View Authorised Policies, Policies:Edit Policies or Policies:Authorise Policies are available.
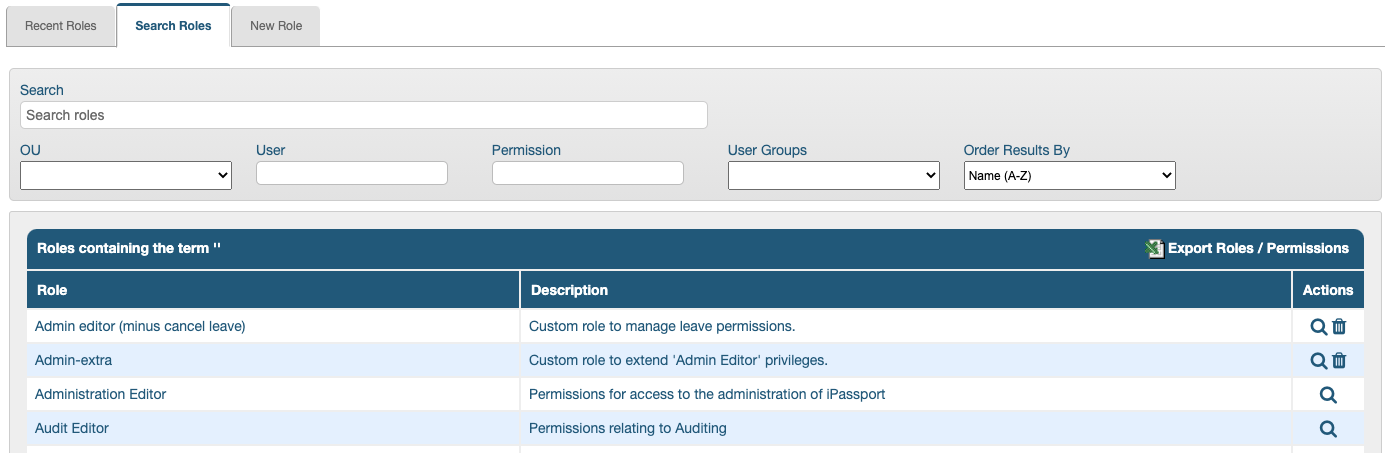
Searching Roles
The Search Roles tab offers the following filters to help locate roles both by their content and by where they are used:
- The Search field allows entering free text to search roles by their name
- The OU filter allows selecting one Organisational Unit and the results will display any roles linked to that OU
- The User filter is a search-as-you-type field and it will match text entered to names of users in the account; the results will bring up all the roles in all the user groups of which the person is a member
- The Permission filter is also a search-as-you-type field and it will match text entered to the permissions in the system; the results will bring up all roles that use the selected permission
- The User Groups dropdown filter allows selecting one of the existing user groups and it will bring up all the roles linked to it
- The Order Results By field allows sorting the results alphabetically by name (Name (A-Z) and Name (Z-A))
You can quickly identify system roles because they can’t be deleted so they’re missing the delete (trash/bin) icon under Actions.
Exporting a Roles/Permissions Report
The results of a search can be exported in a report which provides a matrix of the permissions used in each role (click, Export Roles/Permissions). The CSV file lists all the permissions in the first column; the second column provides the description of each permission. Subsequent columns display the roles from the search result with an “X” in each row where the corresponding permission is used. The same information is available on screen but this report makes it easy to compare two roles’ sets of permissions. It also helps understand how roles are structured at a glance.

Creating and Editing Roles
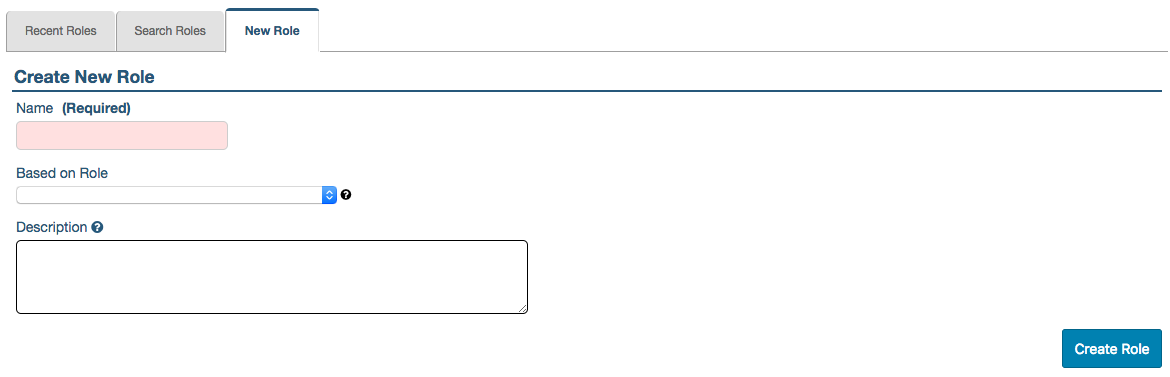
To create a new role:
- Go to Administration > Roles > New Role (or, click the plus sign [+] next to Roles, as a shortcut)
- Enter a Name for the new role
- If the new role is based on an existing one, click the field under, Based on Role to expand a dropdown menu of existing roles and choose one
- Optionally, enter a Description
- Click Create Role
To edit a role (only non-system roles can be edited):
- Go to Administration > Roles > Search Roles
- Click the row or magnifying glass under Actions for the role to edit (the role’s page opens to the General tab)
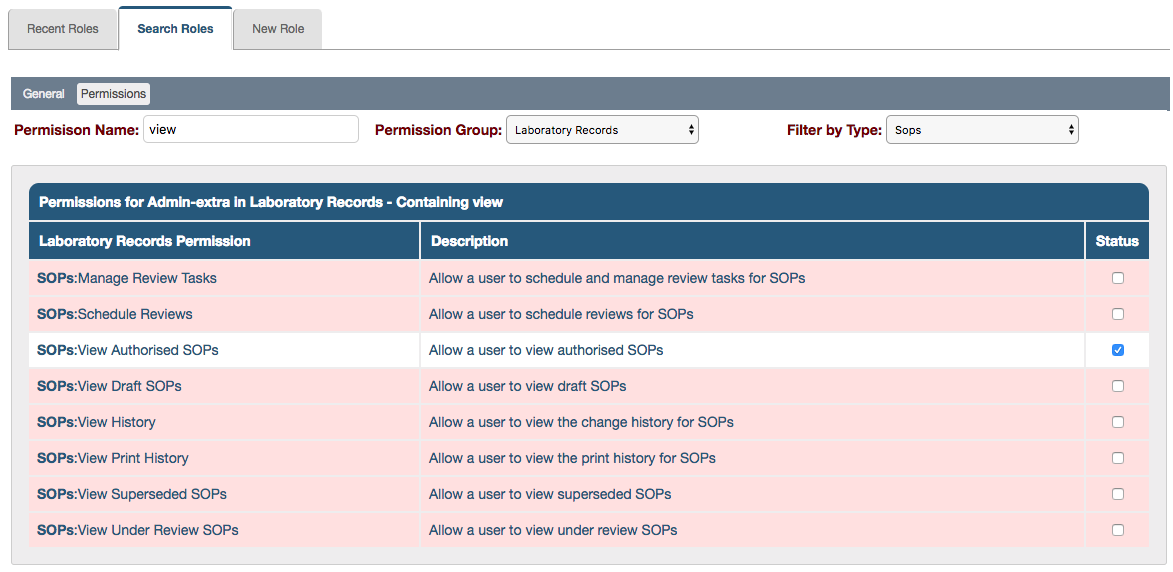
- Click the Permissions tab to open the list of permissions
- Search for the relevant permissions with the aid of the filters available or just scroll to find them
- Permission Name helps filter by key words, such as view
- Permission Group helps filter by ‘modules’ within iPassport, such as Personnel Management
- Filter by Type helps filter by sections, such as SOPs
- Tick or untick the checkbox under Status to enable or disable a permission
Enabled permissions appear on a white background while disabled ones appear on a pink background.