- Creating/Deleting Workflows
Creating Controlled Document Workflows
Controlled Document workflows can be created and edited in two places.
-
There are global workflows which are created and managed in the Workflows module (Administration > Workflows menu). This area can be used to configure common workflows which can be shared by a set of documents (for example, all SOPs in a particular OU).
-
Additionally, each controlled document carries one custom review workflow and one custom publishing workflow which can be configured for use only in the parent document. They are always available but they can be replaced with a workflow created in the Workflows module or they can simply be disabled.
NOTE: It is possible to disable periodic reviews for a particular document altogether.
The Review Settings button found in the General tab of controlled documents has a checkbox marked, “Require periodic review of this document”.
When this is disabled, documents can still be reviewed but no workflows will be used in the process.
Publishing workflows can also be disabled by selecting, ‘None (manual authorisation)’. This reverts the process to having Authorisation and Request Authorisation buttons in place of a Start Publishing Workflow button.
Document Review Workflows and Document Publishing Workflows share some features and functionality so the information below applies to both unless specified.
Creating Global Workflows
Workflows can be designed to be applied to all new and optionally, to all existing Documents of a given type in selected OUs. For this, they need to be created in the Workflows module.
To create a workflow that can be shared:
-
Navigate to Administration > Workflows > Create Workflow
TIP: The plus sign [+] next to menu items is a shortcut to the new record creation tab for that module.
-
Select Document Review Workflow or Publishing Workflow under Workflow Type; the default choice is Document Review Workflow so if no adjustment is made, a review workflow will be created
-
Select an Organisational Unit for the workflow
NOTE: Workflows will only be available for use in documents which belong in the same OU or in an OU with which the workflow has been shared. Users will only see listed the OUs in which they have permission to create/edit workflows.
-
Enter a Name for the workflow in the field provided
-
Add a Description if desired
-
Click the Create Workflow button
The new record will open to its General tab but it will still need some information to become usable:
Creating Custom Workflows
Every controlled document carries a custom review workflow and a custom publishing workflow which are only applicable to itself. They can be built and used as an alternative to existing workflows created in the Workflows module.
Custom workflows can only be used if a global workflow hasn’t been locked in place. It is possible to enforce and lock a given workflow for each type of document in each OU in the Organisational Unit Preferences area. Please refer to the Settings section of this user guide for further detail.
When a new document is created with externally pre-assigned workflows in the Settings area, custom workflows will not be created for such documents as they already have one. Therefore, both for review and publishing workflows, the button, ‘Create Custom Workflow’ will appear when Custom Workflow is selected in the ‘Review Workflow’ or ‘Publishing Workflow’ fields. Clicking the ‘Create Custom Workflow’ will then expand the lightbox to display and allow editing the custom workflow fields.

Creating Custom Review Workflows
To build or edit a custom review workflow within a document:
- Open the document in question to its General tab
- Click the Review Settings button (documents ‘awaiting Authorisation’, ‘pending release’, ‘superseded’ or ‘under review’ don’t display this button)
- Ensure the Require periodic review of this document checkbox is ticked
- Select Custom Workflow from the Review Workflow dropdown menu
- If the button, ‘Create Custom Workflow’ appears on the right, click it; otherwise, skip this step
- Edit the workflow following the information provided in the section, Editing Review Workflows below.
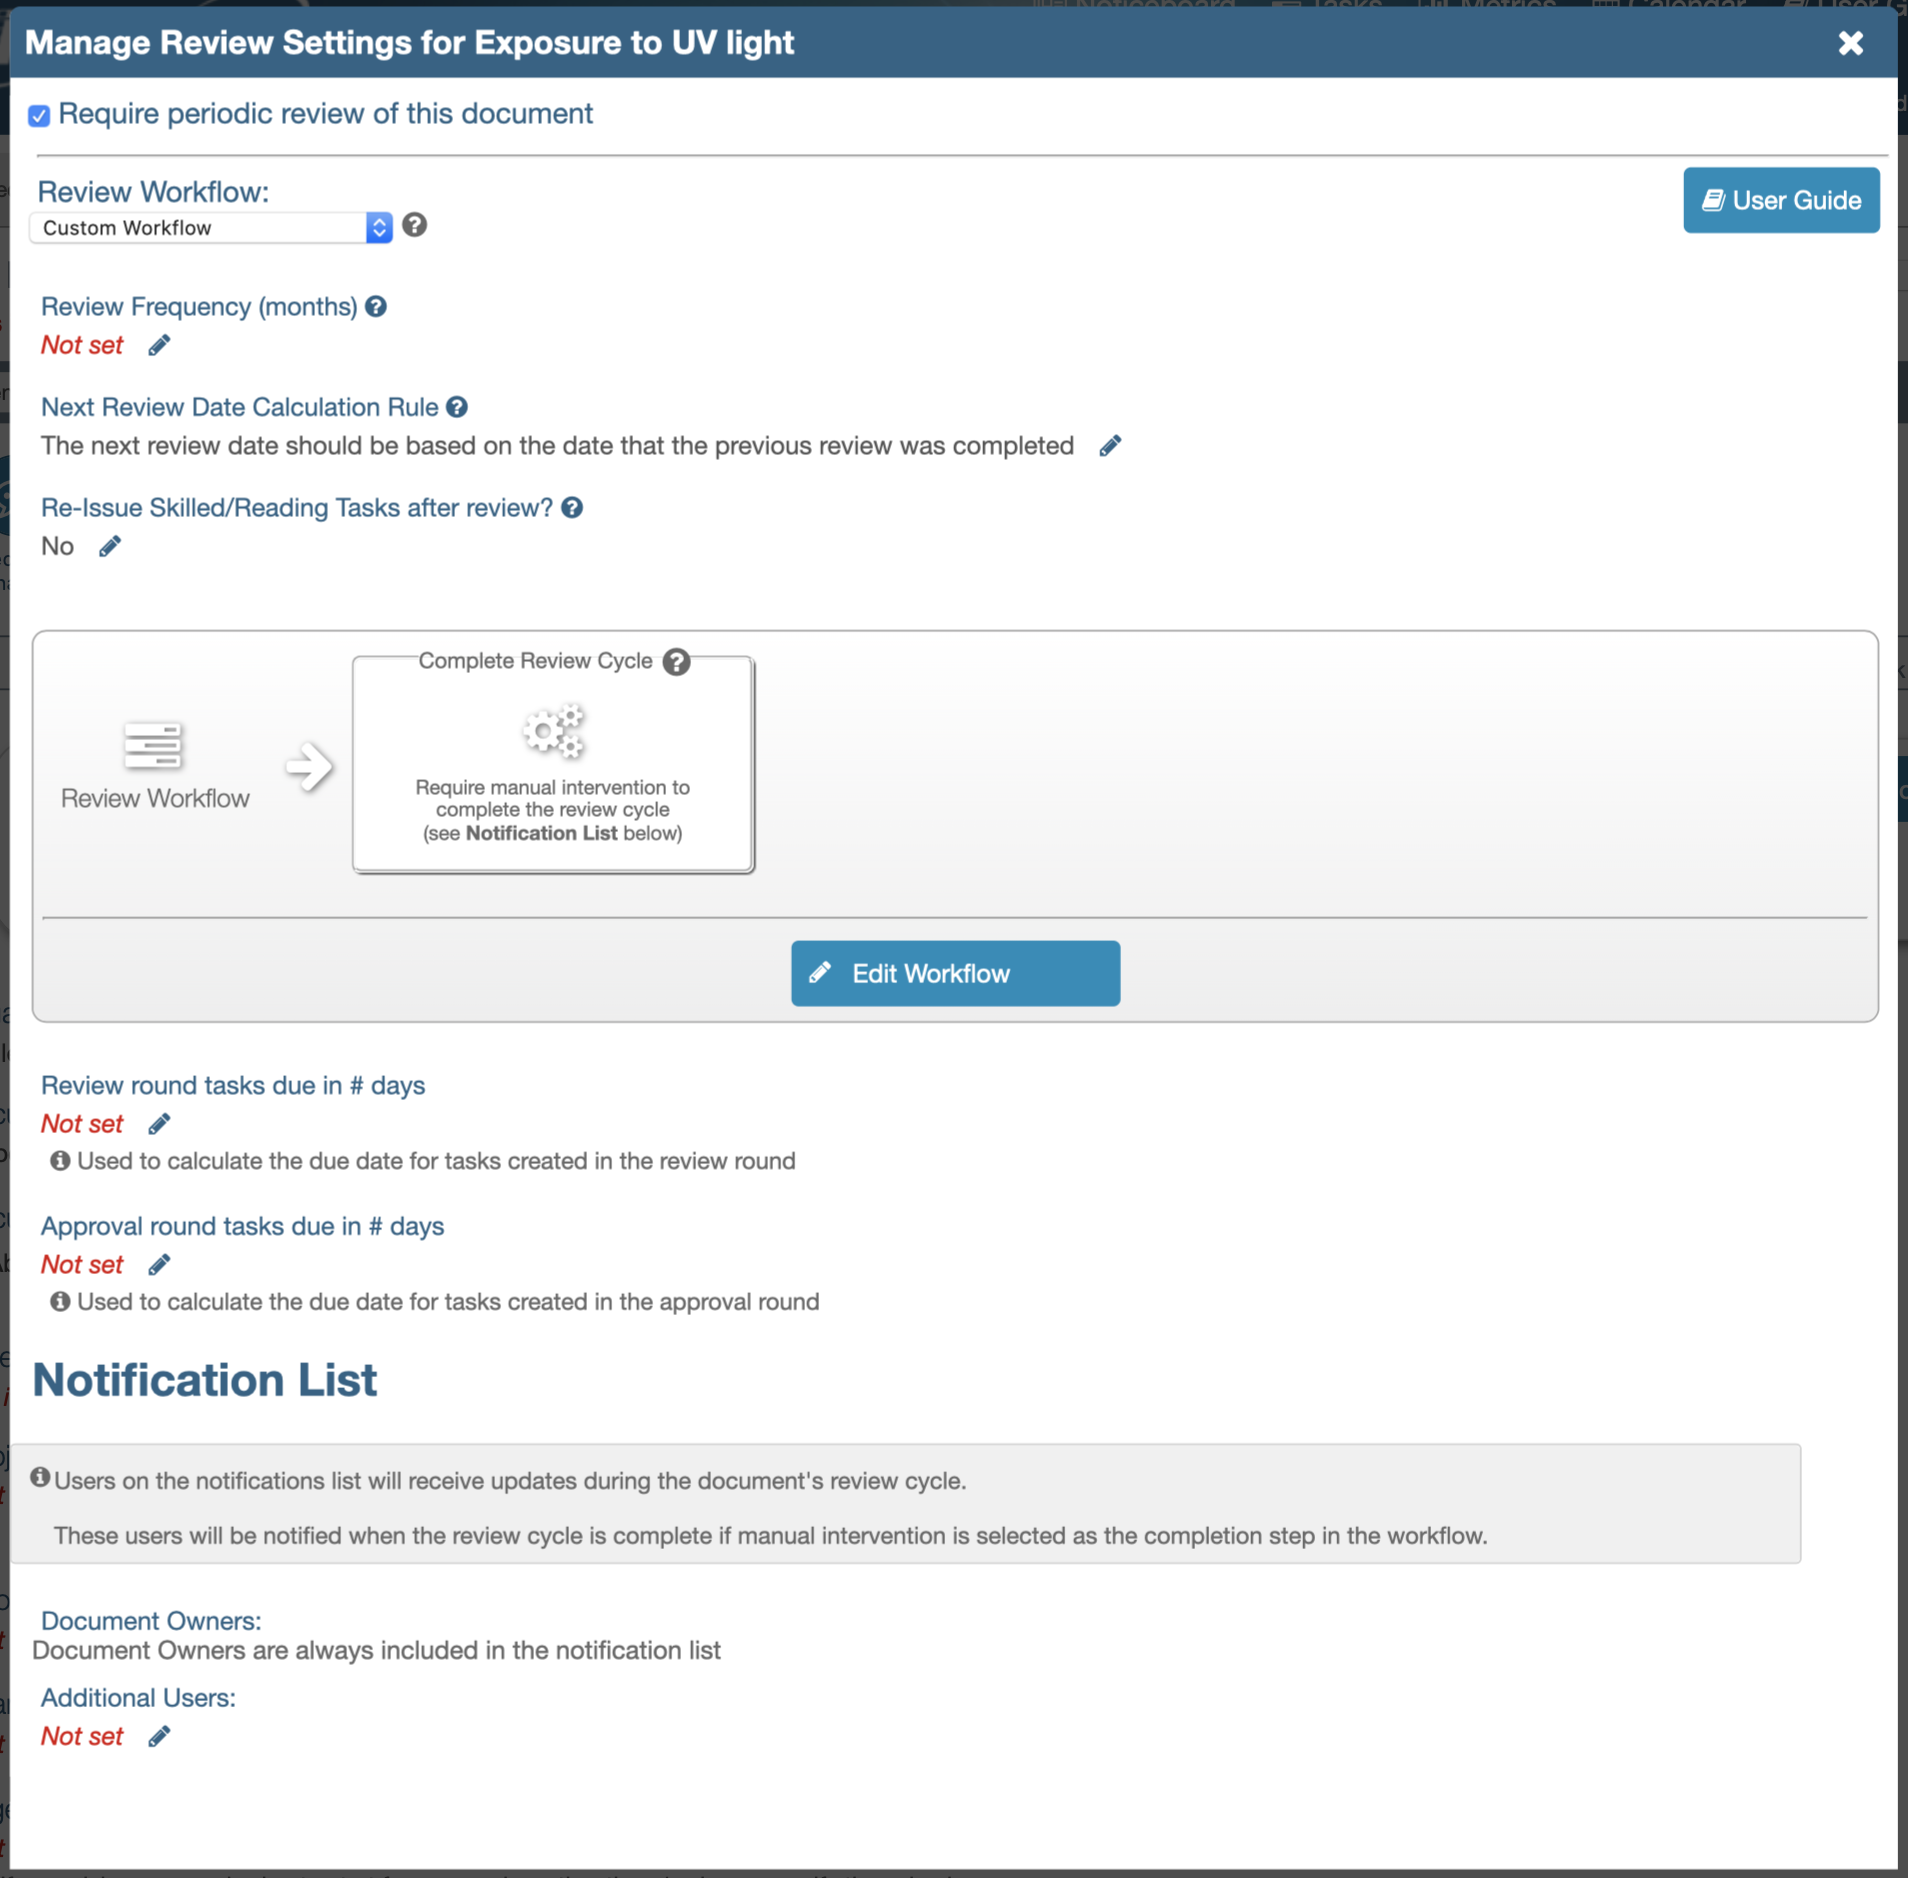
If no global workflow has been assigned to an existing document or if a default workflow hasn’t been assigned in the Organisational Unit Preferences area for a new document, a basic custom workflow will display in the review settings lightbox (as shown above). It won’t have a review frequency and it will only have a completion step, set to require manual intervention.
If such a document has a review date set, when the document is due for review, the document owners and any users on the notification list will be informed that the review is due. They can then manually mark the review as complete and set the next review date.
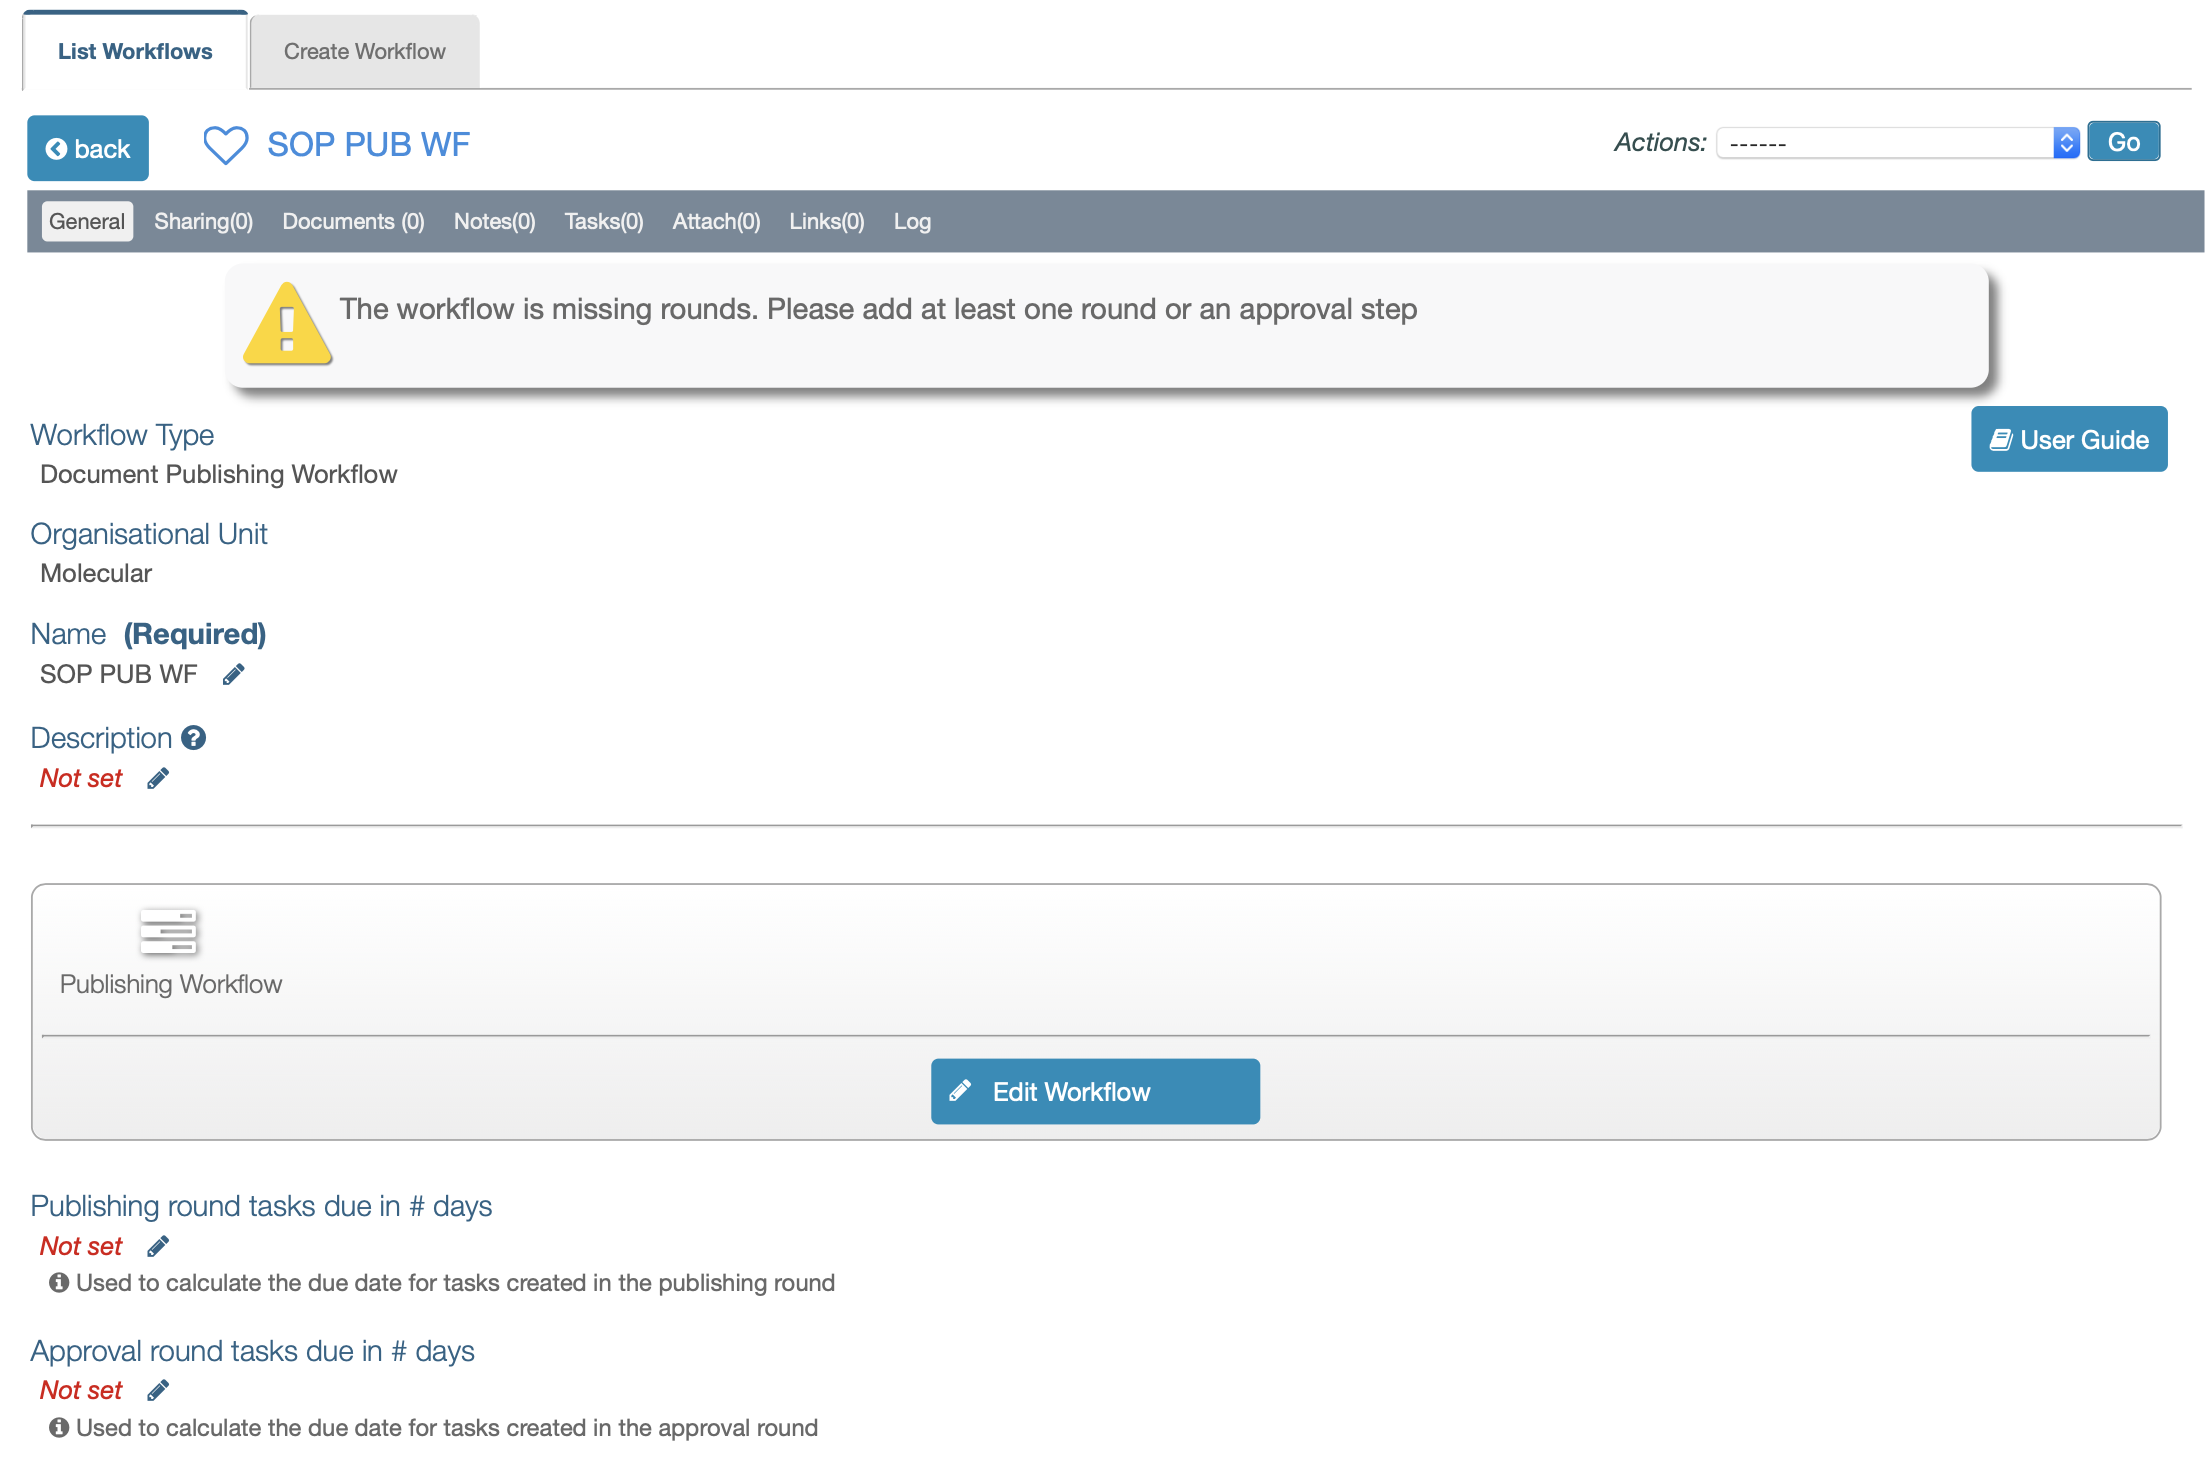
Creating Custom Publishing Workflows
To build or edit a custom publishing workflow within a document:
- Open the document in question to its General tab
- Click the Publishing Settings button
- Select ‘Custom Workflow’ from the Publishing Workflow dropdown menu; it defaults to ‘None (manual authorisation)’ when it hasn’t been adjusted before or if no publishing workflow has been externally pre-assigned
- If the button, ‘Create Custom Workflow’ appears on the right, click it; otherwise, skip this step
- Edit the workflow following the information provided in the section, Editing Publishing Workflows below
If no rounds are added to a custom publishing workflow and it is selected as the one to use, a yellow warning triangle will display over the Publishing Settings button to indicate it’s not ready for use. The buttons, Authorise and Request Authorisation will remain as the options to publish the document and they will only be replaced with the button, Start Publishing Workflow when rounds have been added to the workflow.
Editing Review Workflows
Global and custom workflows share the same fields and they are editable in the same way.
All relevant fields except the OU can be edited, provided the user has the permission, Workflows:Create/Edit Controlled Document Workflows.
Here is a description of each field:
-
Review Frequency (months)
Controlled documents usually require periodic reviews to ensure they are compliant with current knowledge and practices. Document reviews can be triggered at any time if the document is authorised but setting a review frequency ensures the right people are notified and tasked with reviewing a document before the designated review frequency term lapses. For example, in most places SOPs need to be reviewed at least every two years so this field can be set to 24 months in workflows used by SOPs.
It is possible to leave this field blank in workflows intended for documents which don’t require periodic reviews. In these cases, a next review date can still be set manually if required but it is also possible to disable periodic reviews altogether in any individual document. Any such documents will still be reviewable on demand but unless this is done, they won’t automatically generate any review feedback tasks or notifications.
This field does not accept negative values or “0”. -
Next Review Date Calculation Rule
If a Review Frequency is set, one of two options must be chosen:- The next review date should be based on the date that the previous review was completed
If documents are regularly reviewed ahead of their next review date, it might be preferable to use this option. To illustrate, suppose a document is due for its yearly review next December but it gets revisioned 3 months early in September. If the next review date were set for the following December, 15 months would lapse between reviews. By basing the calculation of the next review date on the date when the previous review was completed, no more than a year should pass between reviews.
OR, - The next review date should be locked into a specific timeframe (e.g.every 12 months regardless of when the previous review was completed)
This option will help ensure the review dates don’t slide over time.
- The next review date should be based on the date that the previous review was completed
-
Re-Issue Skilled/Reading Tasks after review?
If this option is set to, “No”, skill confirmation tasks (reading assignments) will only be generated when a new version of a document (which uses this workflow) is authorised; if it’s set to, “Yes”, skill confirmation tasks will be generated after each review, even if no changes are made to the document. -
Review Workflow Diagram
The workflow steps and people involved can be added and edited by clicking, Edit Workflow. This is described in detail in the next section (Review Workflow Design). -
Review round tasks due in # days and Approval round tasks due in # days
These fields allow setting a time limit to complete the related task. Tasks have a 4 week deadline by default; by entering a number of days in these fields, the deadline can be adjusted (e.g., entering “7” will set the deadline a week from when the task is created). -
Notification List
Managers and users involved in overseeing the maintenance of controlled documents can be kept informed of any updates in documents’ review cycles by adding them to the notification list. In addition to update notifications, users added here will have a ‘Review Due’ notice in their ‘My Tasks’ area (left sidebar) to remind them to complete a document’s review cycle when the review rounds have been completed and if the workflow is set to require manual intervention for its completion (please see the section on Complete Review Cycle below).
Document Owners are automatically added to this list so (if a document owner has been set) at least one person will be made responsible for completing review cycles when required. If there are multiple users in the notification list, when one of the users completes their task, the others’ tasks will be automatically invalidated.
To add users to the Notification List, click the edit (pencil) icon under Additional Users and use the search-as-you-type field to find and select the appropriate people.
Review Workflow Design
Document review workflows have three main elements:
-
Review rounds
Multiple rounds can be added and multiple users can be added to each round. Each round is numbered.
If more than one user is added to a round, two options are available to mark it as completed. The workflow can ‘Proceed to the next step when’:- ‘all users completed their tasks’ or,
- ‘at least one user completed their task’
-
Review cycle completion step
This step can have two outcomes - the review can be completed if no changes were requested or, a new version must be created if change requests were approved. A choice can be made to complete the review cycle automatically if no changes are requested. The alternative is to always require manual intervention when the workflow reaches this step.NOTE:
A review round will be complete when the conditions are met and will move to the next step, even if changes are requested. When the option, ‘Proceed to the next step when:’ ‘at least one user completed their task’ has been selected in a review round, if any users haven’t completed their review feedback task, it will not be immediately invalidated to allow all collaborators to participate if they wish.
Once the workflow reaches the completion step the workflow will be paused if changes have been requested so these can be addressed. Document owners & any users on the notification list will be notified. -
Approval Step
This step can be added when a director or manager is required to sign off the review. It generates a task for the people listed and the same rules to require all or just one to sign off can be applied.NOTE:
The approvers’ signatures can be added to the cover page when documents are printed and the last approver’s name is displayed within the controlled document record on-screen (“Last approved by …"). This feature could be of particular benefit if a lab director sign-off is required for all document reviews.
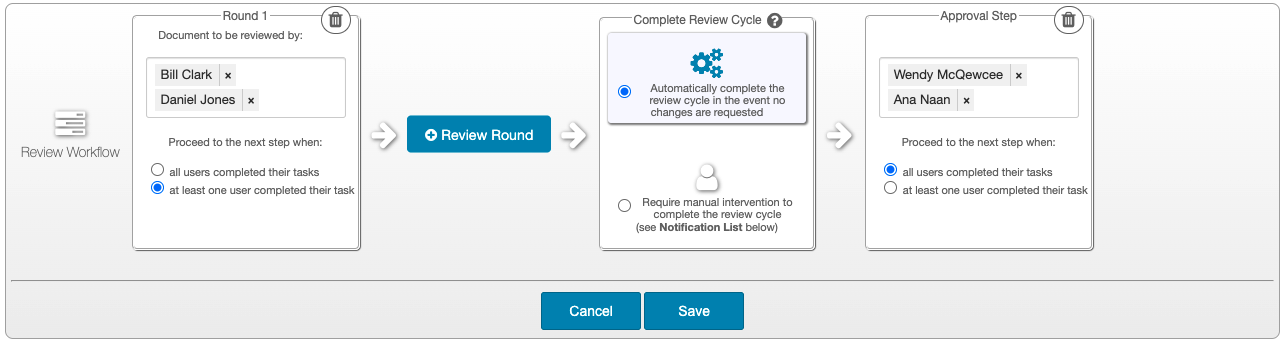
To build or edit a workflow:
- Click the Edit Workflow button
- Click the ⊕Review Round button to add a review round
- Click in the field, Document to be reviewed by to add reviewers; this is a search-as-you-type field and once a name appears in the dropdown list (which can also be scrolled) it must be clicked for it to be added
ENTERPRISE ACCOUNTS: Accounts which have facilities will have an additional filter when selecting users for any step in review or publishing workflows.<br> When clicking the field to add users, the message, <i>"Displaying users limited to current object's facility"</i> will show above the list of users available. Only users from the same facility as the workflow's will be displayed. Clicking the link, <u>'Show all users'</u> will expand the list to include users across the whole organisation. </div>-
In the field, Proceed to the next step when: choose either, “all users completed their tasks” or “at least one user completed their task”
-
If no longer needed, the round can be deleted by clicking the trash/bin icon in the top right corner of the review round box; multiple rounds can be added
-
In the Complete Review Cycle step, choose whether to “Automatically complete the review cycle in the event no changes are requested” or “Require manual intervention to complete the review cycle”
NOTES:
- In workflows where review rounds are set, using automatic completion streamlines the process. If all reviewers confirm that the document is still accurate and no changes are needed, then iPassport can set the next review date and mark the review as complete (subject to an optional approval step).
- If manual intervention is selected, the document owner and any users added to the Notification List will be issued a task to complete the review. Only one of them needs to complete the task.
- Automatic completion can only be selected if a Review Frequency and a Next Review Date Calculation Rule have been set.
- When manual intervention is selected, this step will involve setting the next review date.
- In workflows where review rounds are set, using automatic completion streamlines the process. If all reviewers confirm that the document is still accurate and no changes are needed, then iPassport can set the next review date and mark the review as complete (subject to an optional approval step).
-
If the approval step is required, click ⊕Approval Step; several users can be added in the same way as reviewers are added
-
Click Save to finish

Editing Publishing Workflows
Global and custom publishing workflows also share the same fields and they are editable in the same way.
All relevant fields except the OU can be edited, provided the user has the permission, Workflows:Create/Edit Controlled Document Workflows.
Here is a description of each field:-
Name
This is a free text field which can be edited after the record is created -
Description
This is also a free text field to add a summary -
Publishing Workflow Diagram
The workflow steps and people involved can be added and edited by clicking, Edit Workflow. This is described in detail in the next section (Publishing Workflow Design). -
Publishing round tasks due in # days and Approval round tasks due in # days
These fields allow setting a time limit to complete the related task. Tasks have a 4 week deadline by default; by entering a number of days in these fields, the deadline can be adjusted (e.g., entering “7” will set the deadline a week from when the task is created).
Publishing Workflow Design
Document publishing workflows have two main elements:
- Authorisation rounds
Multiple rounds can be added and multiple users can be added to each round. Each round is numbered and users can be added in the same way as in review workflows.
If more than one user is added to a round, two options are available to mark it as completed. The workflow can ‘Proceed to the next step when’:- ‘all users completed their tasks’ or,
- ‘at least one user completed their task’
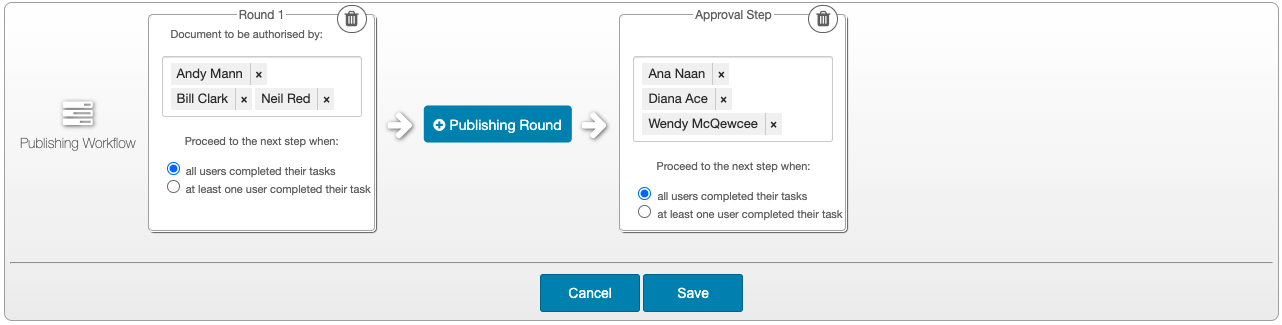
- Approval Step
This step generates a task for the people listed and the same rules to require all or just one to sign off can be applied. The approval step can be treated as the last authorisation or as a sign-off by other stakeholders. The approvers’ names will take precedence over previous authorisers as the ones who signed off the document.
TIP: Any user can be selected as an authoriser or publishing approver, regardless of their permissions. The ‘Document Control’ preference, “Allow a user assigned an Authorisation Request to authorise the document regardless of their permissions." removes the need for account administrators to configure permissions for the users selected. This also allows for mistakes to be made by selecting a user who is not supposed to authorise documents.
When necessary, it is relatively easy to confirm which users are entitled to authorise documents according to their permissions by performing this search:- Go to Administration > User Groups > Search User Groups
- Select the Organisational Unit where the publishing workflow will be used in the field, OU
- In the field, Permission, enter the word, "authorise"
- From the dropdown list which appears, select the permission which relates to the type of document the publishing workflow will be used for (e.g., for Policies, select 'Policies:Authorise Policies'); the search can be repeated for other document types if required
- If any user groups match the criteria they will be listed below
- Each user group can be opened by clicking its row, authorisers can be found in the Users tab and there will be a Back button to return and interrogate the next user group
Deleting Workflows
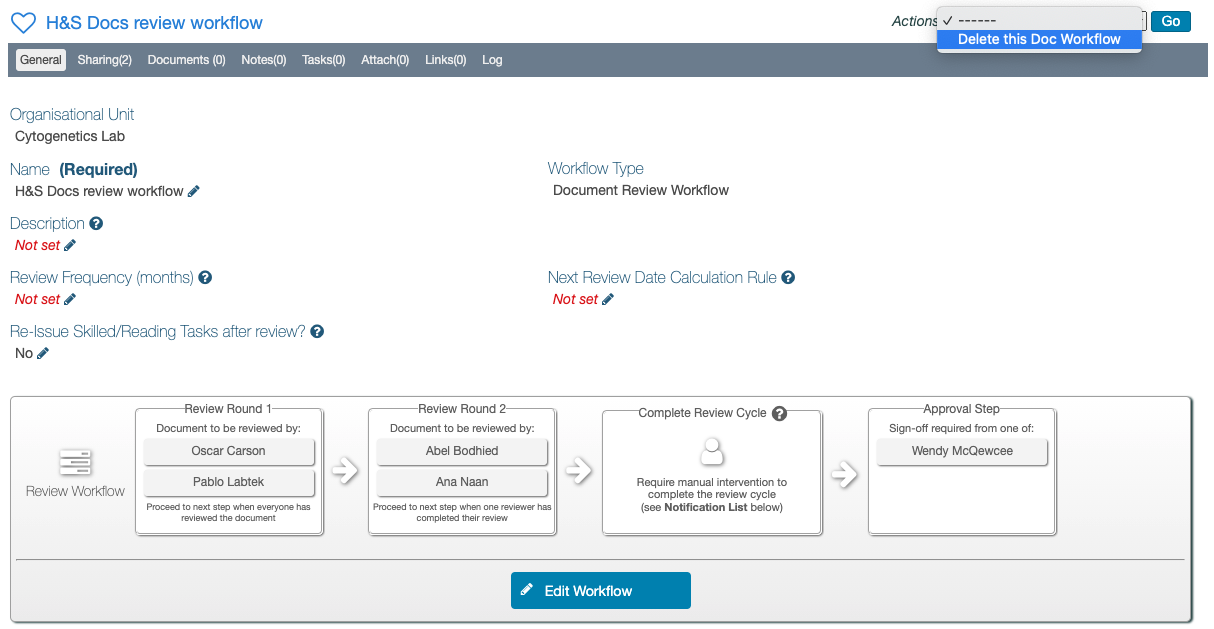
Only workflows which are not in use can be deleted in the Administration > Workflows area. Custom workflows, created and held within individual documents, cannot be deleted. When a workflow is eligible to be deleted, the Actions menu to the right of the workflow title becomes available.
To delete a workflow:-
Navigate to Administration > Workflows > List Workflows
TIP: It can easily be determined whether a workflow can be deleted by checking if any documents are used by it under the Doc Count column in the List Workflows tab.
-
Find and open the workflow to delete
-
Click in the Actions field, select, Delete this Doc Workflow from the dropdown menu and click Go
-
In the lightbox that appears, enter a Reason For Deletion in the field provided
-
Click Delete Permanently
 ________
Next Step: [Sharing Workflows with other OUs](/user_guides/workflows/sharing_workflows)
Previous Step: [Workflows Permissions and Settings](/user_guides/workflows/permissions_workflows)
________
Next Step: [Sharing Workflows with other OUs](/user_guides/workflows/sharing_workflows)
Previous Step: [Workflows Permissions and Settings](/user_guides/workflows/permissions_workflows)
-