- Authorise & Publish Documents
Authorising & Publishing New Versions of Documents
Publishing without a workflow
If no publishing workflows have been assigned to a draft document which is ready for publication, two options will be available. If the user has permission to authorise the document they can click the Authorise Document button; if they don’t have permission they won’t see this button. The other option is to Request Authorisation from users qualified for this. If a workflow summary is not visible to the user, the buttons will also be available just below or they can be triggered from the Actions dropdown menu.
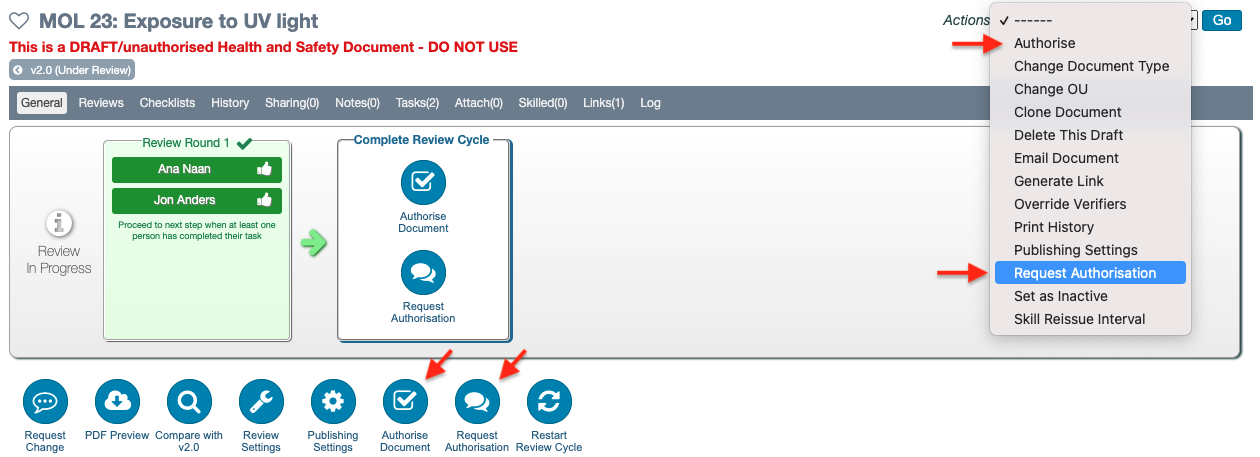
In both cases (whether authorising from this point or requesting authorisation), the user will need to decide if the new version is a major or minor revision, subject to the settings mentioned in the Permissions & Settings to Create, Edit & Publish New Versions of Documents article.
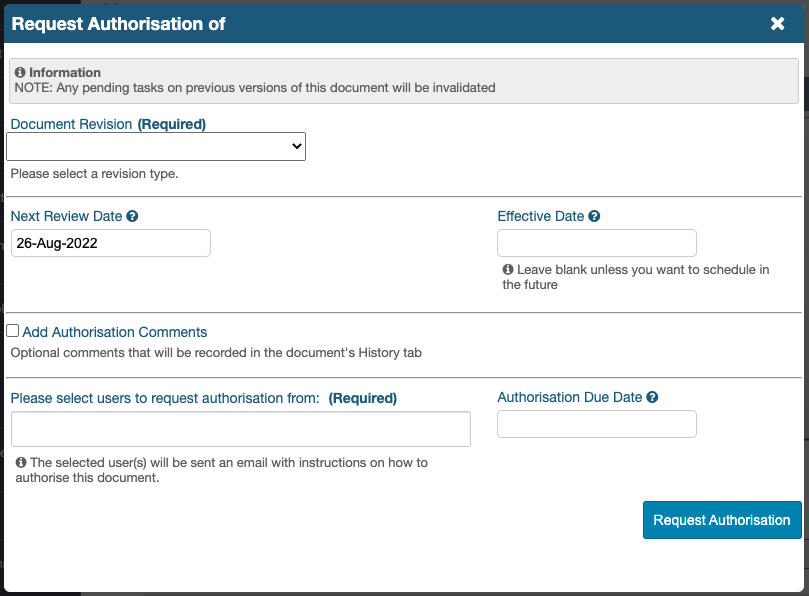
The user will also need to confirm or enter a Next Review Date and if required, an Effective Date can be set in the future to stall the release of the document till the scheduled date.
If the user is requesting authorisation, the user(s) to authorise the document can be selected in the field, Please select users to request authorisation from. An Authorisation Due Date can be entered to set a deadline.
PLEASE NOTE: The field, ‘Please select users to request authorisation from’ uses filters to only display users who have permission to authorise the given document.
The preference, ‘Allow a user assigned an Authorisation Request to authorise the document regardless of their permissions’ has no effect on this. This preference is intended to work with publishing workflows which can designed to include any users and can then be shared with other OUs where these users might not have authorising permissions.
When publishing workflows are not used, this preference becomes irrelevant as only users with the correct permissions can be requested to authorise a document.
Publishing with a Workflow
Starting a Publishing workflow:
-
Click Start Publishing Workflow
-
In the Start Publishing Workflow lightbox, make a selection in the Document Revision field
If the OU Preference, ‘Use Major and Minor Document Versioning’, is disabled, only the option, ‘Major Revision’ will be available.
If the setting is enabled, the option ‘Minor Revision’ will also be available. -
If there is a proposed date in the field, Next Review Date, it can be edited or left as is; if the field is blank, a next review date must be selected from the calendar which pops up when clicking the field.
NOTE: When periodic reviews are disabled for a document (such that the Review Settings button has a yellow warning triangle over it), this field will not appear in the lightbox.
-
An Effective Date can be set in the future to stall the release of the document until the selected date
TIP: To select a date in the pop-up calendars in iPassport, first select the month and year from the dropdown lists and then click the day in the month to finish.
-
There is an option to Add Authorisation Comments by ticking the related checkbox and entering text in the field which appears
-
Click Start Publishing Workflow
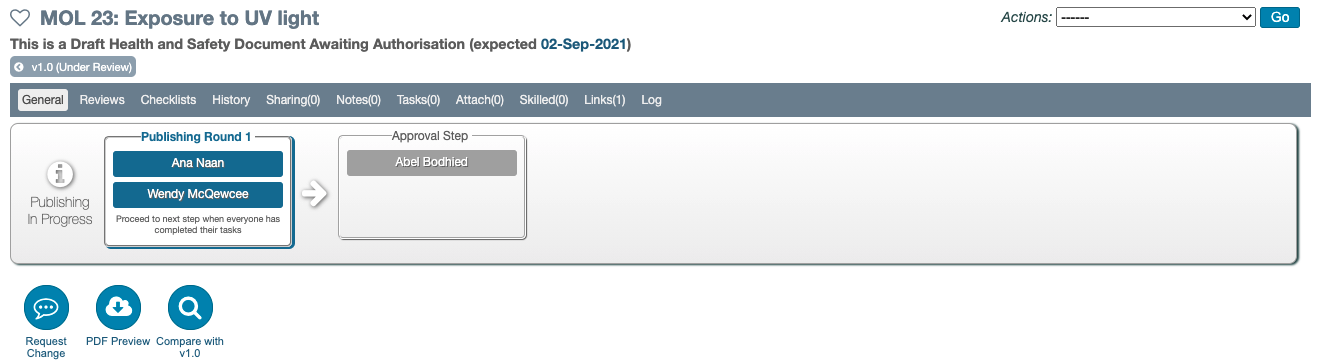
The ‘Review In Progress’ workflow should be replaced with a ‘Publishing In Progress’ workflow summary. The boxes around each user’s name in the first round should appear blue to denote they are active and pending completion. Subsequent rounds and the ‘Approval Step’ should appear grey to indicate they haven’t started yet.
Completing Publishing Rounds
Each user listed in a Publishing Round will receive an authorisation request when their round starts. There is an arrow between rounds which turns green when the round to its left has been completed and the next round should start automatically.
The emails contain a link under the line which reads, “To view a preview and Approve or Reject the authorisation click the link:”. It opens a new browser tab with Authorise and Reject Authorisation buttons in the top right. Below, an online preview of the document is offered when it’s available (only Word, PDF, RTF files can be previewed).
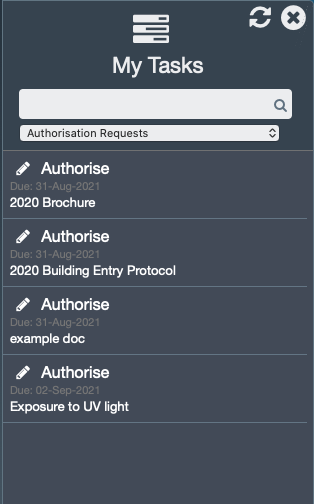
Once their publishing round starts, authorisers logged into iPassport, will also see notifications of authorisations requested from them in the My Tasks sidebar. They can search for them and narrow the search by setting the filter to, Authorisation Requests.
If anyone rejects their authorisation request, the document gets reverted to Draft state.
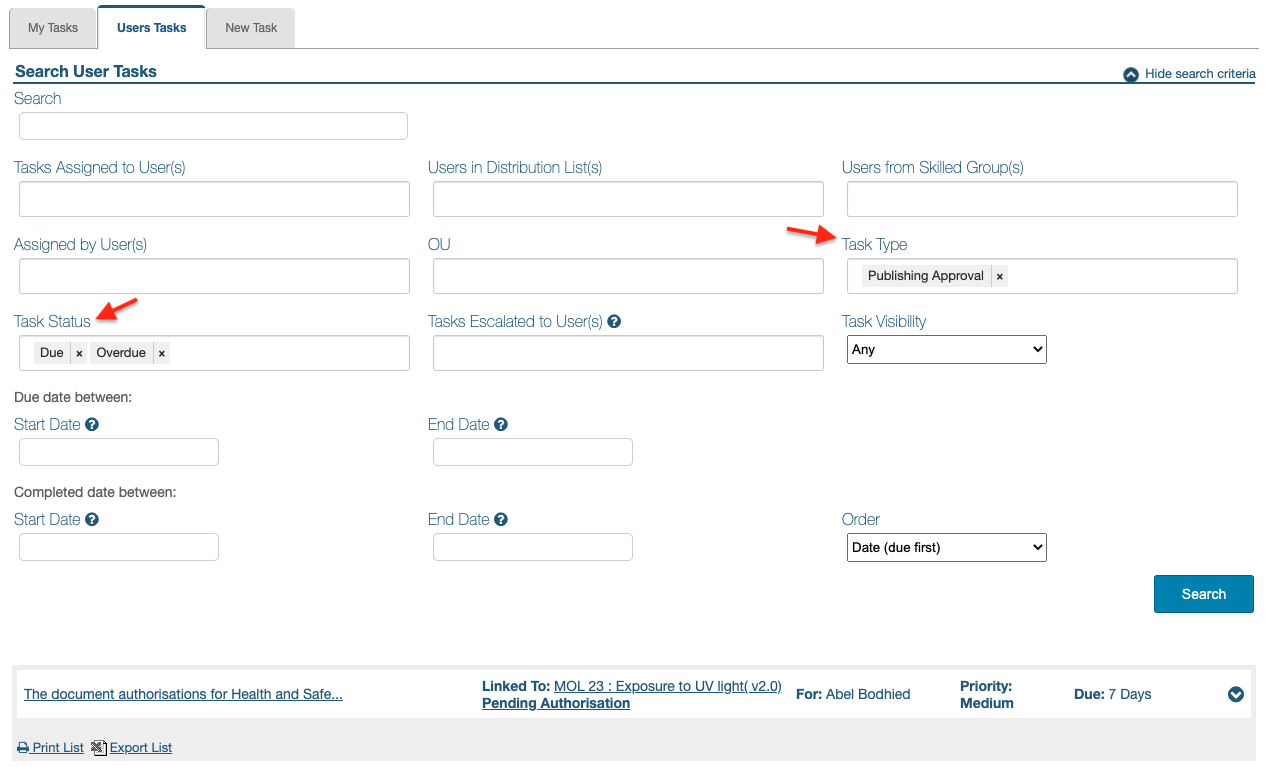
Publishing Approval
Publishing workflows can have a final approval step. This is intended for lab directors and equivalent managers whose signature is required to demonstrate compliance according to local regulations. This step does generate a ‘Publishing Approval’ task which can be monitored in the Users’ Tasks area.
The recipient of the task requires permission to view the draft document if completing the task within iPassport. Permission to authorise the document is normally required but it can be waived with the OU preference, “Allow a user assigned an Authorisation Request to authorise the document regardless of their permissions”, explained in the Settings section.
Publishing approval tasks can be completed from several locations. It’s possible to complete the task directly from the notification email without need of logging into iPassport or from within the application - the options are described below.
Approving a Publishing Cycle from the Notification Email
As with all iPassport tasks, emails are generated for the users assigned a ‘publishing approval’ task. These emails contain a link which when clicked will open another tab in the browser.
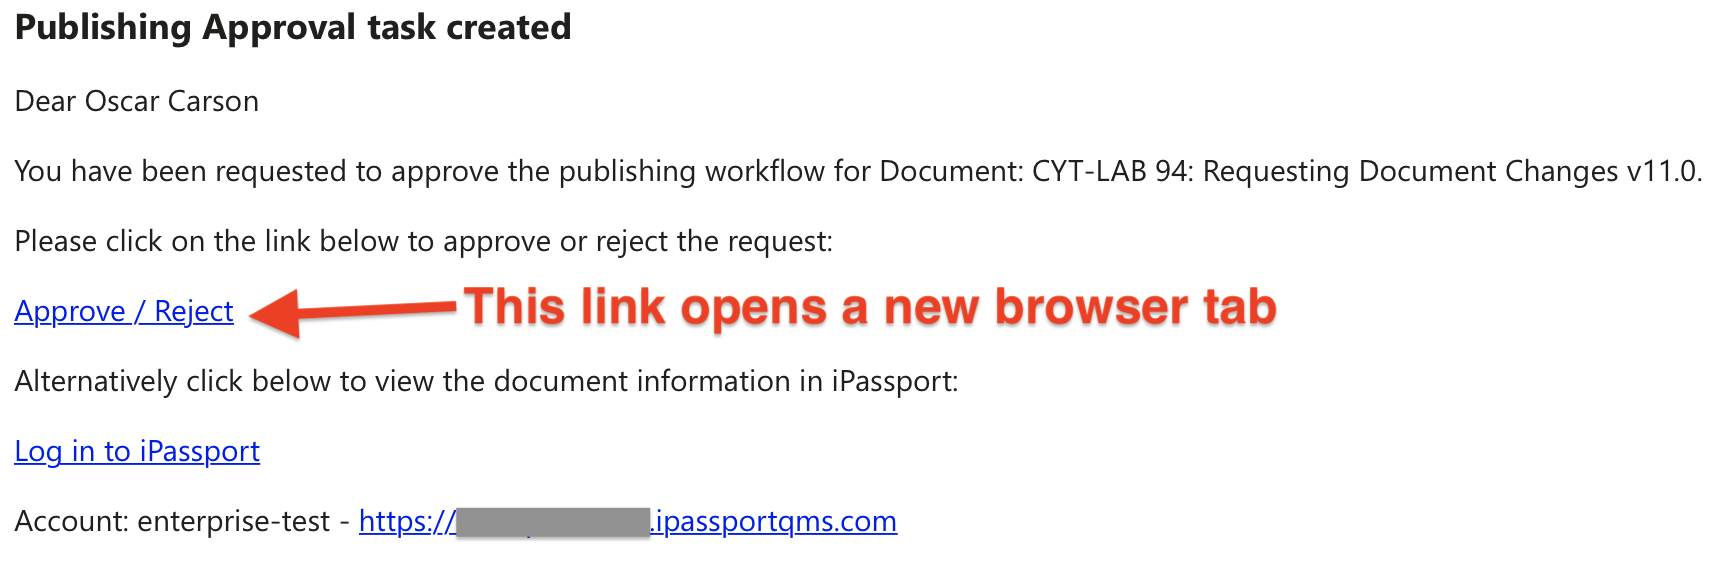
The new window will display a document preview if it’s available (only Word, PDF, RTF files can be previewed) and, there will be buttons at the top to approve or reject the publishing cycle.
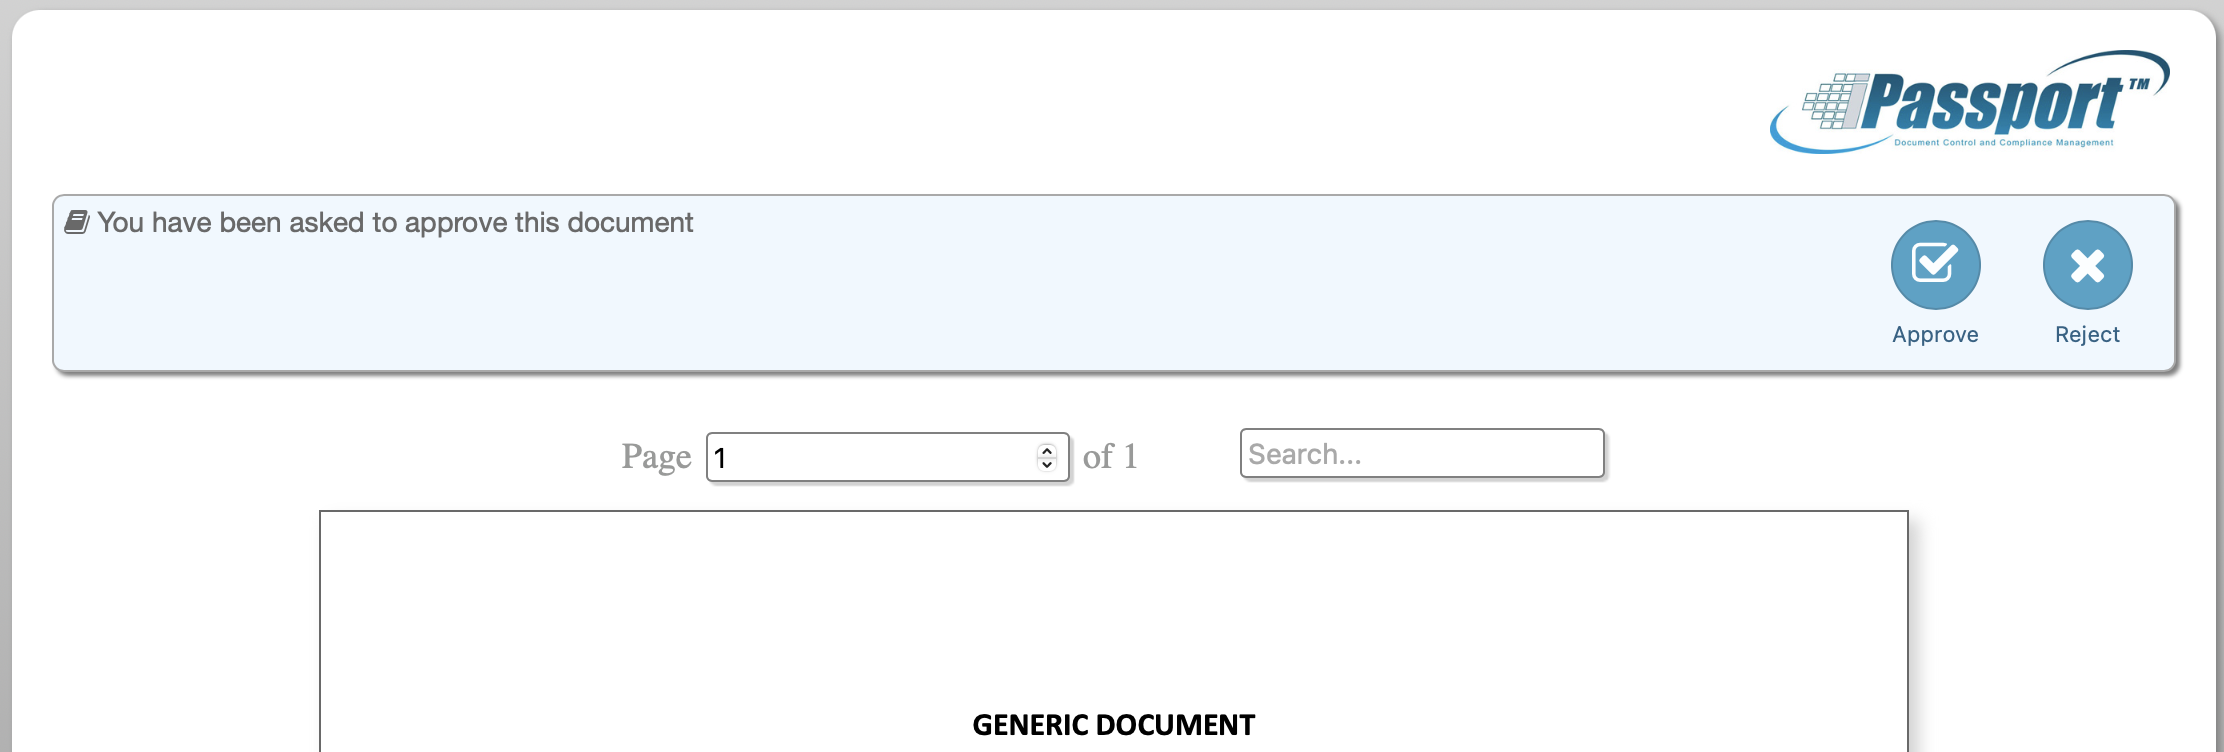
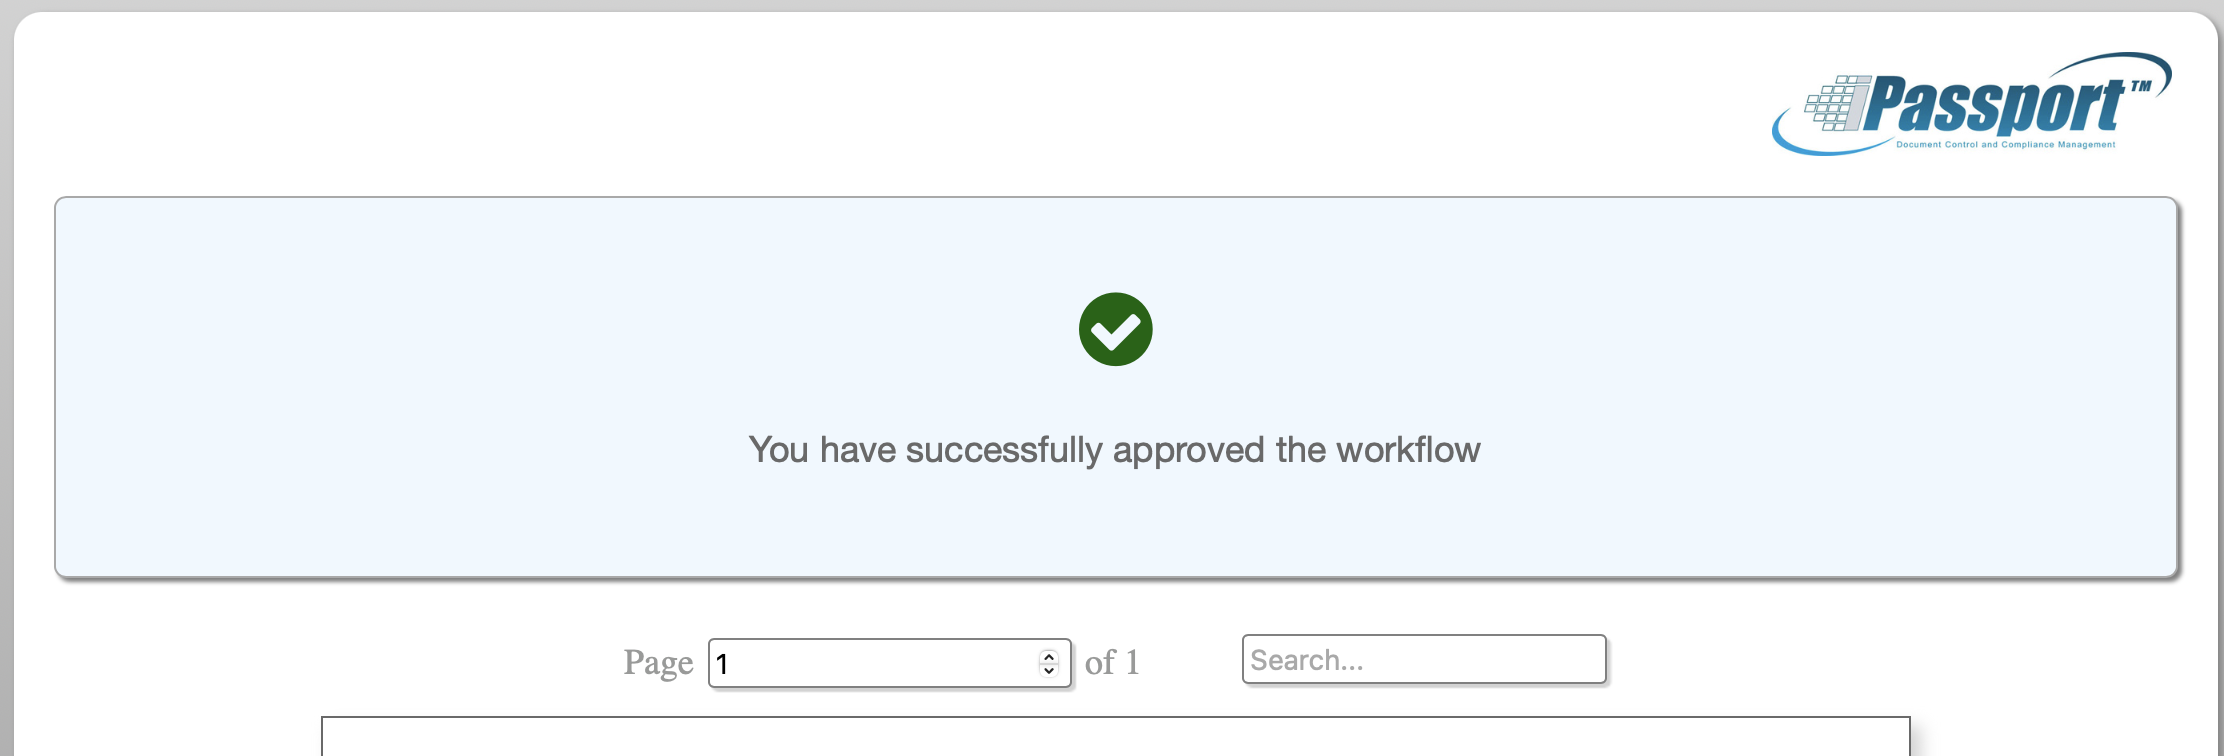
Once the ‘Approve’ button is clicked, a lightbox will open where comments can be entered; information about the next review date and who set it is also provided. Clicking the ‘Approve’ button in the lightbox will refresh the tab to confirm the operation was successful.
If the ‘approver’ clicks the same link again, the message, “Sorry, this link is no longer valid” will display in the linked browser tab.
If a publishing approval task is assigned to multiple users but only one is required to complete it, once any of them approves the document, the others will see the message, “Sorry, this link is no longer valid” too.
Approving a Publishing Cycle within iPassport
Publishing approval tasks can be found in the My Tasks sidebar or in the general Tasks area (in the top right corner of the iPassport screen), where multiple documents can be approved at once.
To approve multiple documents:
- Go to Tasks > My Tasks and select the filter, Documents to Approve
- Select individual documents by ticking their checkbox in the left column or select them all at once by ticking the checkbox in the header area
- Click the button, Approve Selected on the right of the header area
- A lightbox opens where comments can be entered and to complete the task for all the documents selected, click Complete All (the comment entered will be applied to all the documents)
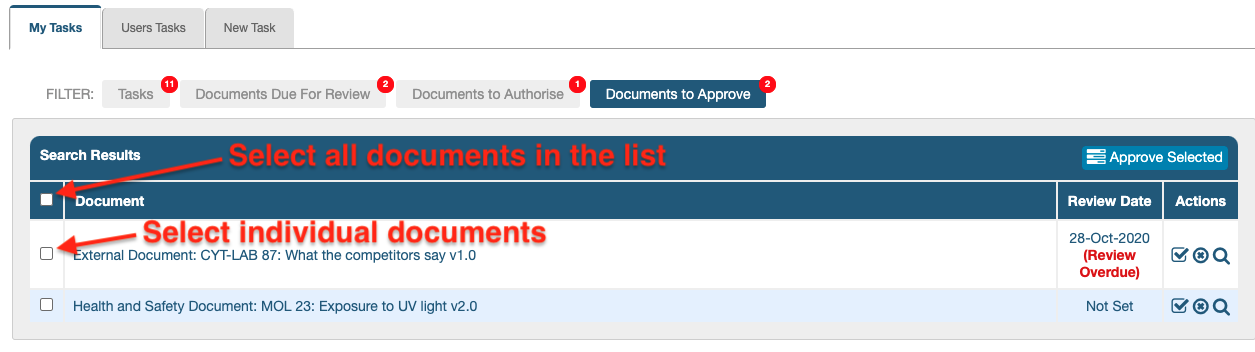
Alternatively, documents can be individually approved or rejected by ticking the options available in the Actions column. A lightbox will open with a Comments field and Approve/Reject buttons to complete the job. If the document is being approved, a Next Review Date field will be available and it can be edited if necessary. If the publishing approval step is rejected by any of the users nominated, the document will be automatically reverted to draft state.
Approvers’ signatures can be added to the cover page of controlled prints.
Monitoring Authorisation Requests
Managers can keep track of authorisation requests in one central place under the Authorisation Requests tab.
INFO: Authorisation Requests are not accompanied by a task so they can’t be searched for under ‘Tasks > Users Tasks’.
The ‘Laboratory Records > Controlled Documents > Authorisation Requests’ tab provides a place to manage and monitor this information.
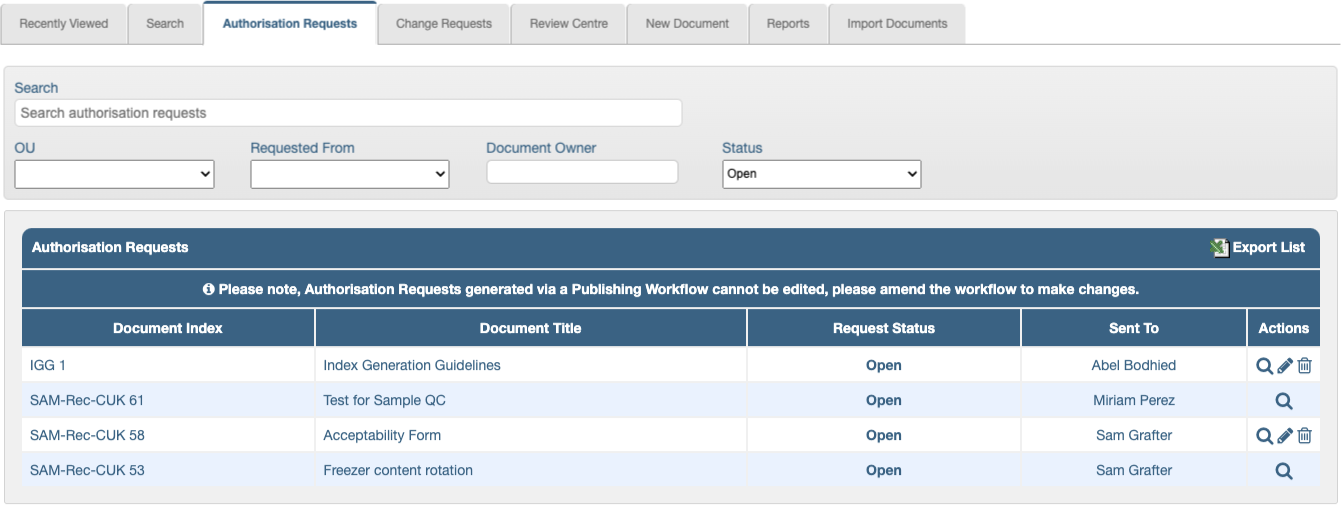
There are 5 search filters available to help locate and group authorisation requests:
-
The Search field is a free text field which will search indices, titles and text within the ‘Subject’ and ‘Introduction and Scope’ fields of controlled documents.
-
The OU filter provides a dropdown of the Organisational Units the user can access.
-
The Requested From field allows searching for requests initiated by a particular user; they could have started a publishing process or they could have requested authorisation directly from other users.
-
The Document Owner filter will bring up any requests on documents owned by the selected user.
-
The Status filter offers the following options:
- ‘Blank’ - brings up all statuses
- ‘Open’ - default option when opening the tab; it lists requests which are pending completion
- ‘Approved’ - lists all successfully completed authorisation requests
- ‘Rejected’ - brings up requests which were rejected by the authoriser
- ‘Invalid’ - lists requests which were invalidated by another user or which became invalid because someone else authorised the document and completed the requirements (for example, when a publishing round only requires one out of several users to authorise a document)
Managing Authorisation Requests
Once authorisation requests are issued, they can be edited or deleted if they were manually generated (using the ‘Request Authorisation’ button). These options are available in the Actions column of the results area on the ‘Authorisation Requests’ tab.
PLEASE NOTE: Authorisation Requests generated via a Publishing Workflow cannot be edited.
The Actions column only displays ‘Edit’ and ‘Delete’ icons on requests generated manually.
To modify authorisation requests generated from a publishing workflow, the workflow must be amended.
The available options also appear in the authorisation request record, which can be opened by clicking the row (or magnifying glass) of any item in this area. A reminder email can be reissued to the authoriser as well.
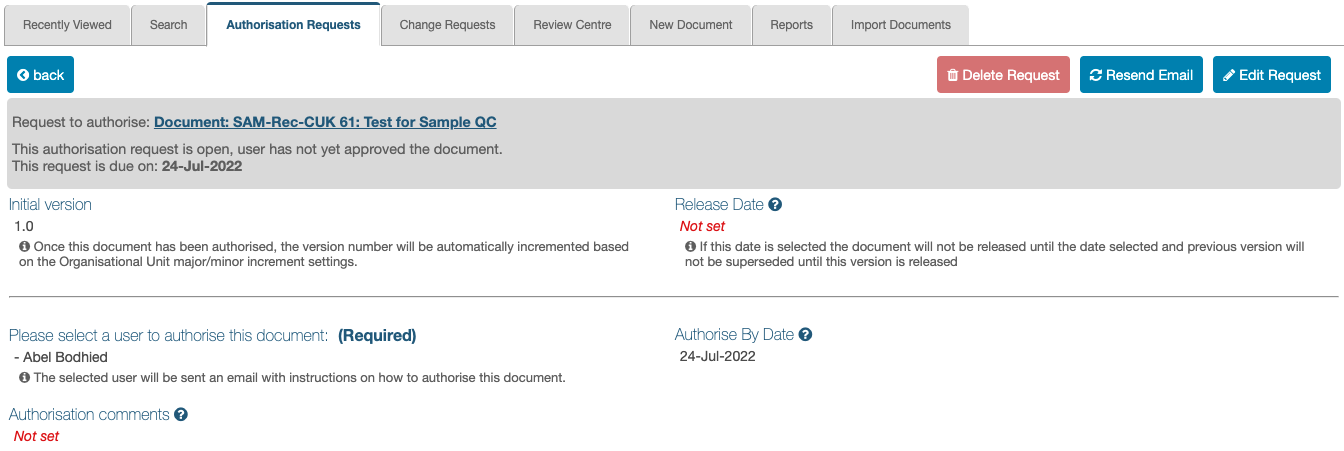
Clicking ‘Resend Email’ will automatically issue a reminder email to the authoriser.
Clicking ‘Delete Request’ will bring up a dialogue box asking to confirm this action.
If the request being deleted is:
- one of multiple authorisation requests, the other requests will remain in place and the publishing process won’t be interrupted.
- the last authorisation request, the process will be cancelled and the document will be reverted to draft.
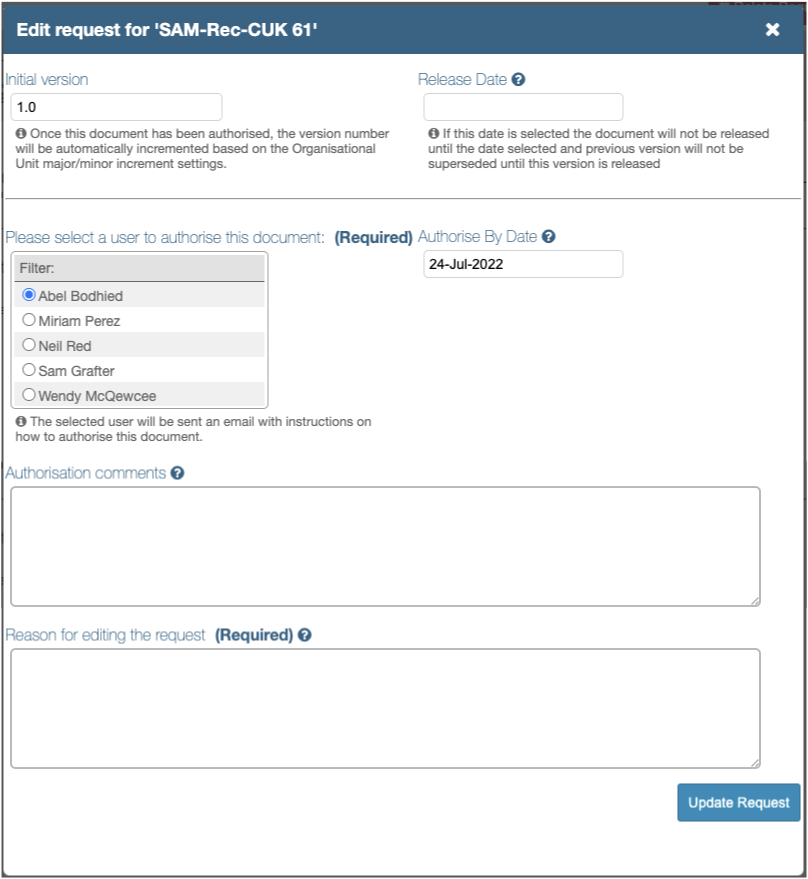
Clicking ‘Edit Request’ button brings up a lightbox where the following fields can be updated:
- Version - can be ‘Initial Version’ if it’s a new document or ‘Document Reviesion’ if it’s a new version of an existing document
- Release Date - if left blank, the document will be released immediately when the publishing cycle is complete; a date can be set in the future to delay the release
- Please select a user to authorise this document - only one authoriser can and must be selected here
- Authorise By Date - the deadline to authorise the document can be adjusted
- Authorisation comments - information for the authoriser or about the process can be added/edited here
- Reason for editing the request - this is a required field so that any changes are accountable; the changes made will be logged in the History and Reviews/Feedback tab of the document
This is the last article in this user guide.
PREVIOUS STEP:
The previous article covers Configuring Publishing Workflows